Welcome

Hi, welcome to Membr - we're excited to show you around!
Even if you've used other gym management software before, it's well worth reading through this short Welcome section to help you quickly find your way around.
What Can the Membr Platform Do?
We can do the heavy lifting for you! Here are just some of the things we provide:
Sign up new members online (or in-club of course)
Sign up prospects, manage related tasks and otherwise help you follow-up on leads
Integrate with access systems to provide automated gym access through the use of QR codes and other technologies
Provide a powerful mobile app that enables members to log exercises and interact with their club
Manage and automate a complete scheduling/booking system for classes, inductions etc.
Provide and manage a referral system to grow your membership and reward members
Provide extensive payment collection and management, including a flexible POS system
Create marketing campaigns to keep in touch with your membership
Automate a series of periodic emails to keep new members engaged and informed

We’ll cover all of these and much more throughout the manual.
The Membr System

Unlike traditional software that you install onto your computer:
Membr works entirely through your browser, so there is nothing to install and you are always using the latest version.
All of the gym’s data - members, prospects, class schedules, and everything else you need are all stored safely online in the cloud (meaning that nothing is lost if the hardware breaks down or is damaged etc.).
Any member of staff with a suitable account and password can log into the gym from any PC, anywhere, so long as it has a browser and Internet connection.
See the list of hardware requirements below to make sure you’re getting the best experience.
What are the Basic System Requirements to use Membr?
We have built and tested Membr to work with the following conditions:
Internet Requirements
An internet connection is required to use Membr.
We recommend the following minimums:
5Mbps download speed
1.4Mbps upload speed
You can test your internet speed here
Note
We recommend using an Ethernet-based connection, as they are always the most reliable and stable method to stay connected. However, if an Ethernet Connection is not available, Wireless Access can be used.
PC Requirements
Note
Please keep in mind that whilst Macbooks / Chromebooks / Linux Devices do work with our system, we recommend using Windows.
The following is the minimum PC specification we recommend for good performance:
Operating System: Windows 7 / OS X 10.8 Maverick / Ubuntu 20.04 or higher
Memory: 4GB or above.
Hard Drive / SSD: 500MB or above.
CPU: Intel i3 OR AMD A6 and above.
We recommend a minimum of 4 USB ports or more, depending on how many peripherals are used.
Nice-to-have (but not required) Peripherals:
Camera
Printer
USB Drives
Supported Browsers
We support all the latest browsers. For a list of current, popular browsers and their respective version numbers, take a look at browsehappy.com.
We recommend that you use Google Chrome with the Membr software.
Accessing the Software
Typing the Web address, or URL, for your club into your browser is all that you’ll need to do to access the Membr system.
Clubs are each given a unique URL and it’s a good idea to bookmark this for easy access.
For Australia and NZ, the URL takes the form of <clubname>.au.membr.com, so a typical address might be https://citygym.au.membr.com
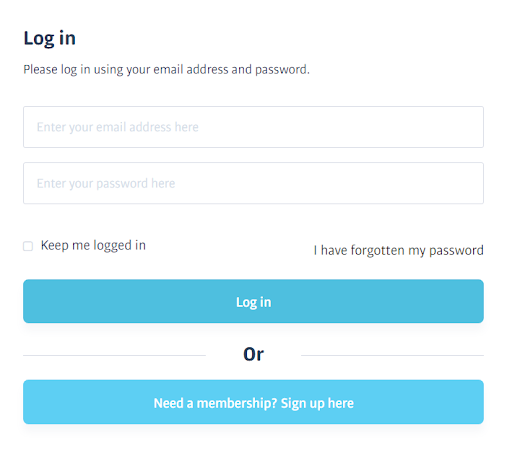
The club’s log in screen will displayed next - these can use different colour schemes and logos, but always feature the same simple log in box:
About Logins/Users
Everyone who needs to use the software will log in with their own email address and password. Everyone logs in via the same login screen, but the exact menus they see next, and the actions they can perform, will depend on their role - Reception staff will have access to different features compared to a Personal Trainer, for example.
We’ll cover every feature in this guide, of course, just be aware that your login type might prevent you from seeing or using certain features.
Tip
Everybody has slightly different requirements, and we can add or remove any functions to suit a particular staff group, or even an individual user. Speak to your Success Manager to find out more.
Your First 5 Minutes with Membr
The User Interface
After you login, you’ll be taken to the Dashboard screen which gives a summary of various aspects of your club. This is covered in more detail further down; we’ll concentrate on the overall software interface layout first:
Down the left in the Side Bar are buttons to switch between different areas such as Members, Bookings and others. Pressing any of these will switch the information and controls being shown on the main central screen to suit the mode you selected. The range of buttons you’ll see varies according to the logged-in user, so don’t be alarmed if you see a different selection compared to the screenshot.
Along the top is the Header Bar which contains a reminder of the logged-in user and a search bar to help locate people quickly.
These two areas are always visible and you’ll use them a lot!
For example, to quickly find any existing member or prospect, no matter what content is being displayed in the main screen area, you can enter a few characters from their surname, Christian name, email etc. into the top search bar to show a list of matches:

Here's a complete explanation of the various areas:
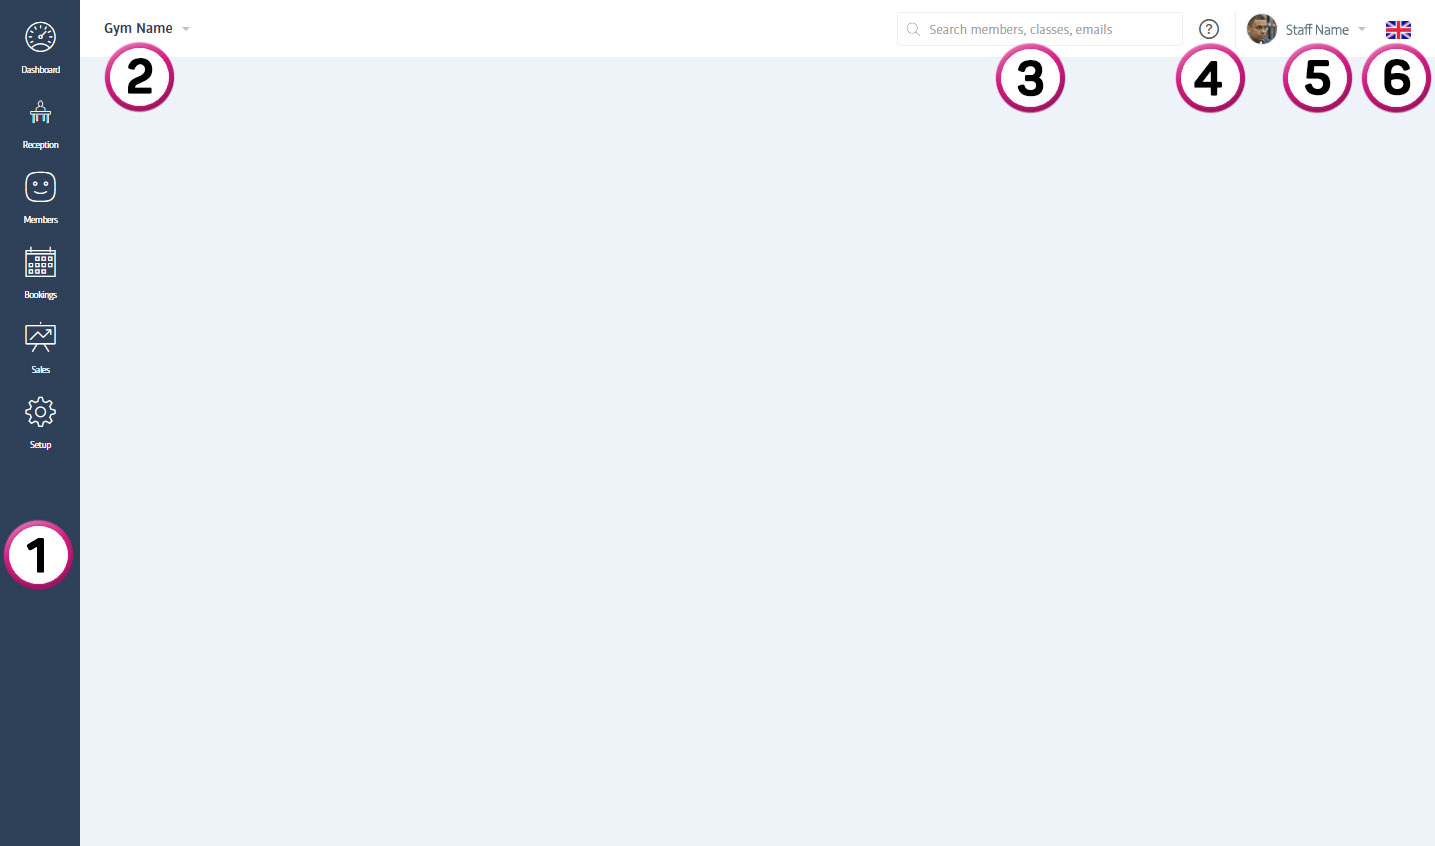
The Side Bar as described above - use this to switch between different areas of the system
The Gym Name - the name of the selected gym - click here to switch between different gym branches (if your gym has multiple branches and your login allows it!)
The Search Box - use this to quickly locate profiles at the gym - staff, members or prospects. Simply start typing a portion of any part of their name or email address to display a list of matching people recorded at the club.
The Create Support Ticket icon - click here to raise a ticket with our fast and friendly support team if you ever experience difficulties or technical issues.
Staff Name and Picture - the name and profile photo of whoever is logged-in right now. You can click here to jump to your profile, or log out of the system.
The Language Selector - click here to open the language selector - even if the club’s native language is set to French, for example, you can click on the flag to choose your preferred language if you’d like to use a different one. This language choice is remembered every time you log in, but affects the current user ONLY and will not change anyone else’s.
Dashboard

Like a vehicle's dashboard, the Membr dashboard provides information about how your club performs in different areas.
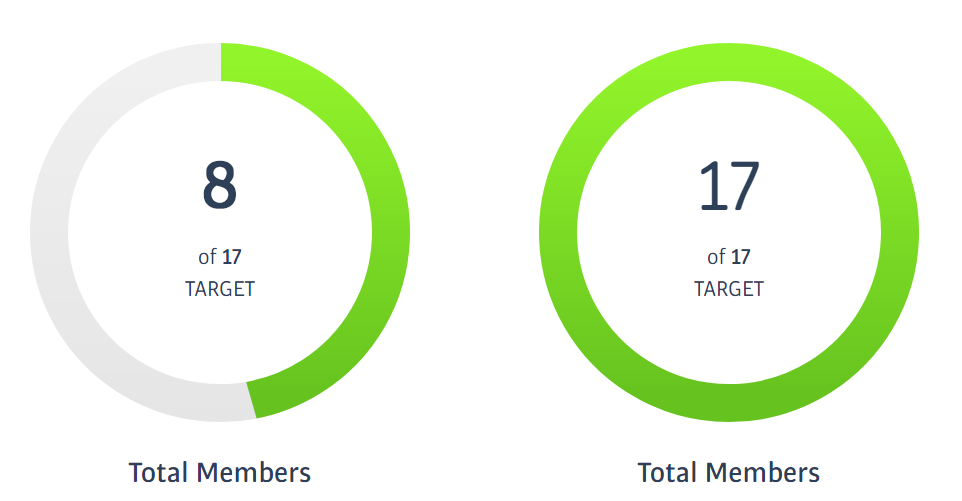
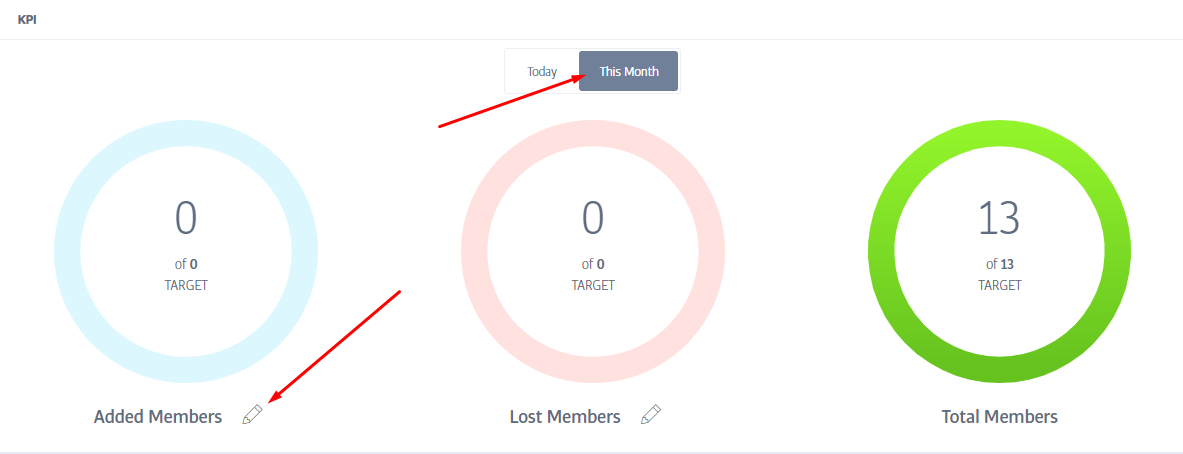
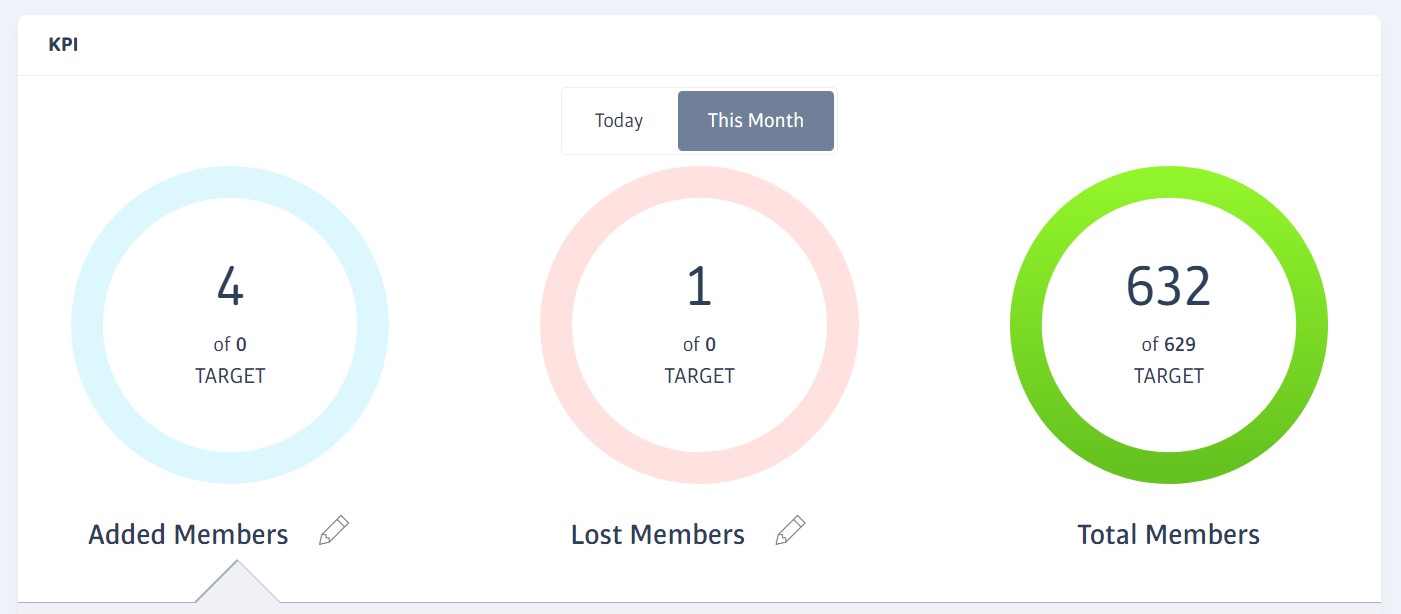
The KPI circles at the top of the Dashboard screen show the overall member activity at the club; the number added or lost this month so far, and the total club membership now.
You can set a monthly target for the first two circles; the third circle showing Total Members is calculated using these first two values.
The monthly targets you set will be scaled when switching between day and month views, e.g. if your monthly target was 30, the daily target would be shown as 1.
When targets are set, the circles fill-up to show how near to the targets you are, for example here are two different values shown against the same target level:
Note
As the targets are monthly, you must set or edit them in This Month view. The edit icons disappear in Today view.
Tip
Clicking on the title text beneath the circles will expand a section to explain all the contributing metrics, such as Prospects Signed Up, etc.
Dashboard Widgets
Below the circles, you’ll see other useful ‘widgets’ summarising other club aspects. The type and number of widgets displayed will vary according to the type of user login.
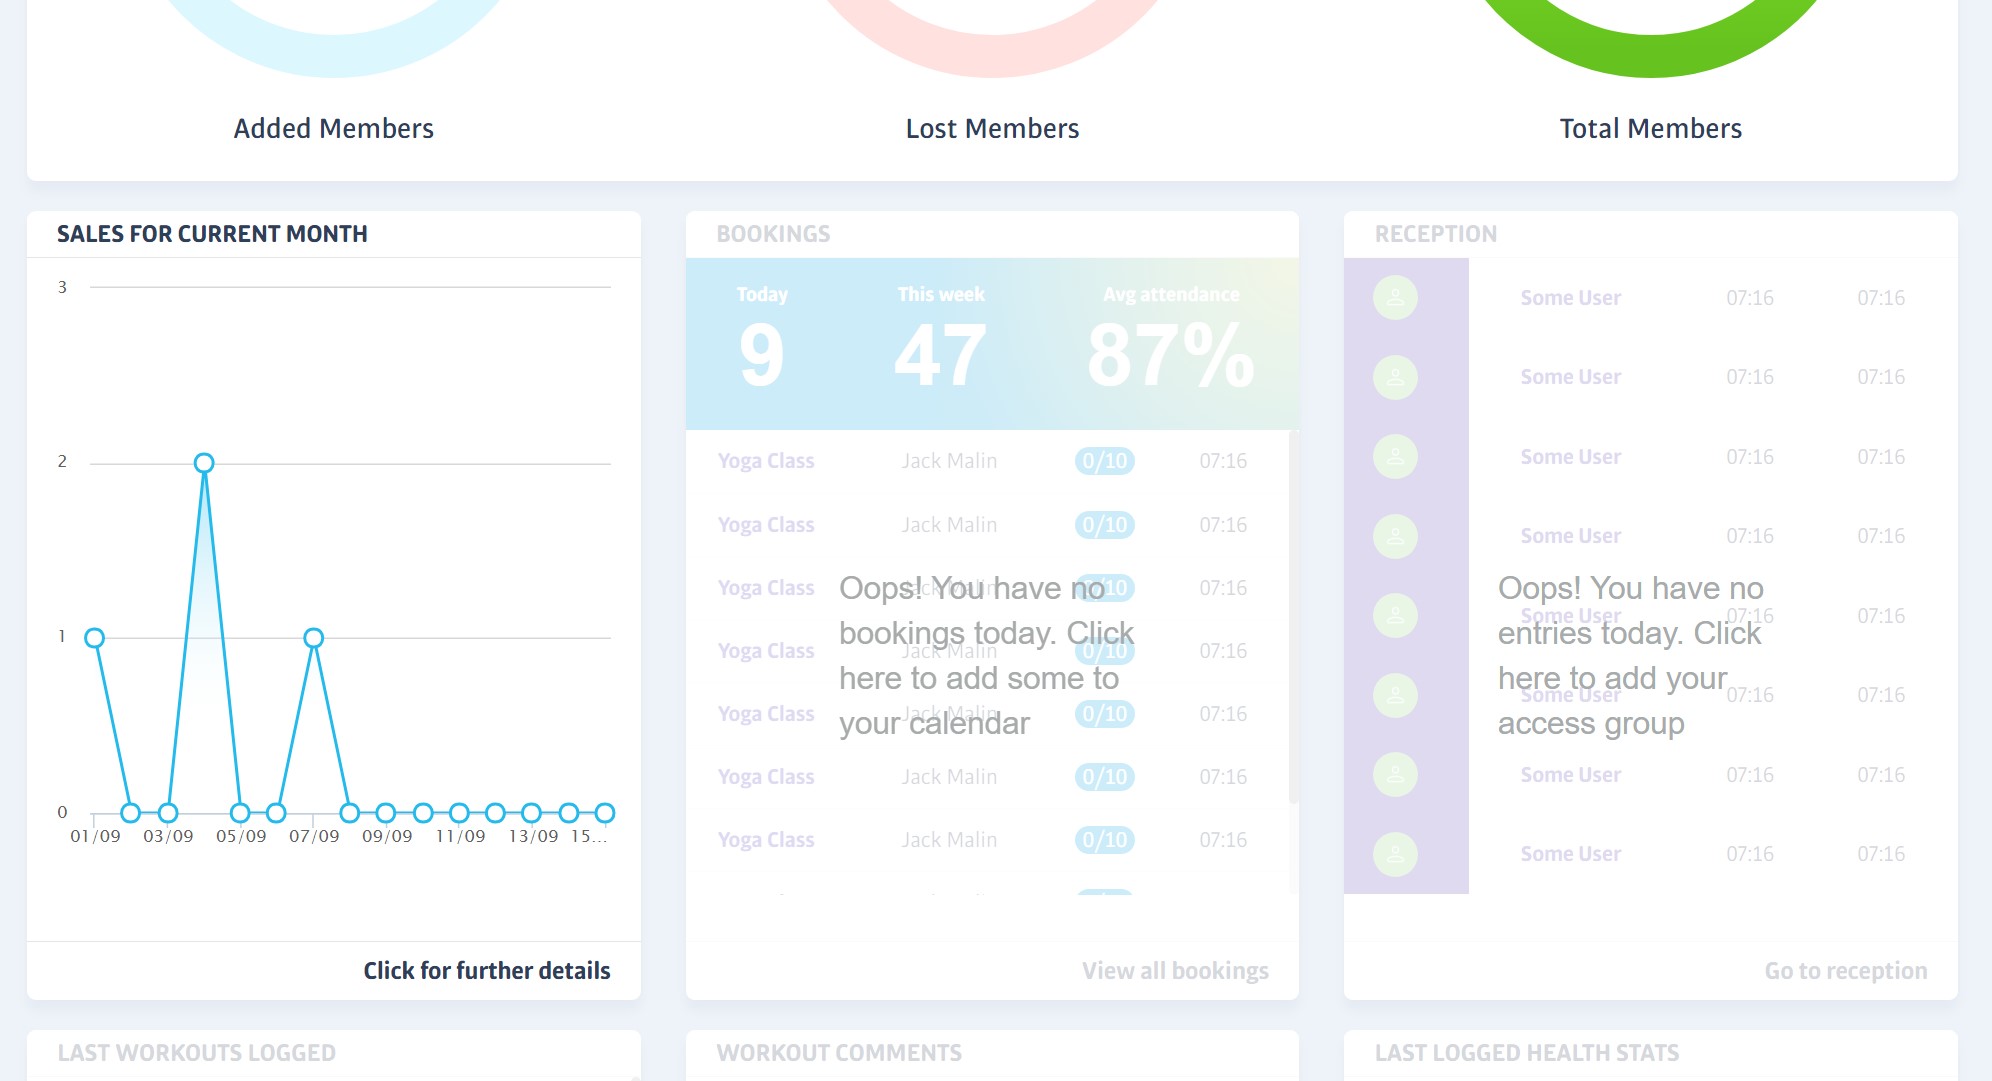
For example, the Reception Widget shows the most recent members to visit the club, you can click this panel to be taken directly to the full Reception screen for even more detail.
Similarly, the Bookings widget will show booking-related performance statistics, including the most recent class bookings. Again, you can click the widget for more details - the full Bookings Calendar in this case.
FAQs - Dashboard
Reception & Access

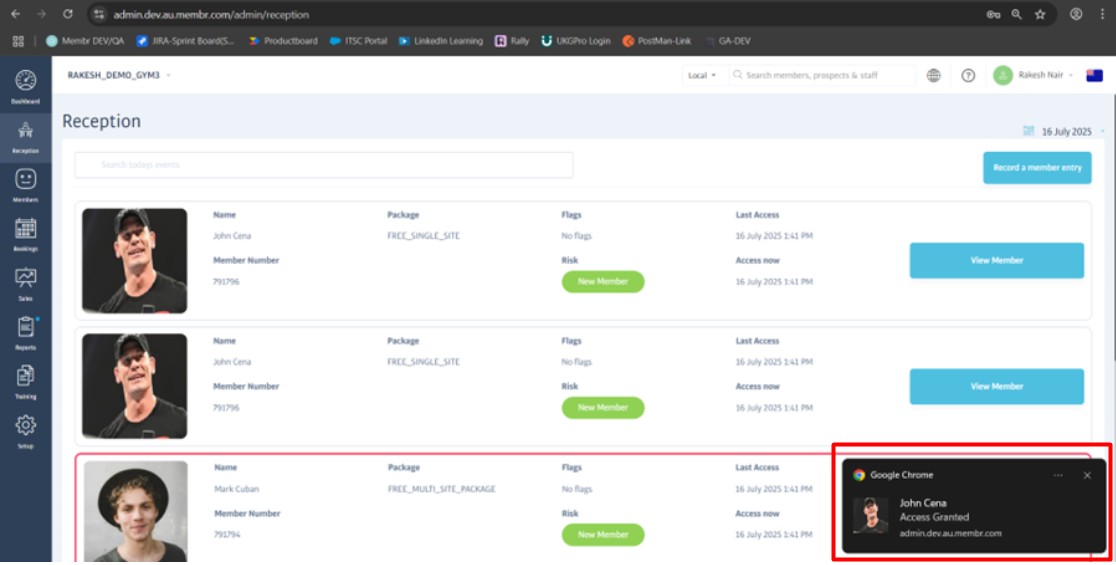
Clicking on Reception opens up the reception screen which shows a complete listing of all members who have visited today (it is cleared/reset every day).
All members who attempt to access the gym (even if they are not granted access) are added to the reception screen when they enter their PIN/scan their QR code etc. Their record can include a photo, their age, package, last access, risk status and more, along with a shortcut to their full profile for even more information.
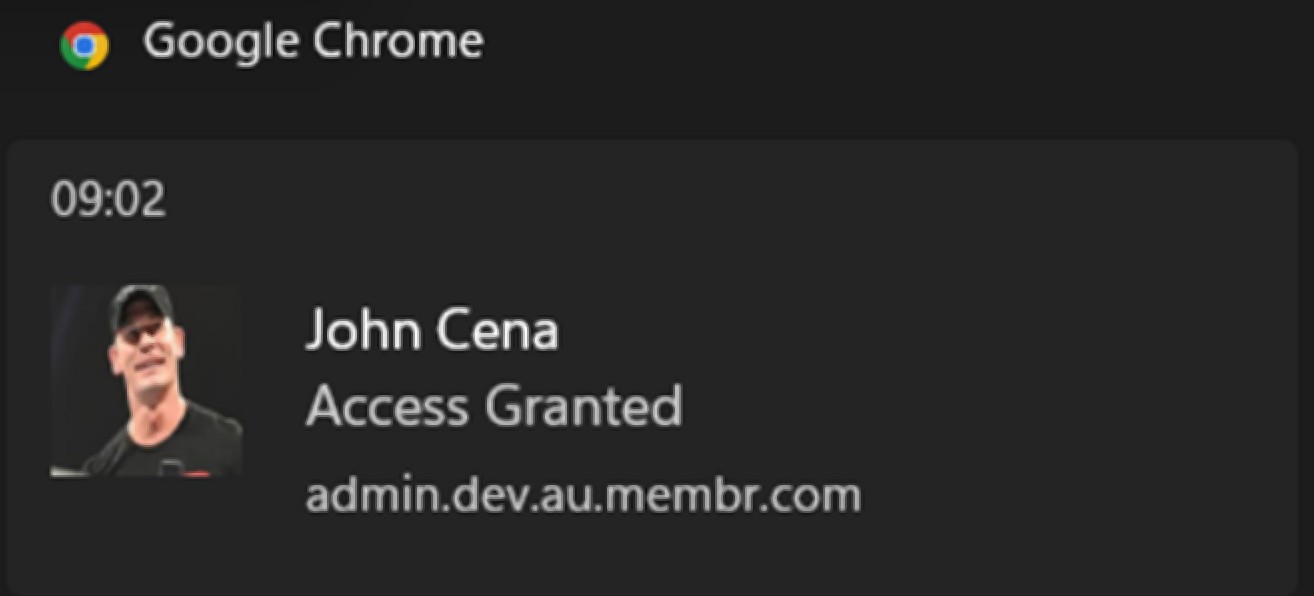
A system notification message/pop-up is automatically generated to alert you when a member comes in, even if your browser is minimised, see Access Notifications for more details.
Colour Area / 'Traffic' Light
Any members with an ongoing payment will display a red, yellow, or green disc in the Colour area. This traffic light shows the status of their membership payment (this does not appear for free or PIF memberships).
Green indicates an active member with up-to-date payments, yellow indicates an issue with the latest payment (such as an expired card), and red indicates an inactive membership (e.g., natural expiry, cancelled, defaulted).
Members who show green or yellow can access the gym - in theory - however, other factors (e.g. suspended membership) can prevent this. When an access attempt is denied, their reception screen entry will be surrounded with a red border:

Flags & Notes
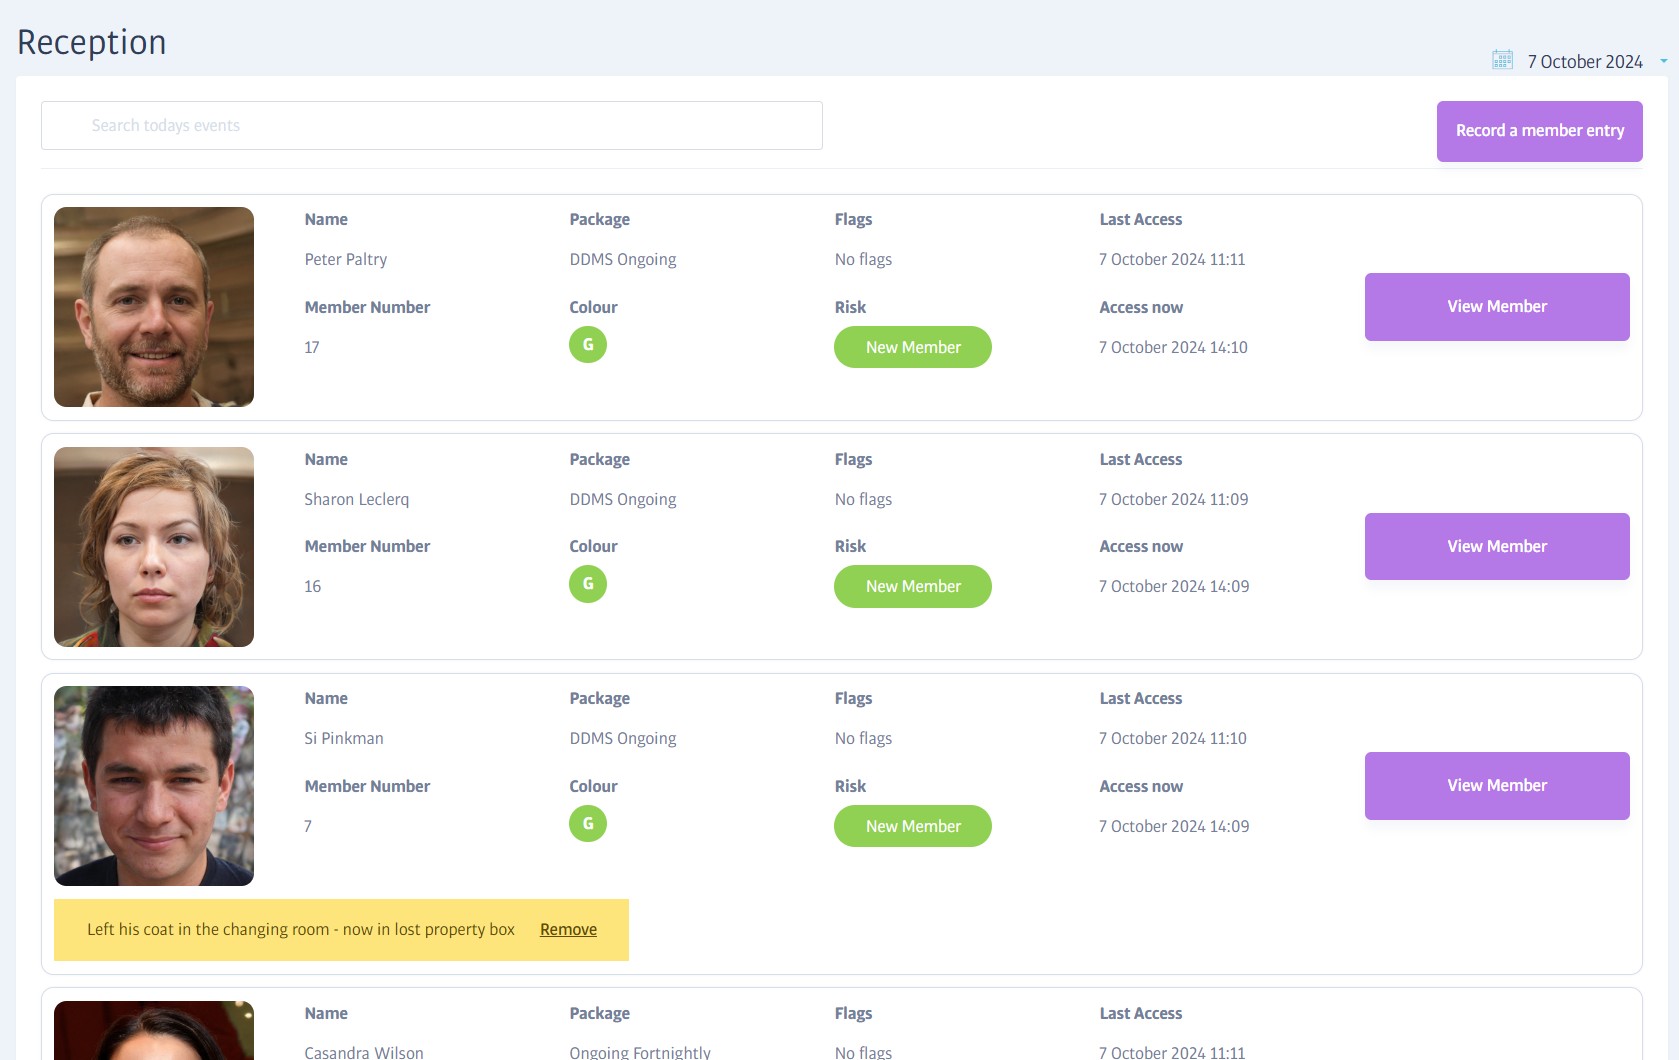
The flags area is used to indicate general membership issues such as no induction, or no PAR-Q. These issues will show as one or more red flags. Hover the mouse over the flag indicator to view the cause(s):
In addition, a Reception Note can be added to a member profile to display any other information a staff member might want to draw attention to, such as a reminder to return some lost property to the member, or to advise them about something; when the member accesses the club, a yellow banner is attached to their 'tile' on the Reception screen:

Understanding Membership Risk
All member entries on the Reception screen include an indicator of Risk; this refers to membership risk, in other words, how likely the member is to remain an active member of the gym.
Risk is calculated automatically based on recent attendance compared to historic attendance. However, it takes approximately 5 weeks to build this profile and five different risk categories are assigned during the process (it is also updated weekly thereafter):
New Member
This member has just/recently joined and their risk profile is in the process of being calculated.
Pending
A new member that has yet to become active.
High Risk
Used for members that attend infrequently or who change their attendance pattern significantly, and are therefore at most risk of cancelling.
Average Risk
For members with no strong attendance pattern, but who attend fairly regularly.
Low Risk
These are considered the safest members - people who exhibit a fairly regular attendance pattern and stick to it.
Members & Gym Access

Our Global Access System supports various entry methods, including QR code, RFID, and more. All types use a numeric code to identify members, either directly (e.g., a PIN they enter on a keypad) or indirectly (e.g., encoded in their keyfob or triggered by their fingerprint).
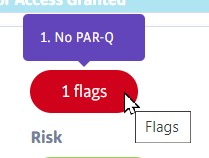
Consequently, each member has a unique code that can be viewed - and in some cases edited - in the access controls area of their profile, found just underneath the profile picture on their member profile page. This, as well as some other access settings, is initially hidden so that the overall Door access value can be seen more clearly - this will either be Enabled or Suspended:

Clicking Show more access controls will expand the remaining settings:
Warning
The access settings for this member will not operate as expected unless the Access status shows a green Synced symbol.
Keyfob
To issue a new keyfob, simply enter its number and hit the Update button, but note the warning about Access status above.
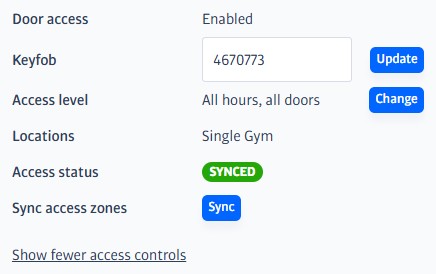
Access level
Provided the separate Door Access setting shows that access is Enabled, the exact doors that can be opened by this member (and when) are set using the Access level. The different types on offer can vary from club to club, and are set up when the access system is installed.
For example, there may be different access levels for male and female changing rooms, staff-only doors and so on. Here's an example of the types you might find:
Warning
Even if Door access shows that it is enabled, it is possible to choose an Access Level that does not actually open any doors - No access - choose this level if you want to disable gym access manually.
Access Status
Any changes you make to a member's Access settings (and some other member profile areas, see below) must be communicated to a separate server controlling the club's access hardware.
The agreement (or otherwise) between the two systems is indicated by a colour-coded status as follows:
 | The two systems are synchronised - the access system has acknowledged the settings you can see in Membr and should work as expected. |
 | Changes have been made in Membr (and communicated to the access system), but confirmation has not yet been received - your changes are not yet live. |
 | This (much rarer) state can occur when there is a problem communicating any changes. Contact your Success Manager or raise a support ticket for help. |
Changes you make to any of the following settings will trigger an access update/Pending status:
Update/change keyfob
Update/change Access Level
Update/change membership package
Update/change the member's name
Access Notifications
Any access attempts (e.g when a member scans their keyfob) can generate pop-up notifications to alert you when a member enters the club. By default, most systems will play a sound to alert you too.
These notifications will appear/sound even when the Reception screen isn't selected, or the browser is minimised, but the browser must be running the Xplor/Membr software.
Appearance
Once enabled, the two access notifications look like this: (appearance will vary slightly according to system/browser)
Access Granted
Access Denied
So that denial notifications remain on screen to grab your attention, they include a button for you to dismiss them:

Enabling Access Notifications
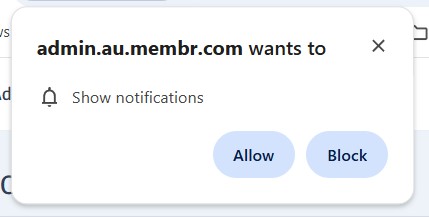
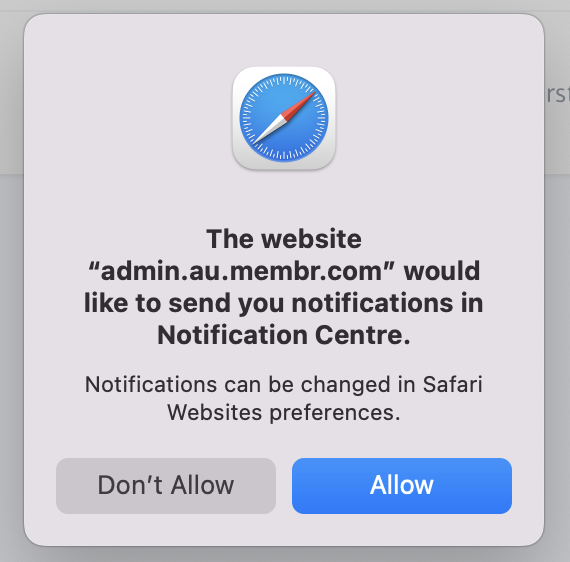
To see the alerts, most clubs will just need to enable browser notifications for their site.
To do this, most browsers will ask if you want to enable site notifications when you navigate to your club's site:
Or this:
If your browser doesn't offer a choice for any reason, you can often change site settings quickly using a button next to the address bar at the top of the window on most Windows-compatible browsers (this can be found instead in the Safari->Preferences menu on Mac).
To do this, first navigate to your site and then click the site information icon. On Chrome it looks like this (Firefox, Edge, and many other browsers use the same approach with slightly different names or icons):
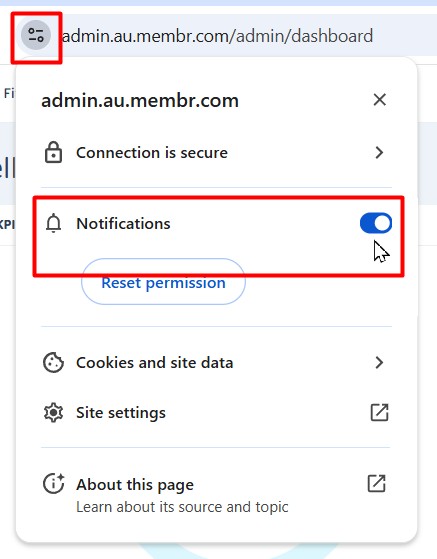
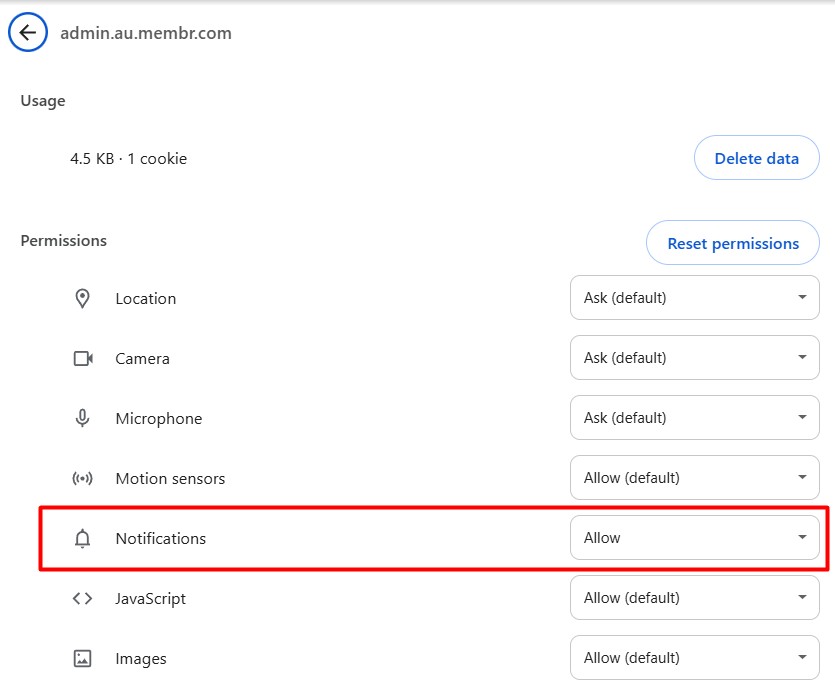
If you do access the site information box above, but don't see a Notifications setting, you will need to open the full Site settings box, accessed lower down in the same menu. This will open a page containing all settings for the site:
Access Notifications - Prerequisites
To support the Access Event Pop-Up Notification feature, the following Windows configurations are required:
Windows 10 or later.
Notification settings enabled for the browser (as described above)
XG-Membr Application must be running in the web browser.
System sound settings should be enabled for notifications
Ensure that Focus Assist is turned off or configured to allow notifications from the application.
Ensure ‘Do Not Disturb’ is turned off or configured to allow notifications from the application.
Access Notifications - Troubleshooting
If you are sure that notifications have been enabled in your browser, and system features such as Do Not Disturb are not active, here are some other things you can check:
Javascript - Javascript is a technology all browsers rely on to achieve certain functions. Because it's so essential, it is widely enabled by default. However, it may have been disabled for some reason.
Check your Javascript setting - it will be available in the site settings menu already shown - for Chrome, it sits just below the highlighted notification setting.
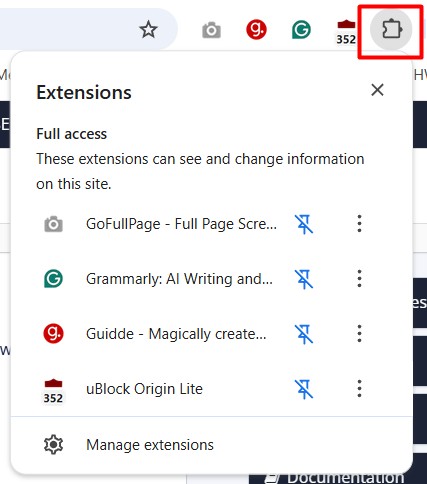
Browser plug-ins/extensions - disable any extensions you have installed that interfere with notifications - if you're not sure which ones might, turn them all off!
For most browsers, these are accessed using a jigsaw icon to the right of the address bar: (look in the Safari->Extensions menu on Mac)
Recording a member entry (automatic)
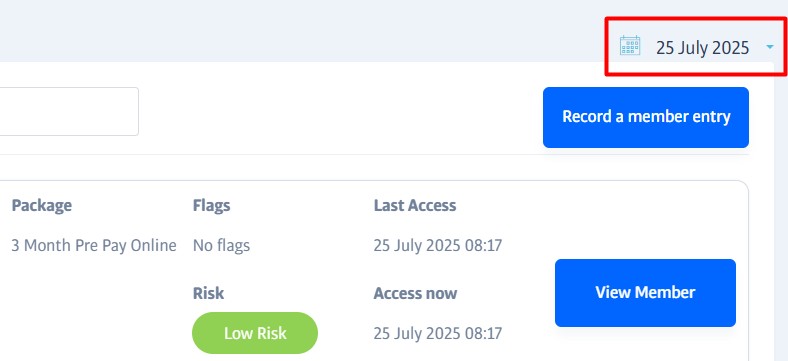
At the start of a new day, the Reception screen will be empty. As your members enter the gym using their pin, QR code or whatever system you've installed, they are logged in a database and displayed on the Reception screen. A typical entry for a member is displayed like this:

At a glance, you see a photo of the member (assuming one has been added), the date they last accessed the gym, and lots more useful data besides. The items that may need more explanation include:
Flags

Flags are used to draw your attention to issues affecting the member; hover over the red box if you see one to display the reason (e.g. Incomplete PAR-Q).
Risk
This refers to membership risk, in other words, how likely this member is to remain an active member of your gym. Risk is calculated automatically and is based on recent attendance compared to historic attendance. However it takes approximately 5 weeks to build this profile and five different risk categories are assigned during or after the process:
New Member
This member has just/recently joined and their risk profile is in the process of being calculated.
Pending
This is a new member who has not yet fully joined and completed the payment process.
High Risk
Used for members who change their attendance pattern significantly, and are therefore at most risk of cancelling.
Average Risk
For members who use the gym but only lightly, and that have no strong pattern of attendance.
Low Risk
These are considered to be the safest members - people who exhibit a fairly regular attendance pattern and stick to it.
Recording a member entry (manual)
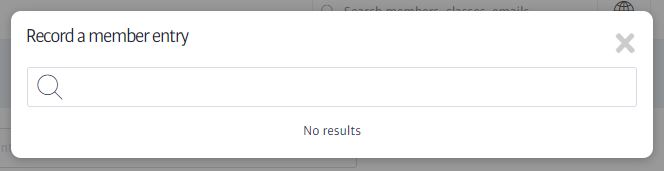
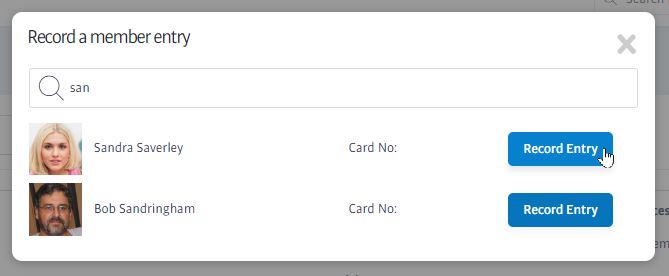
Members can be manually logged on the reception screen too - handy if your membership scanner malfunctions, for example.
From the Reception screen, click on the Record a member entry button to open the member entry box:
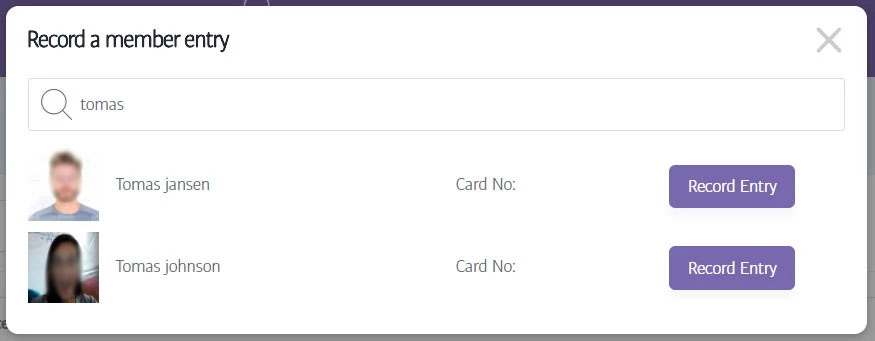
Using this window, you can enter part of the member's forename or surname to narrow down the list of matching members that appear as you type.
When you find a match, you click on Record Entry to log the member into the system with the current time. If you prefer, you may also search/admit members using their membership number instead.
Reception Filters
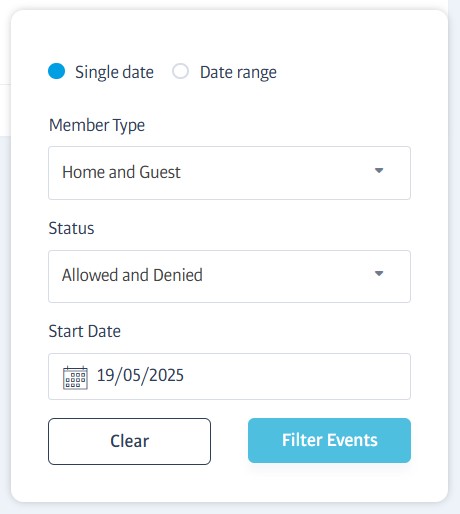
Using the reception filter - click on the date to open its settings - you can select a date or date range to view access events from previous days. You can also filter the results to show only access attempts that were allowed or denied.
You can also expand the Filter Time section to search after (or before) a specific time if you need to, otherwise the entire day will be assumed.
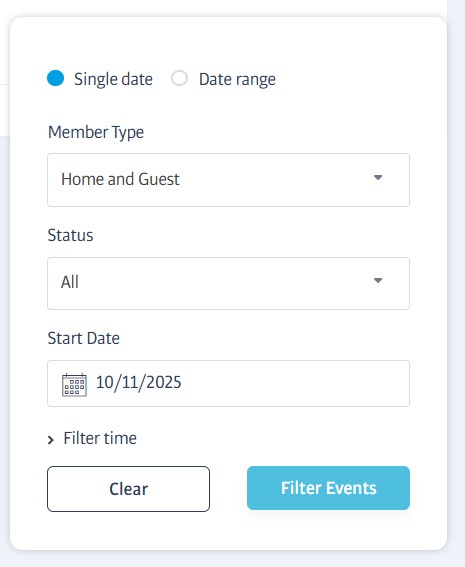
Member Type
If you have multiple gyms/sites, the Member Type filter will be shown. Use this to show only guest members, home members, or both.
Status
All clubs see this filter - show only the access types that were allowed, denied, or both.
Start Date
When you select the Reception screen, the date selector is automatically set to today's date, and the display lists any members who have accessed your gym today only.
However, all previous accesses are also logged and kept in a database; you can view admissions from a week ago, a month ago, or even a year ago if you wish!
Choose between a single date, or use the date range selector to view admissions between two dates.
Searching admissions
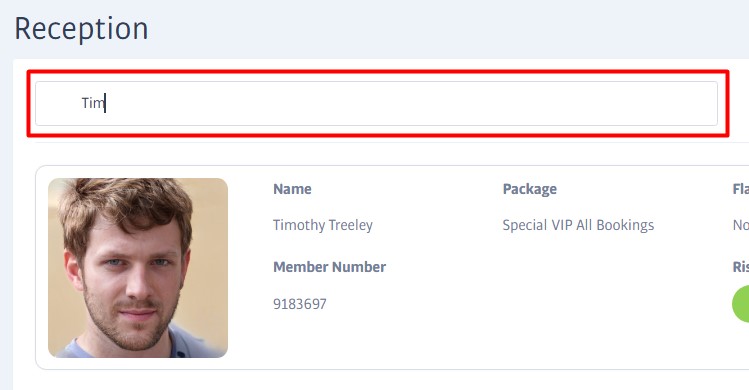
Just under the Reception screen's title, you will see a search bar saying Search today's events. You can use this to search for any member who has come into the gym by entering your search text in the box. As you type, the list of entries that match your criteria will update.
The search list will show any members that match the text you enter; the more letters you type, the shorter the list of matches will become.
Notice
The search is not case-sensitive
Important
This search function only searches the list of members who have come into the gym for the time period being shown (usually today); it can not be used to find ANY member at the club, or to log them into the gym!
Reception Notes
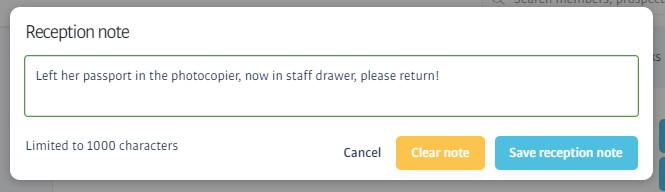
You can add a note to a member's profile so that when they next access the gym the note will be attached to their entry on the Reception screen. Useful if you want to alert reception staff to anything they need to know about the member:
If you have seen and acted on a reception note, click Remove to prevent it from appearing on this member's next visit.
FAQs - Reception
Prospects

A prospect, or sales lead, is someone who might become a member right? Well, Membr has a bunch of features to help you manage them and keep them engaged.
Prospects don't have a main sidebar button of their own; all of the prospect tools are collected together in the Sales menu. Selecting Sales -> Prospects will open a handy dashboard and calendar that shows you what's going on with your leads:
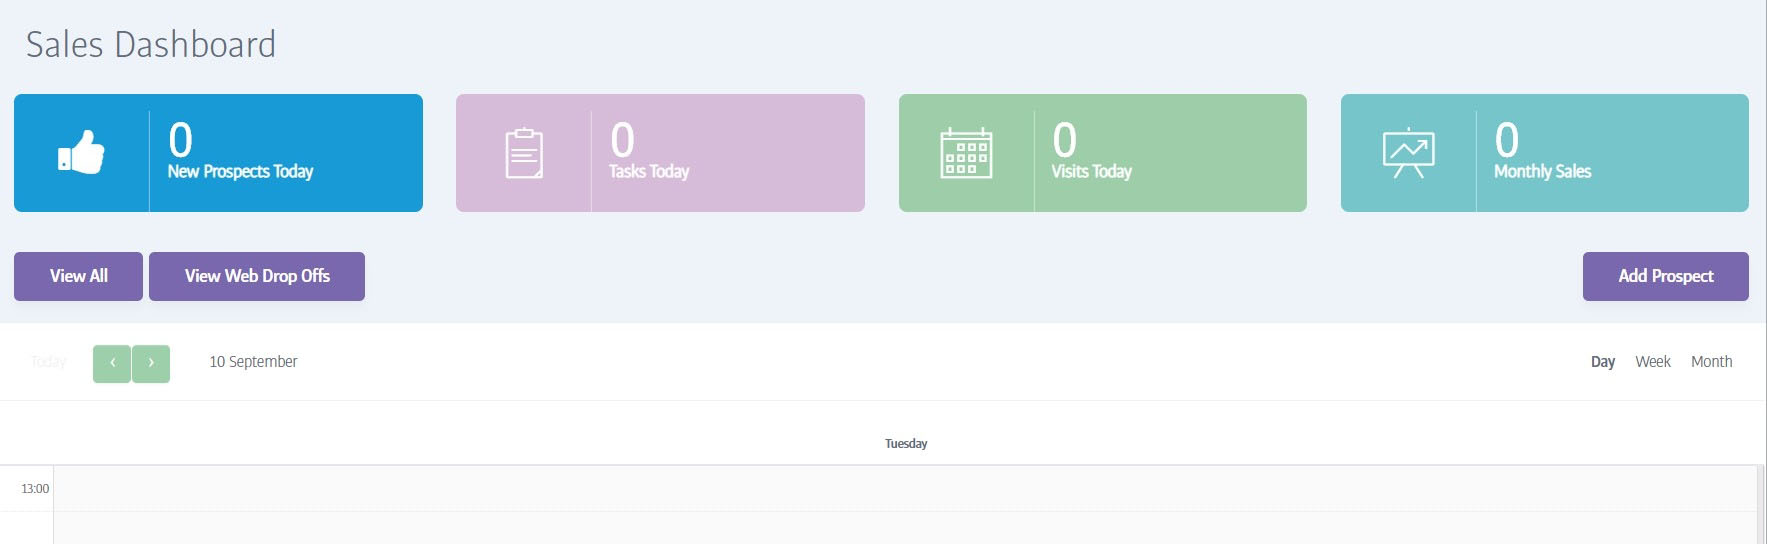
From here you can see what prospect tasks you have coming up, book a visit or add a new prospect task by clicking on the calendar and choosing what you want to do. You can also click on View All to see a complete list of all of your prospects, or Add Prospect to add a new one manually.
Finding Prospects
You can find prospects using the same search box that you use for finding members (always at the top of the screen):
The search results will be split into separate categories for members, prospects, and staff.
Adding Prospects
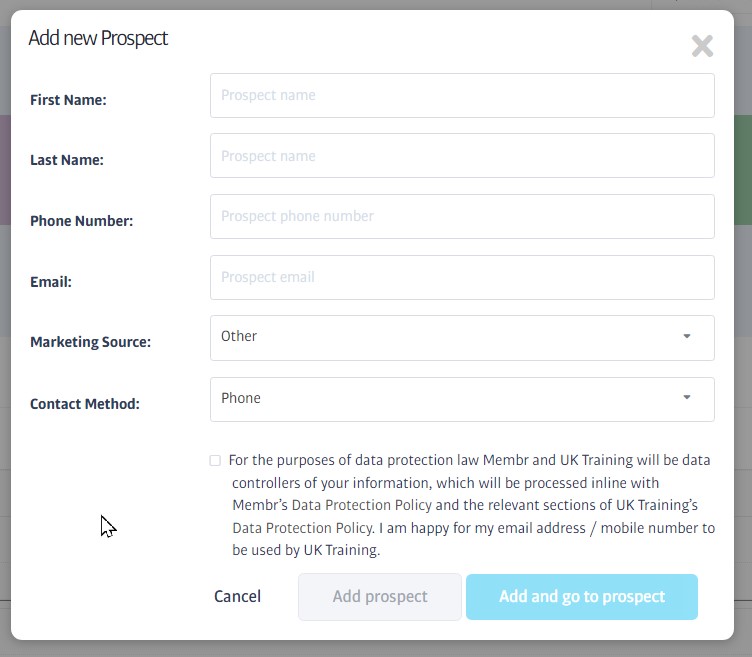
(Find this in Sales -> Prospects -> Add Prospect)
It's easy to add a new prospect; just fill in the basic info, agree to the Ts&Cs and then hit either Add button to finish up!
Auto-added Prospects
Prospects can also come from different sources:
A web drop-off will be turned into a prospect automatically after the period of time you define in the settings area.
Prospects can register directly via your website if you have implemented one of our web forms
Viewing Prospects
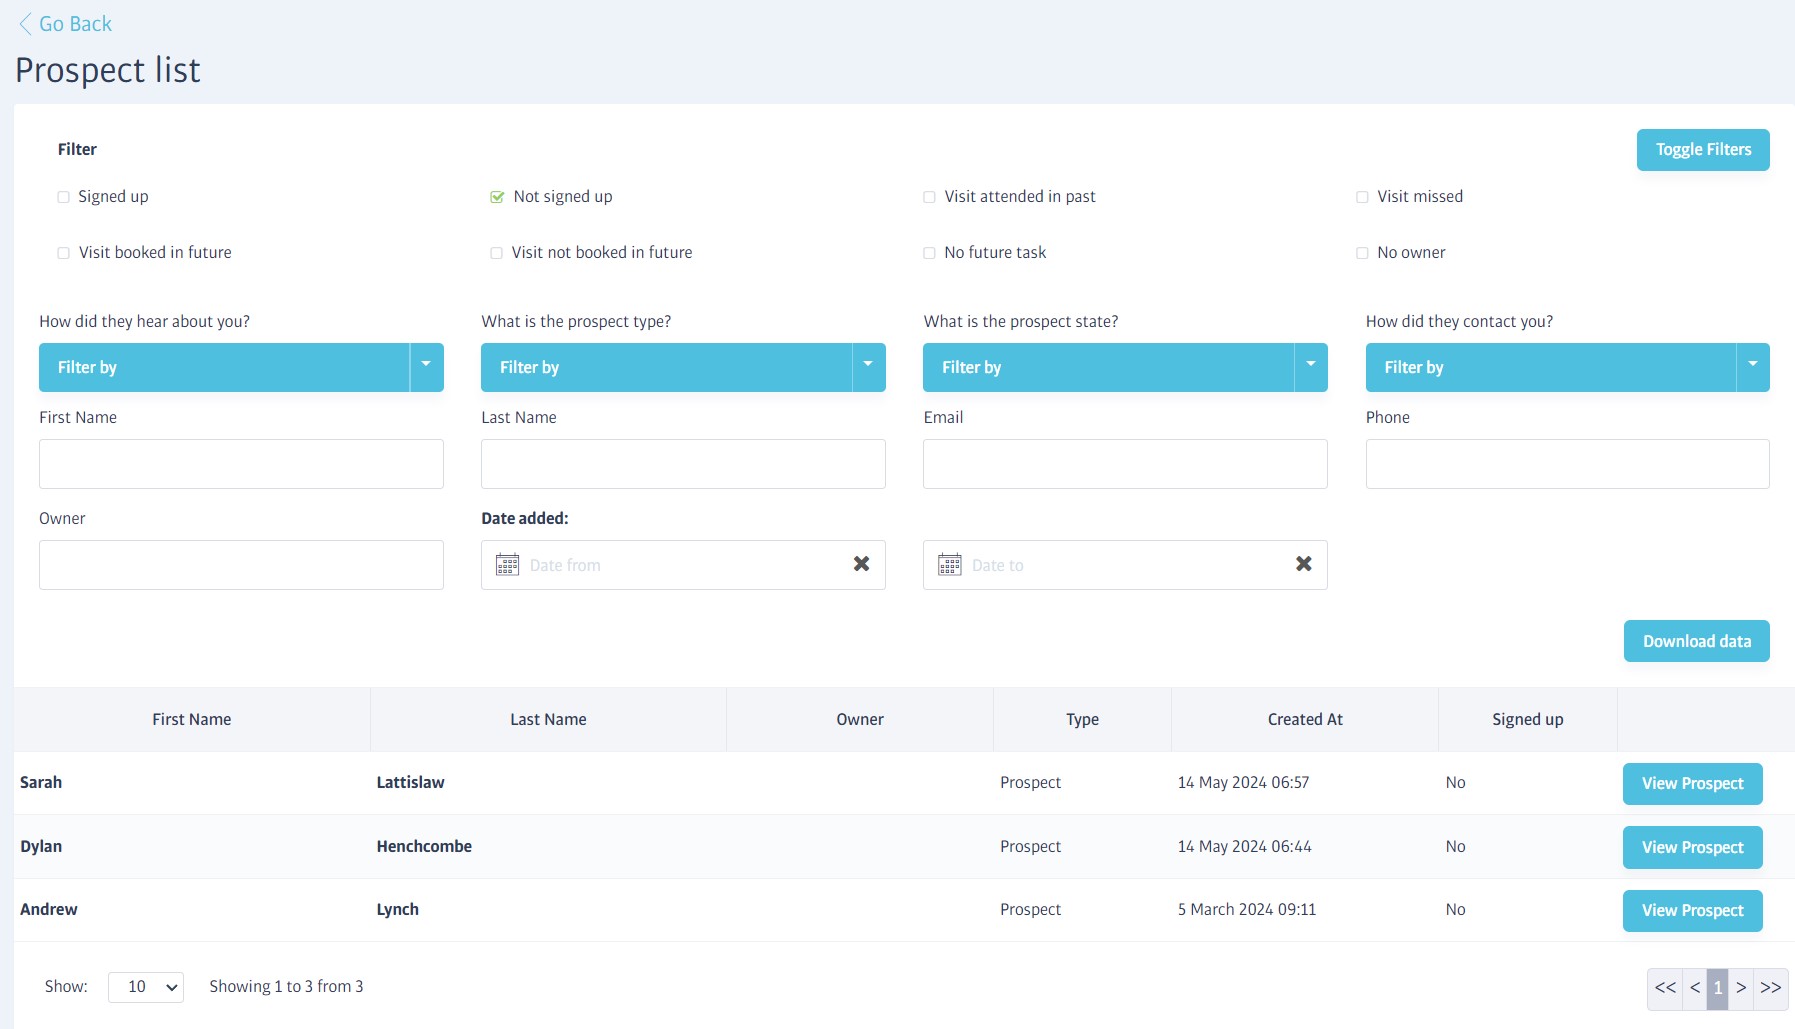
(Find this in Sales -> Prospects -> View All)
Clicking View All from the sales dashboard will show a complete list of all prospects on your database. The top of the list has a filter toggle that you can use to locate certain groups of prospect, such as marketing source or date range:
Prospect Profile
Similar to a member profile but more stripped back, a prospect profile captures all the basics about a sales lead; when they registered their interest, how we should contact them, contact details and more:
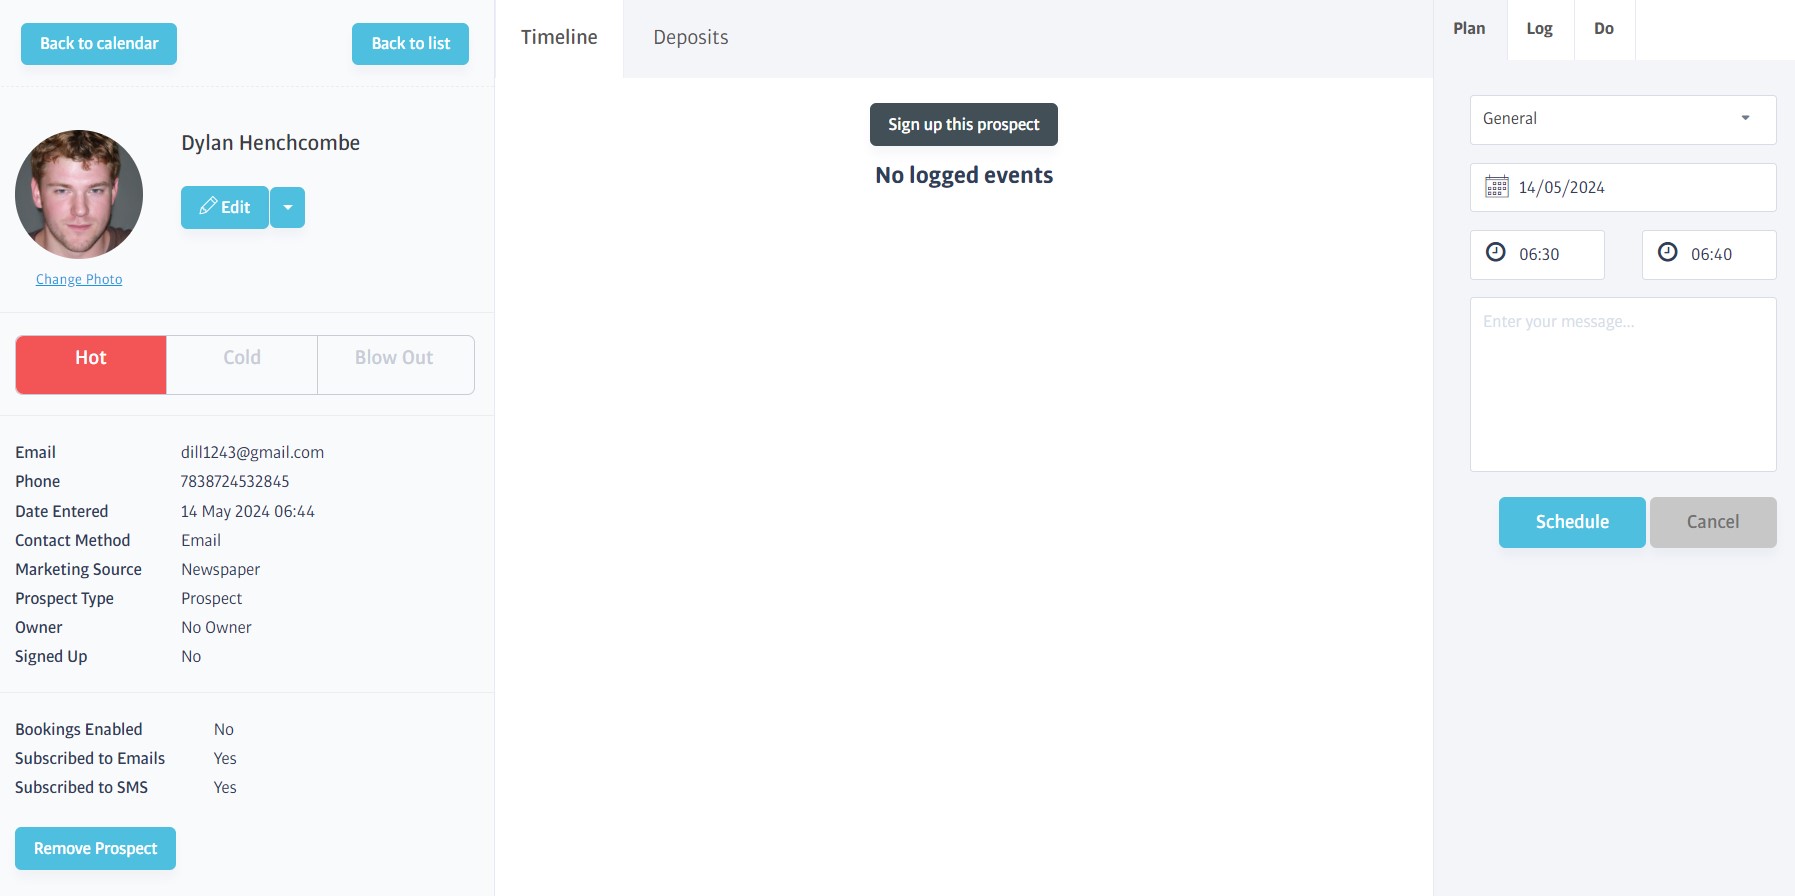
You can add a photo, plan follow-up calls, and even sign them up for full membership from here.
Communicating with Prospects

There are several built-in tools you can use to keep in touch with your prospects:
You can email a single prospect directly from their profile, just click the arrow button to the right of their profile photo.
You can send a group email (e.g. a promotional message) to any number of prospects at once using the Prospect Mass Emailer tool.
You can send automated emails at different intervals to keep prospects engaged using Prospect Pathways.
Prospect Mass Emailer
(Find this in Sales -> Prospect->Prospect Mass Emailer)
Use the mass emailer whenever you want to mail some, or all, of your prospects at once.
You might want to reach out to all prospects who've registered in the past 10 days for example, or only those prospects who heard about the gym through social media.
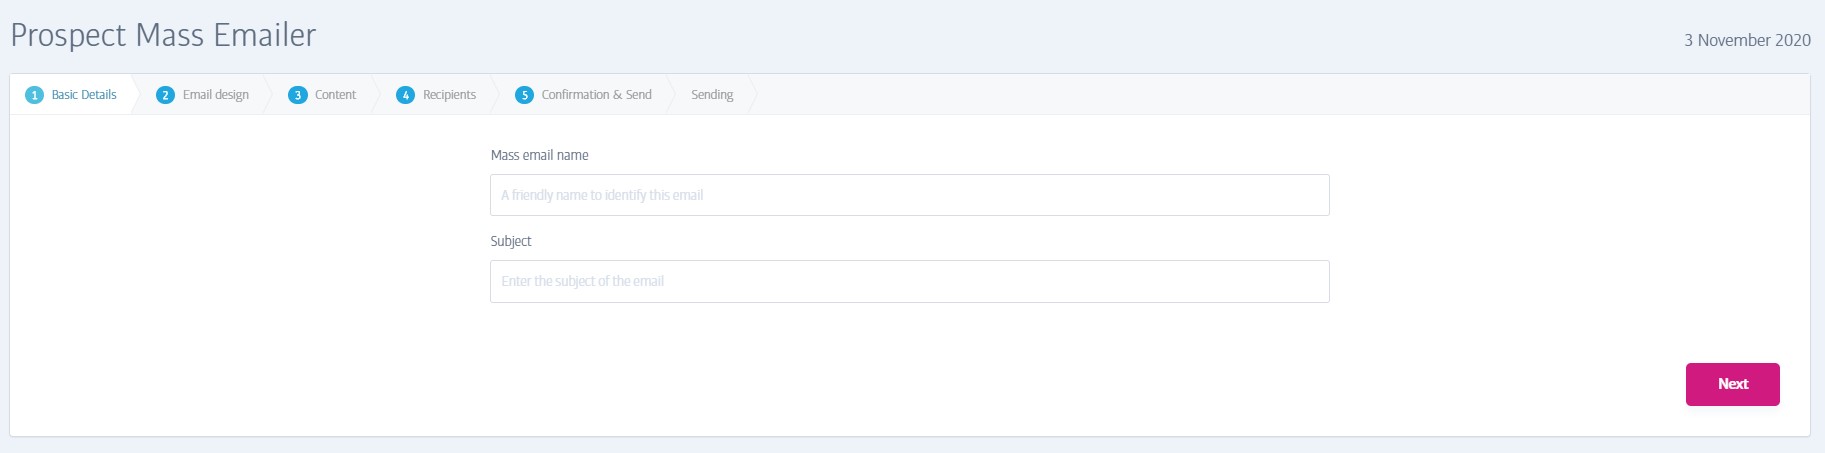
Let's look at a typical flow with the 5-step dialog:
Basic Details
Simply a memorable name for this email internally, and a separate subject line that will appear in the recipient's inbox.
Email Design

Select any of the five layout types for the email; the grey areas represent images that you'll need to supply when you create the message.
Content
You'll see a fairly standard word-processing style toolbar with things like font style, bold, bullets etc.
Note the tags on the right; use these to personalise the mail easily. For example {prospect_first_name} will be substituted with the actual recipients' names when processing later.
Recipients
Use the filters to narrow down the list of prospects to include. The list of prospects below this will update as you make changes.
Confirmation & Send
Check you're happy with the number of recipients. Send yourself a test email using the provided box if you like, note that 'Test with a member's details' is used when replacing any personal tags in the email, the member will NOT be emailed!

(Once complete, you will be able to find and view the progress of any mass email job by looking in the Prospects->Prospect Mass Email List.)
Prospect Mass Email List

The email jobs you create in the Prospect Mass Emails area are summarised in this Mass Emails list, and also queued-up for the mass email system to send (if you deferred them) on the date you defined. When the jobs run and the emails get sent, a record of the finished job is also stored here, and you can switch between viewing the pending and completed jobs listing using the Completed Jobs and Queue tabs respectively.
Prospect Pathways
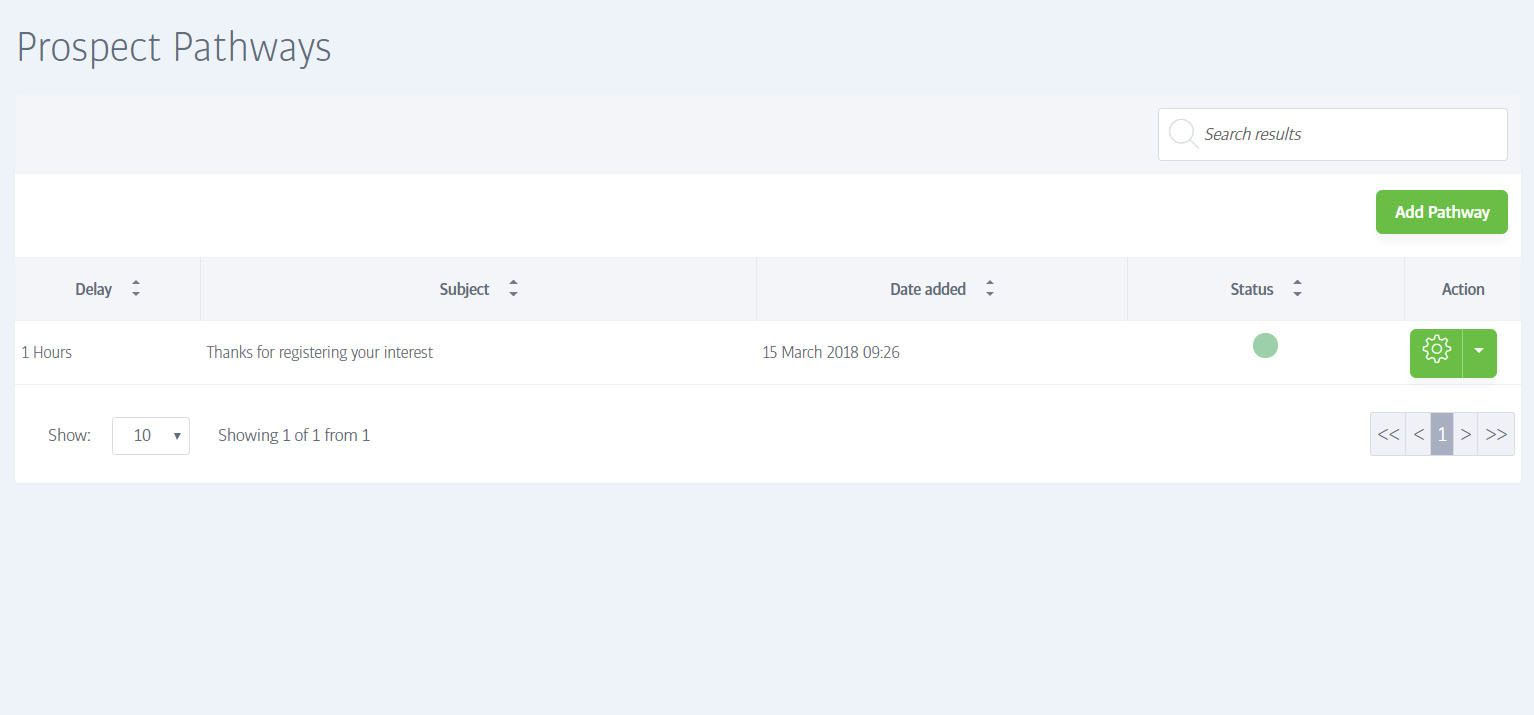
(Find this in Sales -> Prospect Pathways)
In much the same way as for the Member Pathways option, Prospect Pathways let you define one or more emails that are sent to any (or certain types of) new prospect, after a series of specified delays when they sign up.
These mails will help you to stay in touch with your prospects and hopefully gently nudge them towards signing up - you might choose to mail them after a few days to remind them about a current membership promotion or open day, or simply to thank them for registering their interest, for example.
Unlike Prospect Mass Emails (which are sent as a one-off mail to existing prospects), Pathway emails can define a series of messages that get sent to any new prospects when they register. So in essence, Prospect Mass Emails are mainly a manual sales tool, whereas Pathways are an automated way of acknowledging and encouraging fresh prospects.
The list will be blank initially, but when you have some emails defined, they will display either a green disc or an amber disc to indicate their status; just as with Member Pathways, green=active and amber/yellow=inactive. You can click the disc to toggle between the two states.
A typical series of pathway emails might look like this: (remember, these are sent automatically once a prospect is created, so +3 days would be three days after the prospect was added to the system)
+1 day = 'Thanks for your interest in the gym, did you know... etc.'
+5 days = 'Did you know about the wide range of classes we offer? A full membership would.. etc.'
+10 days = 'Still interested in <name> gym? This month only, we're offering half price memberships... etc'
FAQs - Prospects
Prospect Dashboard

Prospect Profile

Prospect Mass Emails

Signup

Signups fall into two broad categories: online, or inclub. Membr offers a highly-configurable solution to make either type a breeze, whatever your needs! Read on to find out more.
Inclub Signup
The inclub signup process uses an enhanced version of the online signup site. To get started, head to the Members->Add a new member option in the sidebar.
The inclub version of the signup site offers all the same functionality as the online signup page, with access to some additional editing opportunities, and a potentially wider range of packages that can include in-club-only types.
There are also a range of filtering options to make it easier to locate specific packages:
The rest of the flow is almost identical to the online signup process described next. The main difference is that clubs can incentivise how up-front fees are handled, described below.
Incentivising In-club Signup
There are some tweaks that clubs can make to various aspects of signup to make it more attractive for potential joiners.
Editable Up-front Payments
All clubs can edit up-front payments during in-club signup.
Clubs can choose to waive a joining fee, or discount a keyfob fee, or whatever they need, as the fees can be edited directly by a staff member during the signup process:
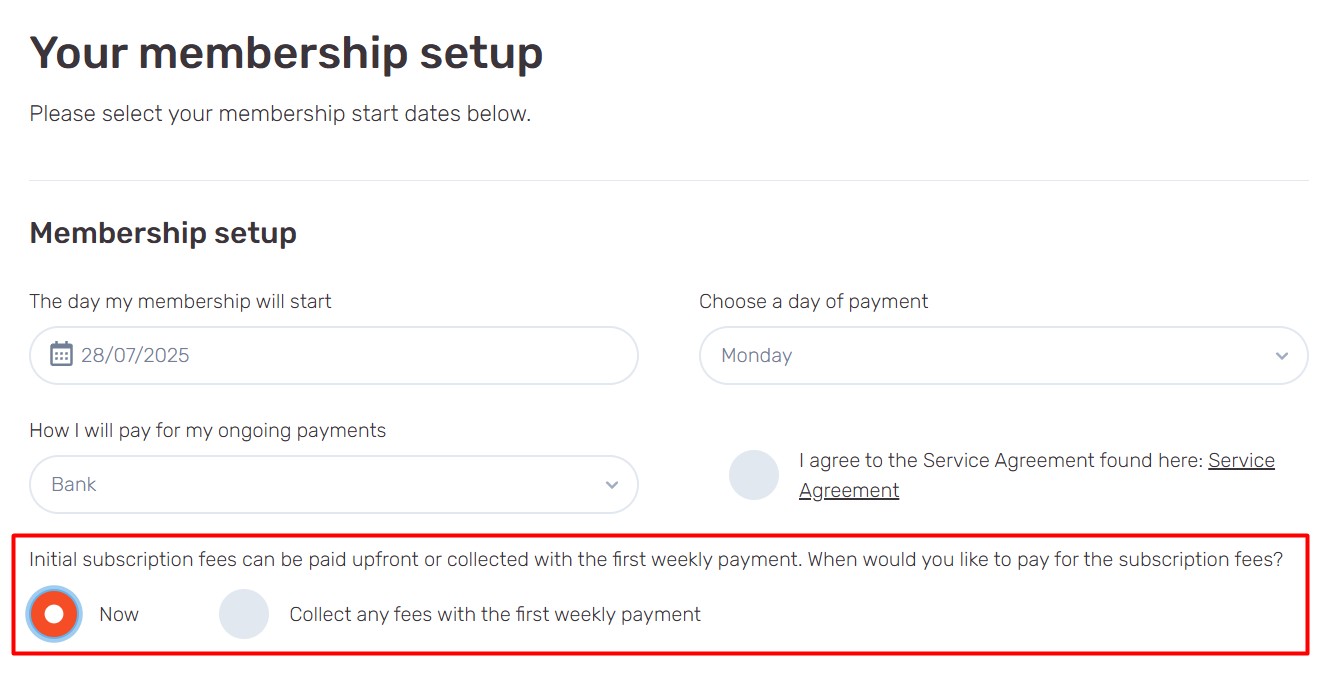
Defer/collect Up-front Payments with First Debit
Clubs can now also choose to collect any one-off fees with the member's first ongoing payment. This will skip immediate collection and add the one-offs to the first scheduled debit.
This is off by default, but at a club's request (speak to your Success manager), we can enable a toggle offering a choice:
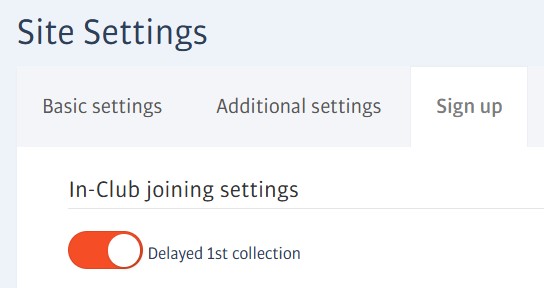
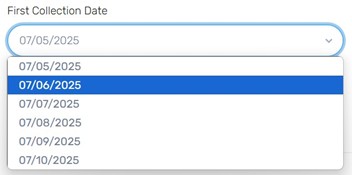
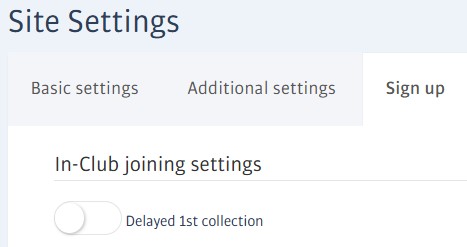
Delay Collection of First Debit
Clubs can enable a toggle (in Settings->Signup) that offers a choice of dates for a signup's first debit collection. The intervals will vary according to the package payment interval, i.e. weekly, monthly, etc.
The setting looks like this:
Giving a choice via a drop-down at signup time:
Online Signup
All Membr clubs get a flexible, bespoke signup portal. You can find the address of yours by looking on the Setup->Settings page:

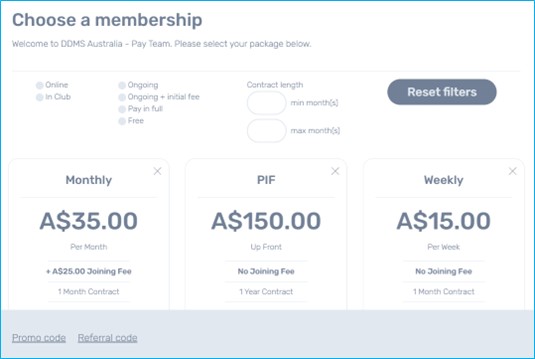
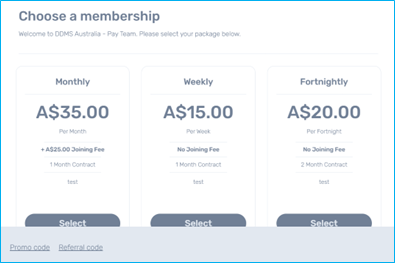
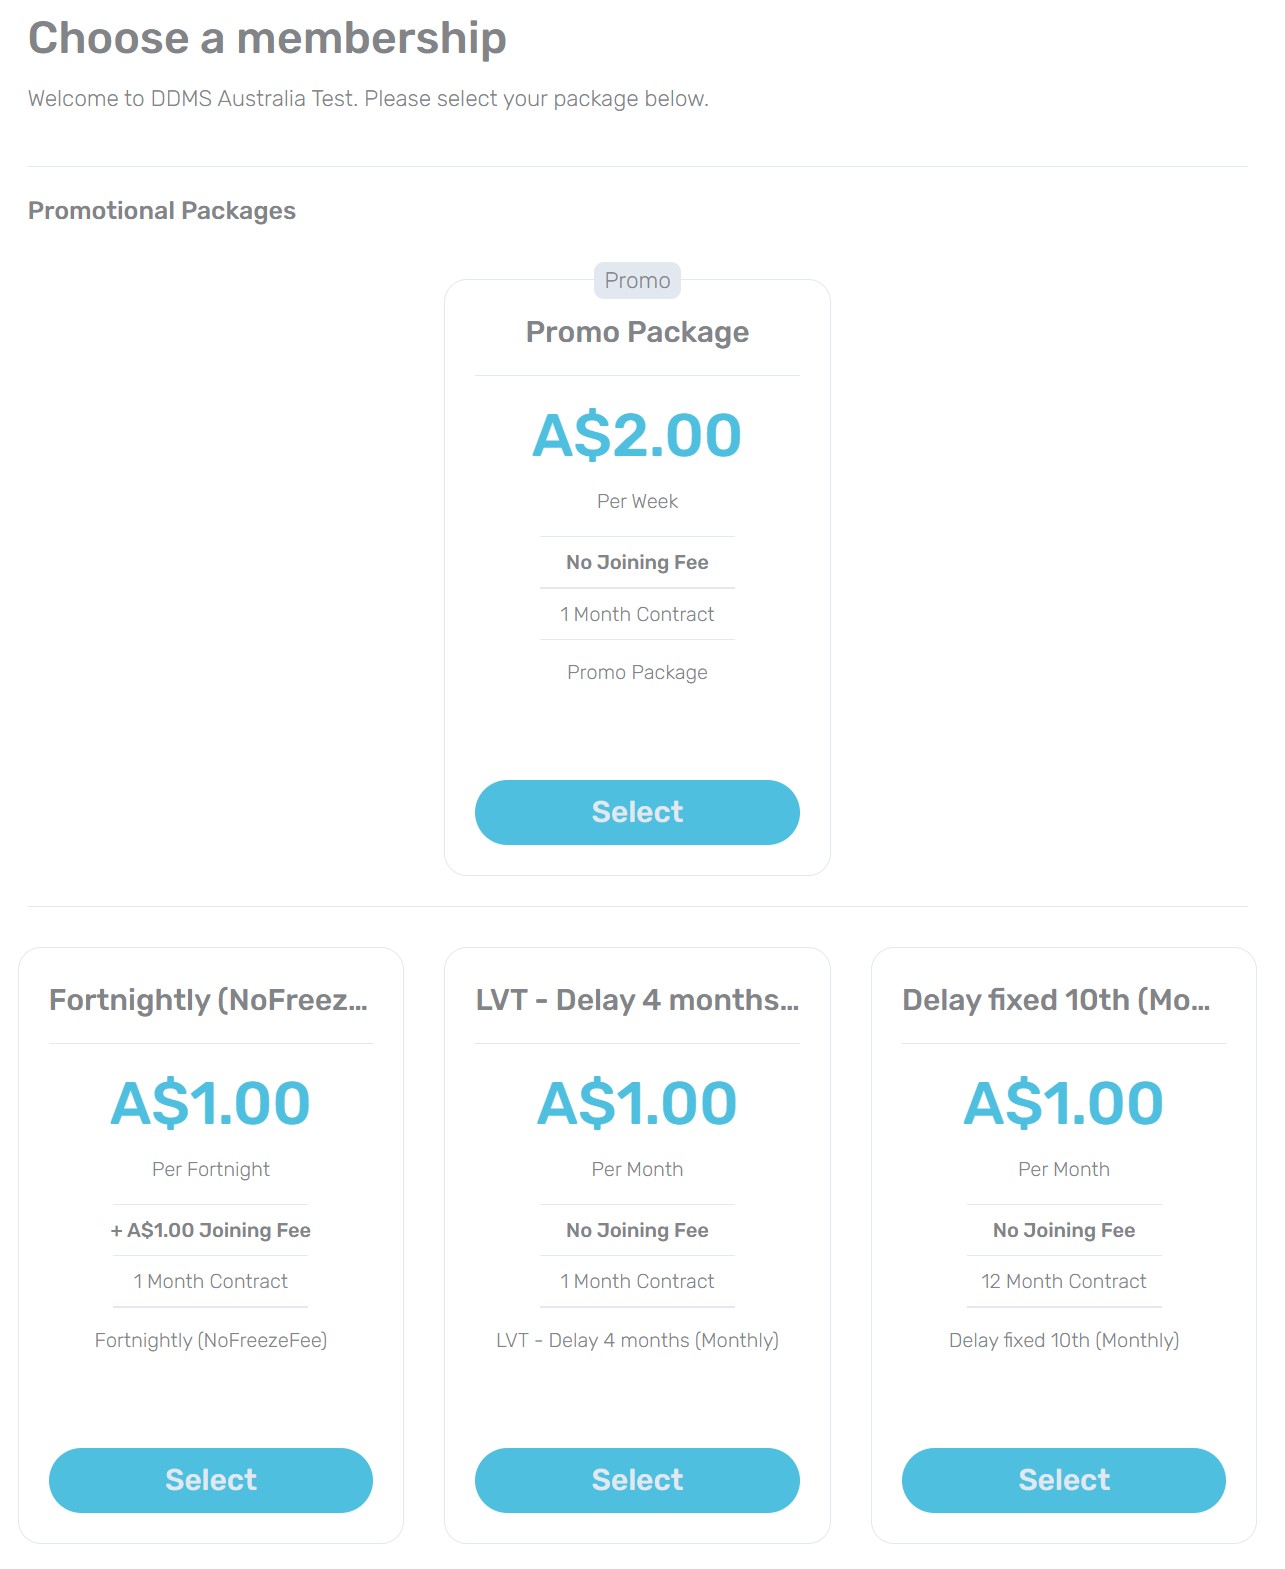
Navigating to the signup URL will take you to a page inviting you to Choose a membership package or enter a promo/referral code to unlock even more.
Each package can have a different contract duration, different joining fees, and payment terms. If a valid referral or promotional code is provided, further packages will be unlocked and added to the available choices. Here are the screens that a new signup is taken through:
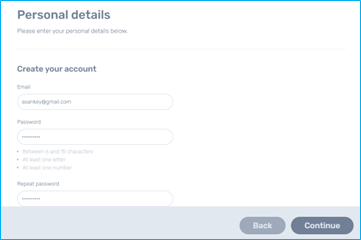
The next step is to provide Personal details such as name, address, email, and so on:
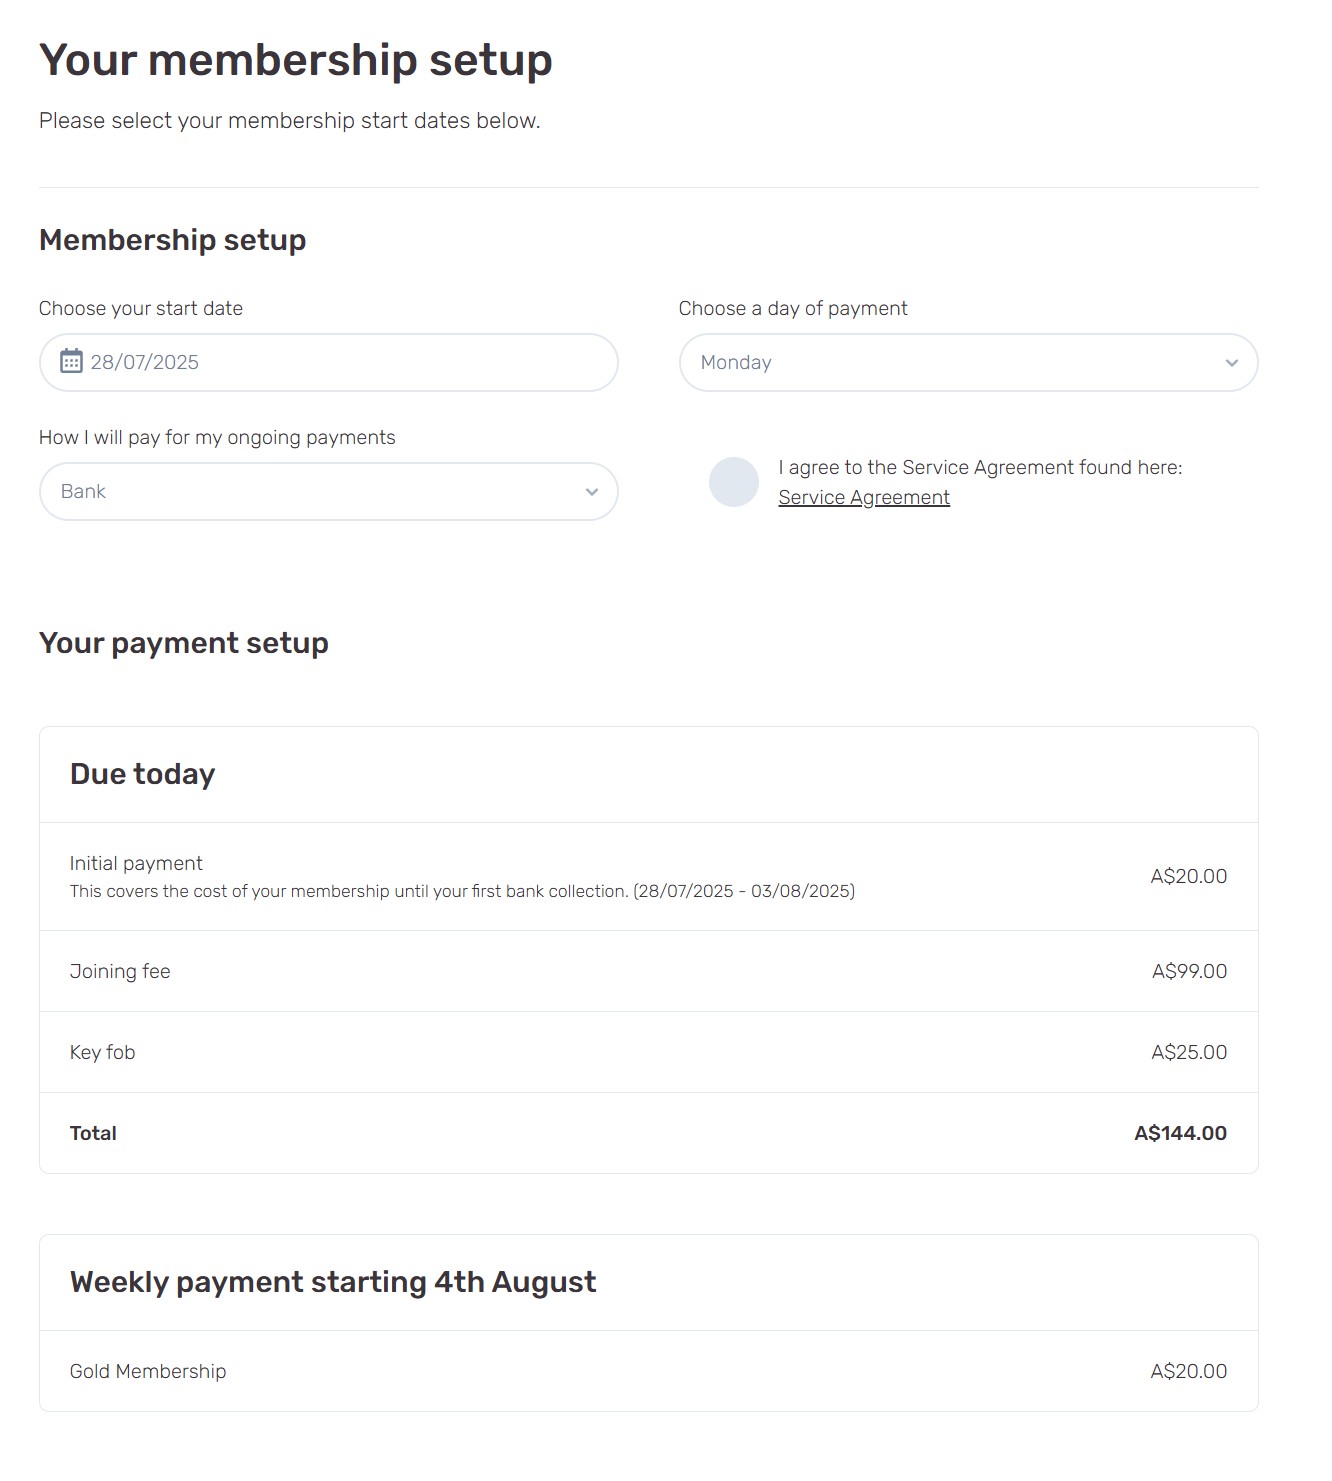
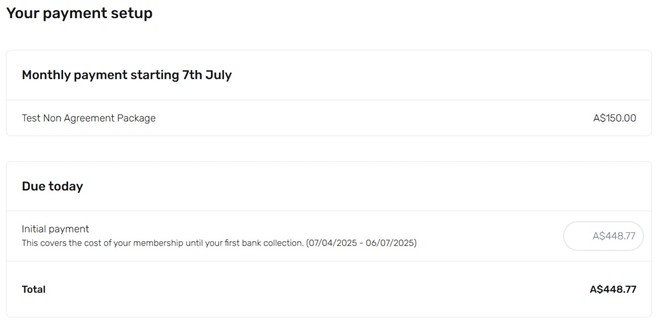
Once completed, signup advances to Membership Setup where the start date, preferred payment date (for ongoing payments where appropriate) and payment method are all setup.
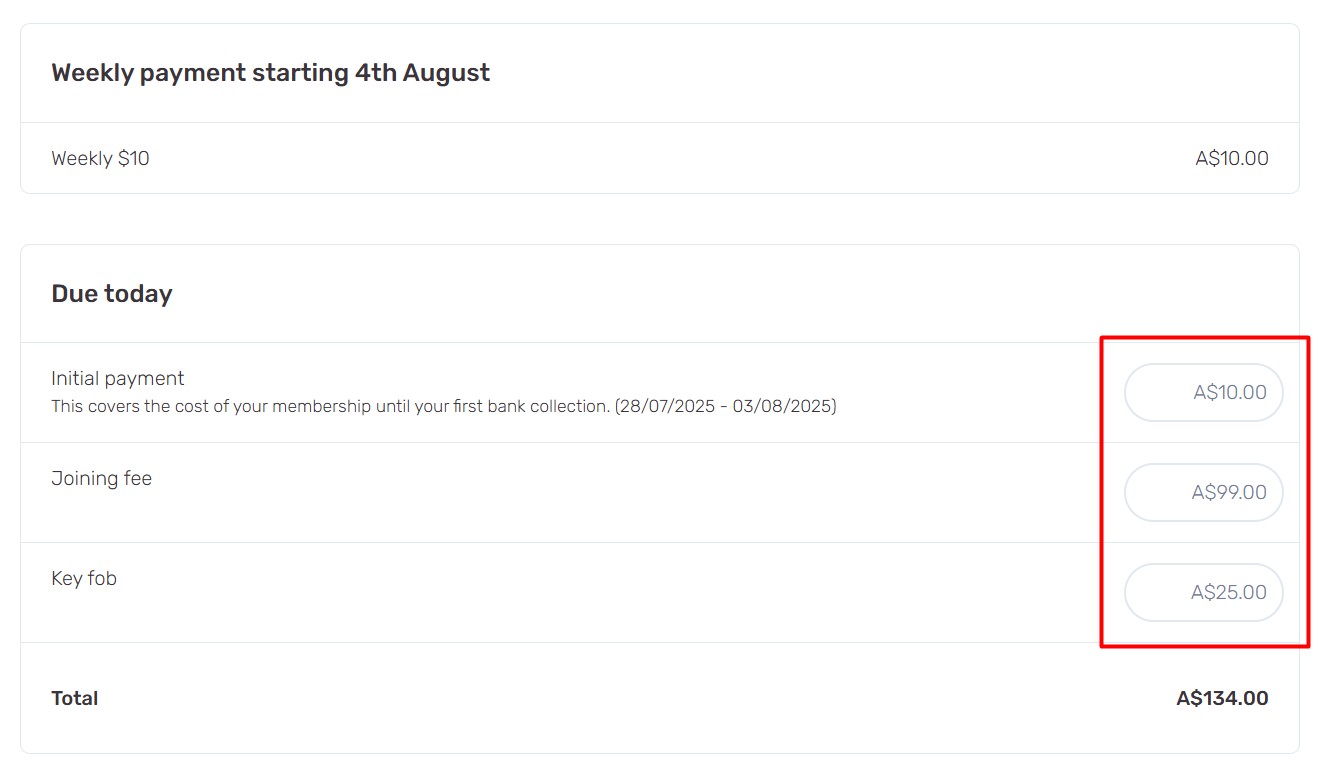
Any ongoing future payment, in addition to one-off, upfront costs will be itemised:
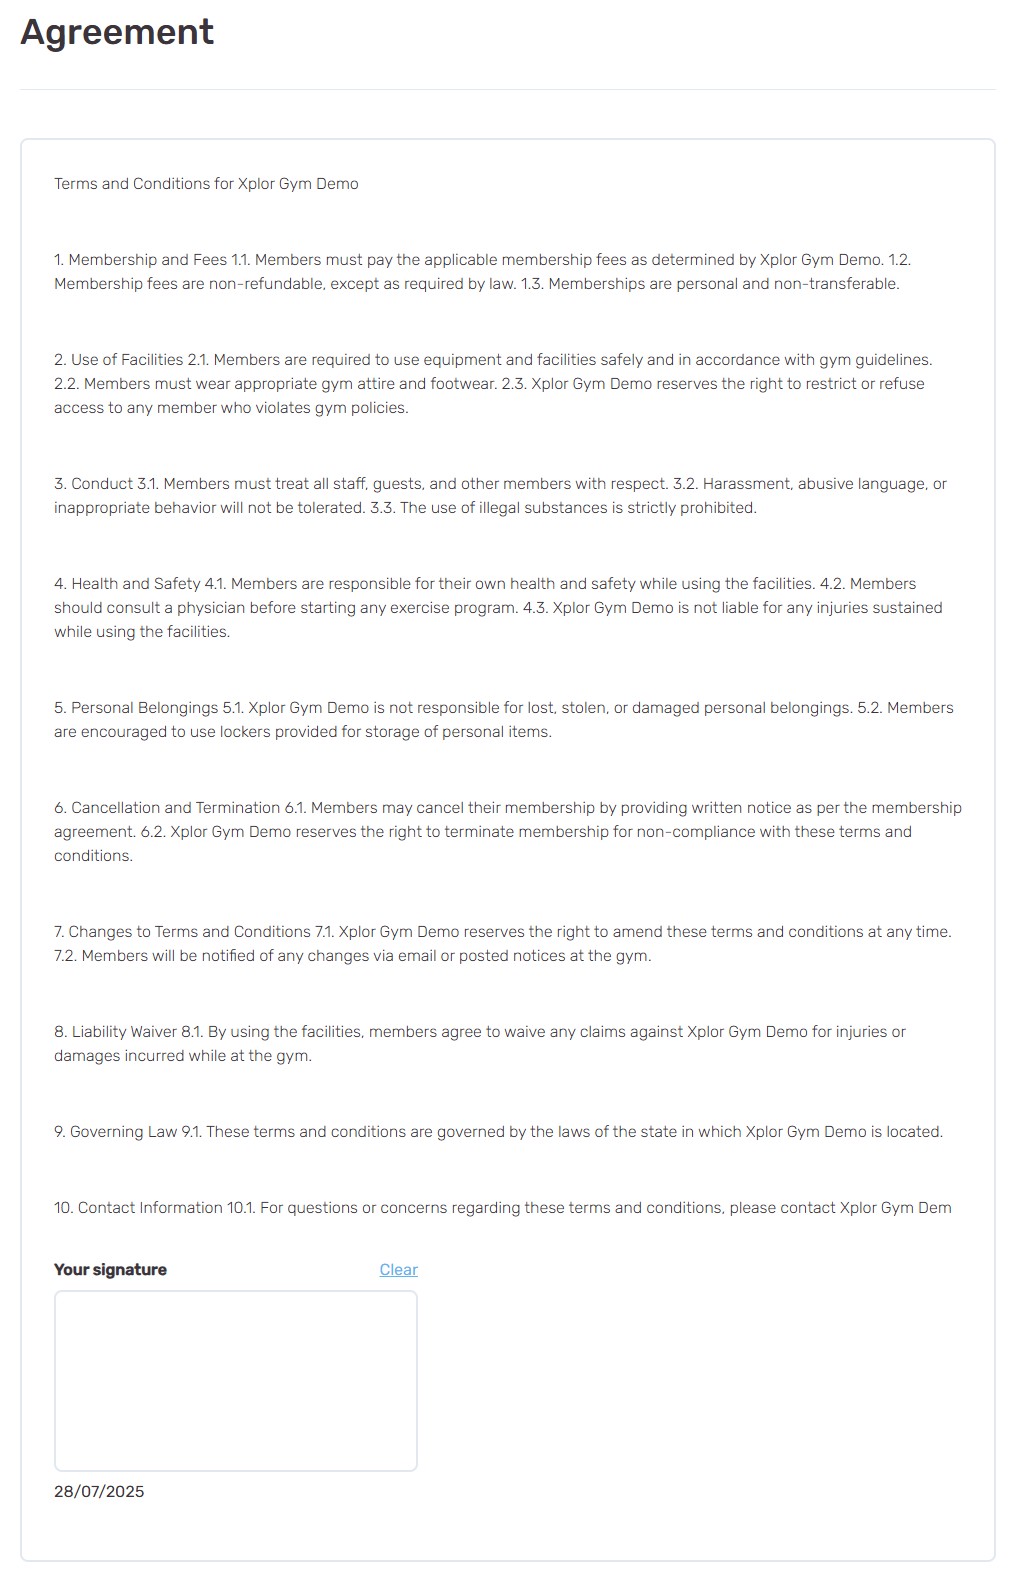
If the package includes one, a digital agreement will appear for the customer to acknowledge:
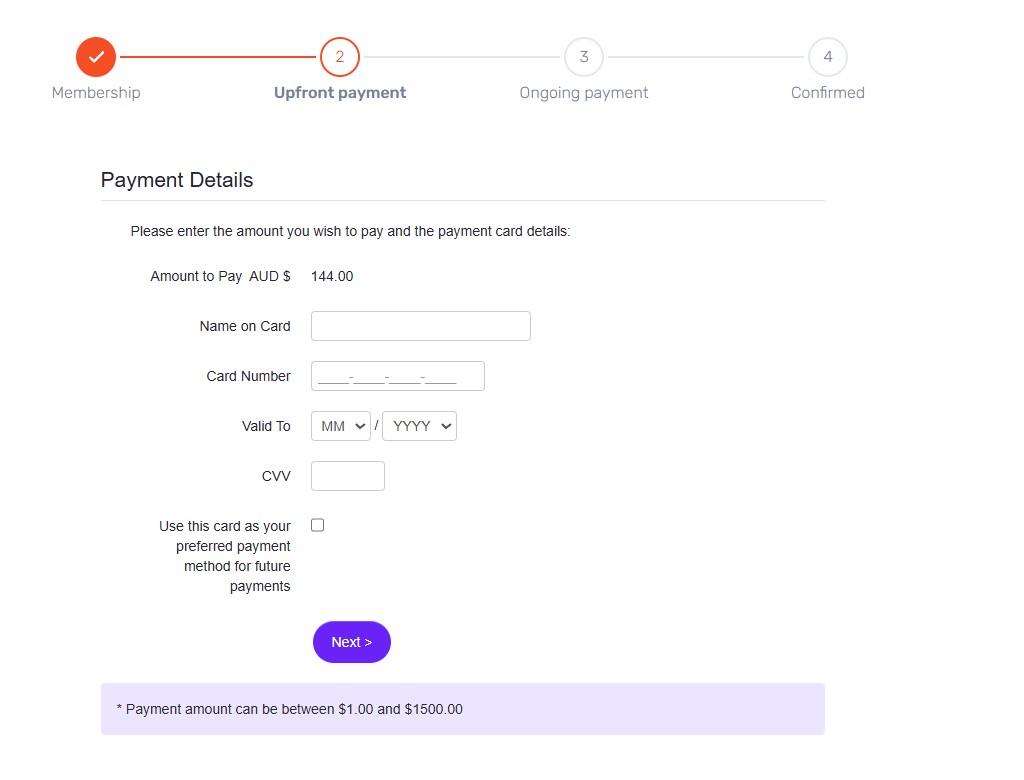
The Payment Details step will follow, where the signup needs to enter their card/bank details as appropriate:
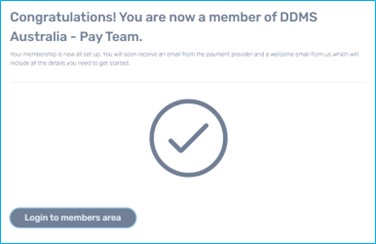
After confirming the supplied details, payment will be collected/setup and a membership profile will be created. The new member will be welcomed to the gym with an email to explain membership benefits and to provide a reminder of the password chosen during signup.
This can be used to login to a special membership area, a link to which is also provided on the final signup screen:
Online Signup Configuration
Clubs can customize several aspects of the signup process:
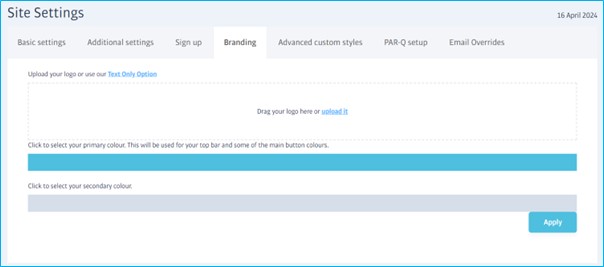
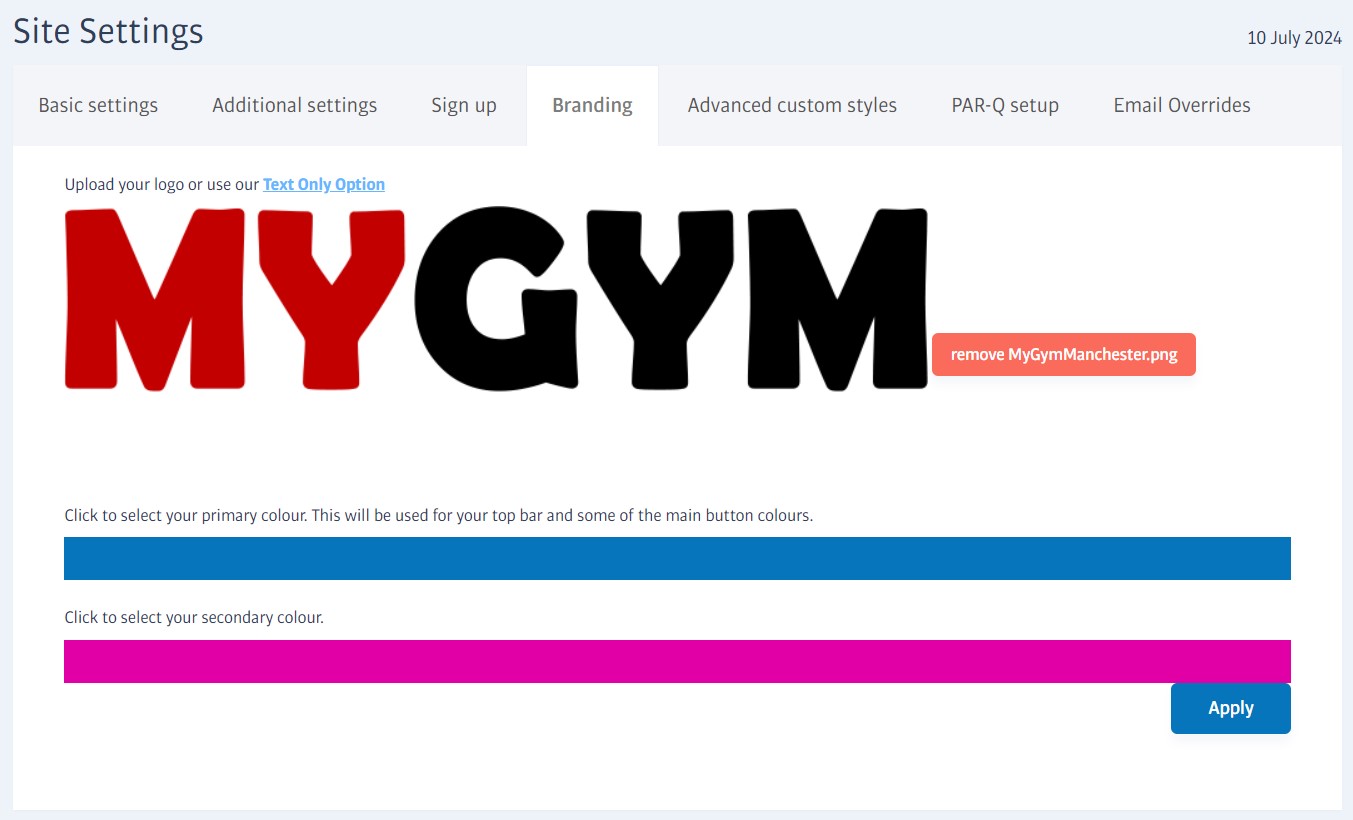
Site Branding
You can upload your gym's logo or customize the colour scheme used for the signup page. Head to Setup->Settings and select the Branding tab:
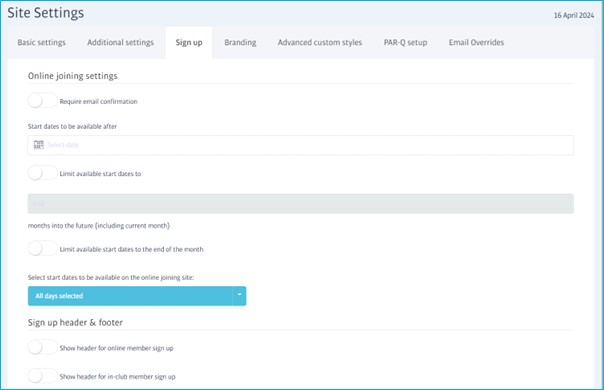
Other Settings
You also have control over some of the messaging used and the availability of starting dates. Look for the Sign Up tab in the same Setup->Settings area:
Web Dropoffs
Web dropoffs refer to anyone who has started - but not completed - the online sign-up process.
When enabled (and provided the signup had accepted the privacy policy), this type of partial signup can be logged by the system and emailed with a reminder to continue with their signup.
Enabling Web Dropoffs
Head to Setup->Additional settings to find the Web Drop Off Settings area:

If the setting is disabled, nothing will happen to the partial signup. Once enabled, you can set several time delays to control when they are mailed or turned into a prospect:
Time when a joiner becomes a web drop off [min] The delay in minutes after the failed signup is treated as a Web Drop Off
Time when an email to a new web drop off is sent [min] The delay in minutes before a new drop off is automatically emailed with a message urging them to complete their signup.
Time when the web drop off becomes a prospect [min] The delay between a new drop off being created and subsequently turned into a regular prospect if they do not finish their signup. This is typically a larger value to give them time to signup again (1440 mins = 24 hours)
Automatically delete web dropoffs that cannot be converted... Where a web dropoff has supplied an email address that is already used elsewhere in the system, the web dropoff can not be converted into a prospect, and will be deleted instead.
This will prevent the build-up of 'broken' web dropoffs but will not give operators visibility of failed sign-ups.
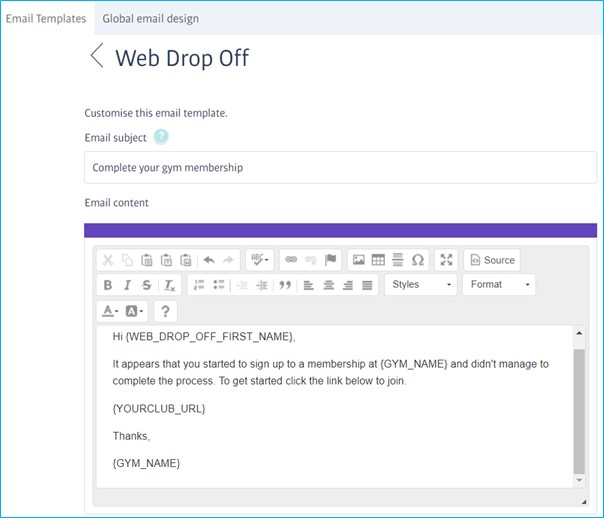
The email sent to web drop offs can be found/edited in the Setup->Emails area. The default email looks like this:
Rejoiners
Past members (i.e. those that have expired or cancelled memberships) can be signed up again using a Rejoin button on their profile:
Clicking Rejoin will jump to the familiar inclub signup process, with the added benefit that any fields will be pre-filled with relevant information where possible, taken from the existing member profile.
Finding Expired Members
Finding an expired or cancelled member profile is very straightforward, but they are hidden by default if you use the Members->View All Members option.
There are two main ways to find them:
Use the search bar at the top of the screen; this will return any matching member, prospect, or staff member, regardless of status.
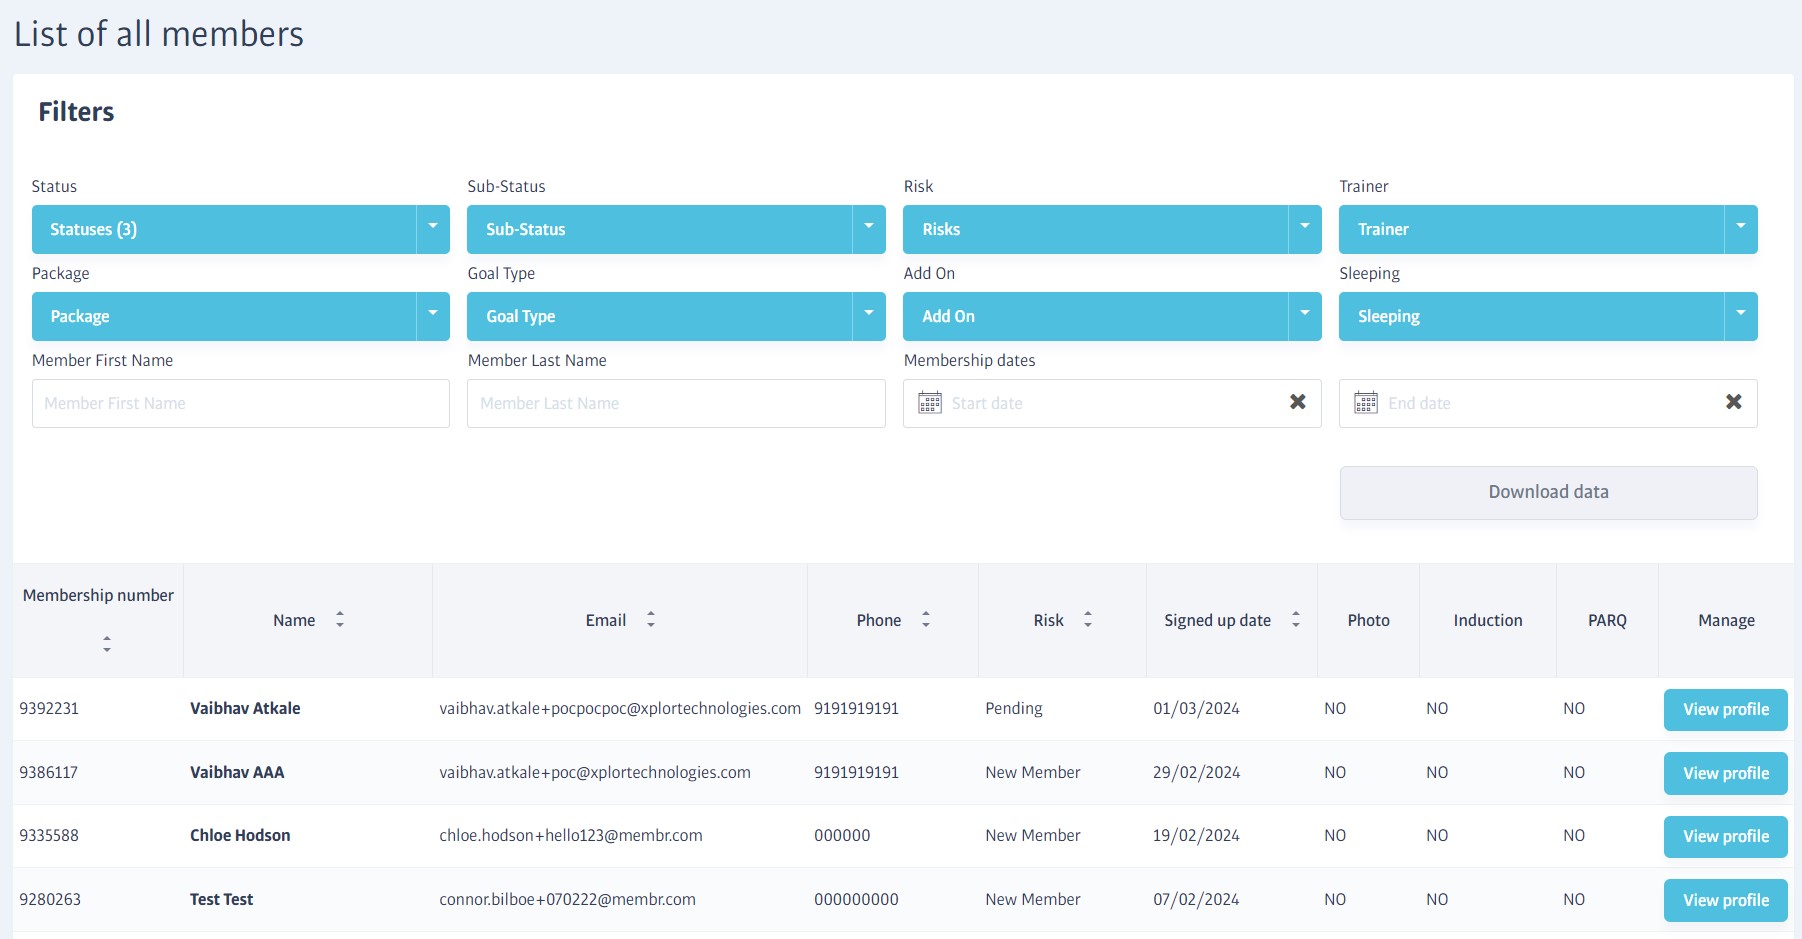
Use the Members->View All Members option, but adjust the filters (Active is selected default):

Members & Gym Access
Our Global Access System supports various entry methods, including QR code, RFID, and more. All types use a numeric code to identify members, either directly (e.g., a PIN they enter on a keypad) or indirectly (e.g., encoded in their keyfob or triggered by their fingerprint).
Consequently, each member has a unique code that can be viewed - and in some cases edited - in the access controls area of their profile, found just underneath the profile picture on their member profile page. This, as well as some other access settings, is initially hidden so that the overall Door access value can be seen more clearly - this will either be Enabled or Suspended:
Clicking Show more access controls will expand the remaining settings:
Warning
The access settings for this member will not operate as expected unless the Access status shows a green Synced symbol.
Keyfob
To issue a new keyfob, simply enter its number and hit the Update button, but note the warning about Access status above.
Access level
Provided the separate Door Access setting shows that access is Enabled, the exact doors that can be opened by this member (and when) are set using the Access level. The different types on offer can vary from club to club, and are set up when the access system is installed.
For example, there may be different access levels for male and female changing rooms, staff-only doors and so on. Here's an example of the types you might find:
Warning
Even if Door access shows that it is enabled, it is possible to choose an Access Level that does not actually open any doors - No access - choose this level if you want to disable gym access manually.
Access Status
Any changes you make to a member's Access settings (and some other member profile areas, see below) must be communicated to a separate server controlling the club's access hardware.
The agreement (or otherwise) between the two systems is indicated by a colour-coded status as follows:
| The two systems are synchronised - the access system has acknowledged the settings you can see in Membr and should work as expected. |
| Changes have been made in Membr (and communicated to the access system), but confirmation has not yet been received - your changes are not yet live. |
| This (much rarer) state can occur when there is a problem communicating any changes. Contact your Success Manager or raise a support ticket for help. |
Changes you make to any of the following settings will trigger an access update/Pending status:
Update/change keyfob
Update/change Access Level
Update/change membership package
Update/change the member's name
FAQs - Signup
A - Sure*! However, this isn't offered by default, it is enabled using a setting on the Sign Up tab in the Setup page:
When you turn this on, the signup will be offered payment dates spanning the next six months. Selecting any future dates will increase the amount of any initial payment to be collected immediately. However, as clubs can edit the upfront payment, this may be discounted or waived entirely at the club's discretion:
*Note that this only applies to packages with monthly payments - support for other intervals is planned.
Members & Memberships

The Members tab is the place to go to view and manage your members directly. It has everything you need to keep track of memberships, which members are active, when they last came in, and tools to reach out to them.
You can filter the list of members by different criteria, send them emails, manage their membership or payments, find out what bookings they've made, and much more.
Unlike the Reception screen, which only shows you who's checked in today, the Members area is a huge database that stores everyone who's ever been a member of your gym, even if their membership has ended. You can keep in touch with lapsed members and maybe interest them in another membership.
See the sections below to find out more:
Membership Packages - About
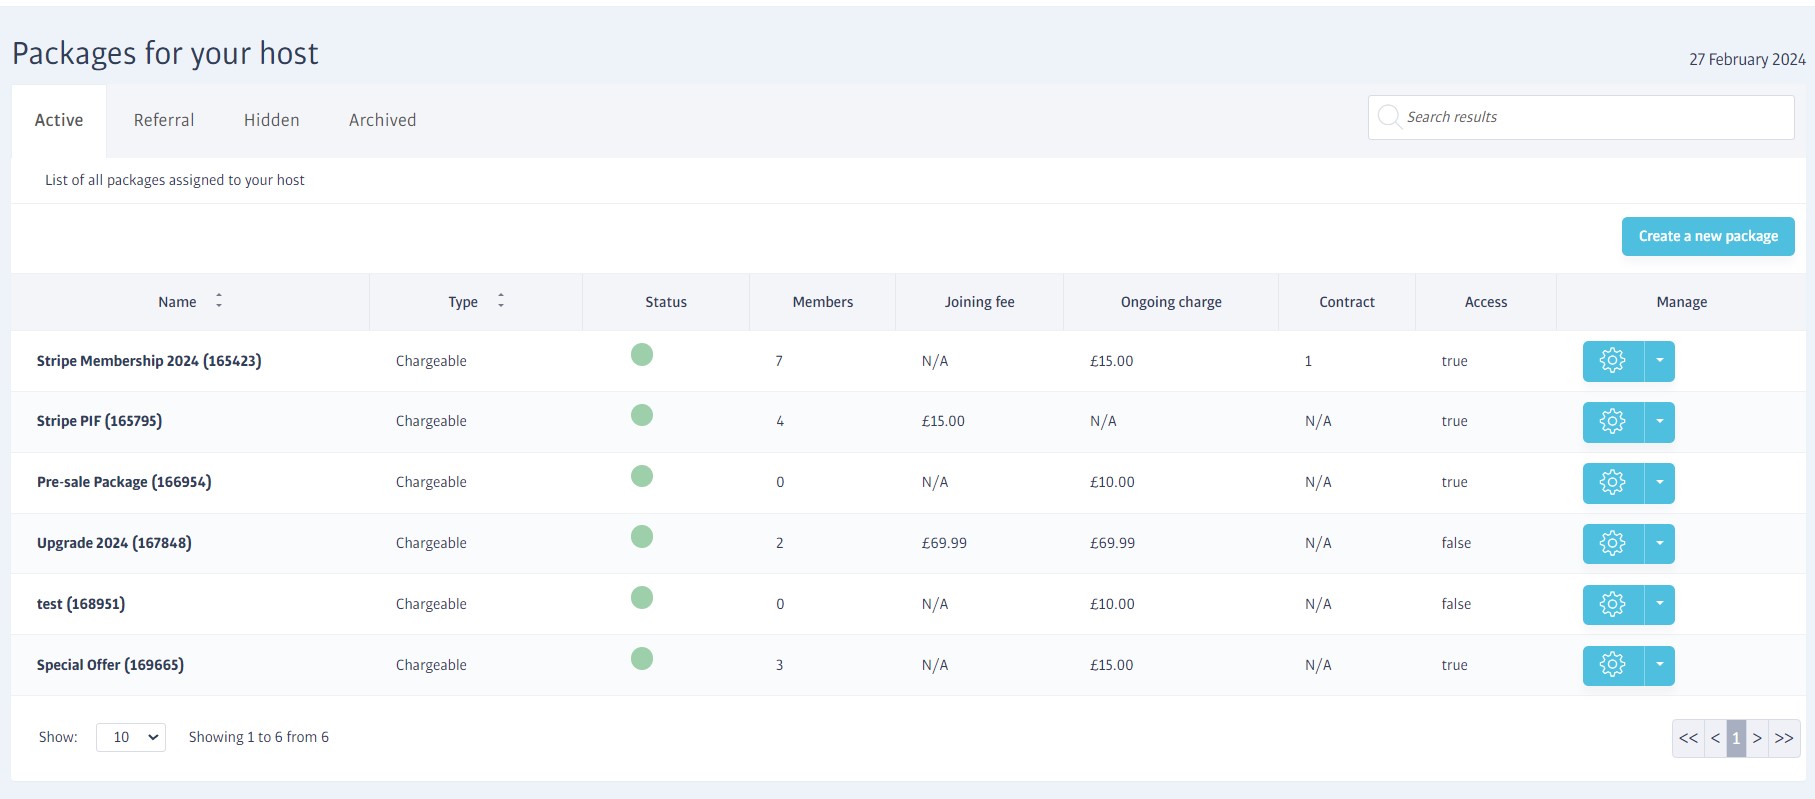
(Find this screen in Sales -> Packages)
A wide variety of membership packages can be created to suit different requirements, including:
Free, ongoing or Paid-In-Full
Ongoing packages can use weekly, fortnightly, four-weekly and monthly payment frequencies (where supported by the payment system used)
With or without additional fees, e.g. joining fees, keyfob charges
Fixed-term or ongoing contracts
New! Visit-based memberships* (often called 'concessions') - these provide a fixed number of visits, after which the membership expires.
*visit-based memberships are initially enabled in Australia and New Zealand only, but we can enable elsewhere by request; please contact your representative.
In addition, memberships can be upgraded using extras/upsells that are collectively known as Bolt-ons. These are comprised of Session Packs and Add ons.
All of your membership packages can be found on the Packages page and there are four different visibility types:
Active - Any packages that are live now. They may already have active members that have signed up to them, and are available for new joiners.
Referral - These packages are also available to new joiners, but are available only after typing in a referral code on the signup page.
Hidden - These packages are also available to new joiners, but are available only after typing in a special promotional code on the signup page.
Archived - These are no longer available to join, but can still have active members. These packages can no longer bemodified (but all the others can).
Note that all (non-archived) packages can always be joined in-club (using referral or promo codes where necessary), but only those packages that have been enabled specifically for online use will be available on your online signup site. This is set during package creation (or edited at any time later):

Package Options

You will see an options menu (a cog) to the right of any packages you've made. This menu gives you several options depending on the package visibility type.
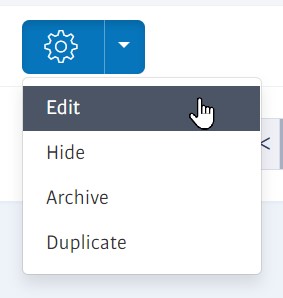
For Active packages, you can:
Edit the package to adjust most of its settings
Hide the package, which will prevent new joiners from seeing it or joining it without a special offer code
Archive the package, which will permanently hide it from joiners
Duplicate the package, which will make an exact copy of the package using the same name with the word (copy) added to it.
For Referral packages, you can:
Edit/Archive/Duplicate as per active packages, but note that you cannot hide a referral package.
For Hidden packages, you can:
Edit/Archive/Duplicate as per active packages
In addition, you can activate a hidden package to turn it back into an ordinary package visible to everyone.
There are no options for Archived packages.
Membership Packages - Creating
(Find this in Sales -> Add new package, or by clicking Create a New Package on the Sales->Packages page)
There are a huge number of settings you can adjust to fine-tune every aspect of membership! You can offer different payment frequencies, delay membership payments to offer free introductory periods, include or exclude up-front fees, offer visit-based memberships* (rather than time-based), and much more besides.
*visit-based memberships are initially enabled in Australia and New Zealand only, but we can enable elsewhere by request; please contact your representative.
There are five steps in total to define a chargeable membership package, let's go through what's available:

Basic details step
Package Name - The package's name, as it will appear on your sign-up page.
Category - The type of package - this field is limited to 'membership' at the time of writing, but others may become available.
URL - This is auto-generated, and based on the package name so you can just skip the field.
Description - A brief description of the package's content - try to keep this fairly short as it needs to fit in the small package 'tile' on the signup page.
Type - Public, Private or Referral as described in Membership Packages - About
Should this package be chargeable? - Choose whether the package is free or not. (Visit-based memberships - where supported - are only available if this is set to yes)
Should this package have an agreement? - enable this and then select one of the predefined membership agreements from the drop-down as appropriate.
Is this package going to apply to more than one of my facilities? - Enable this and choose which other branches to use if you have more than one facility, otherwise leave unchecked.
Should this package be available for online joining - if you enable this, the package will be visible to members trying to join online. If you switch this off, the package will only be available in-club.
Tax Type - Your club should have one or more types already defined - choose the rate that should apply.
Product Code - Choose an optional product code for this package (used in some reports).
Freeze product code - Choose an optional freeze product if you want to charge a reduced fee during membership freezes. (The product you choose also sets the price to use).
Key Fob Product Code - Choose an optional product code from the drop-down.
Joining Fee product code - Choose an optional product code from the drop-down.
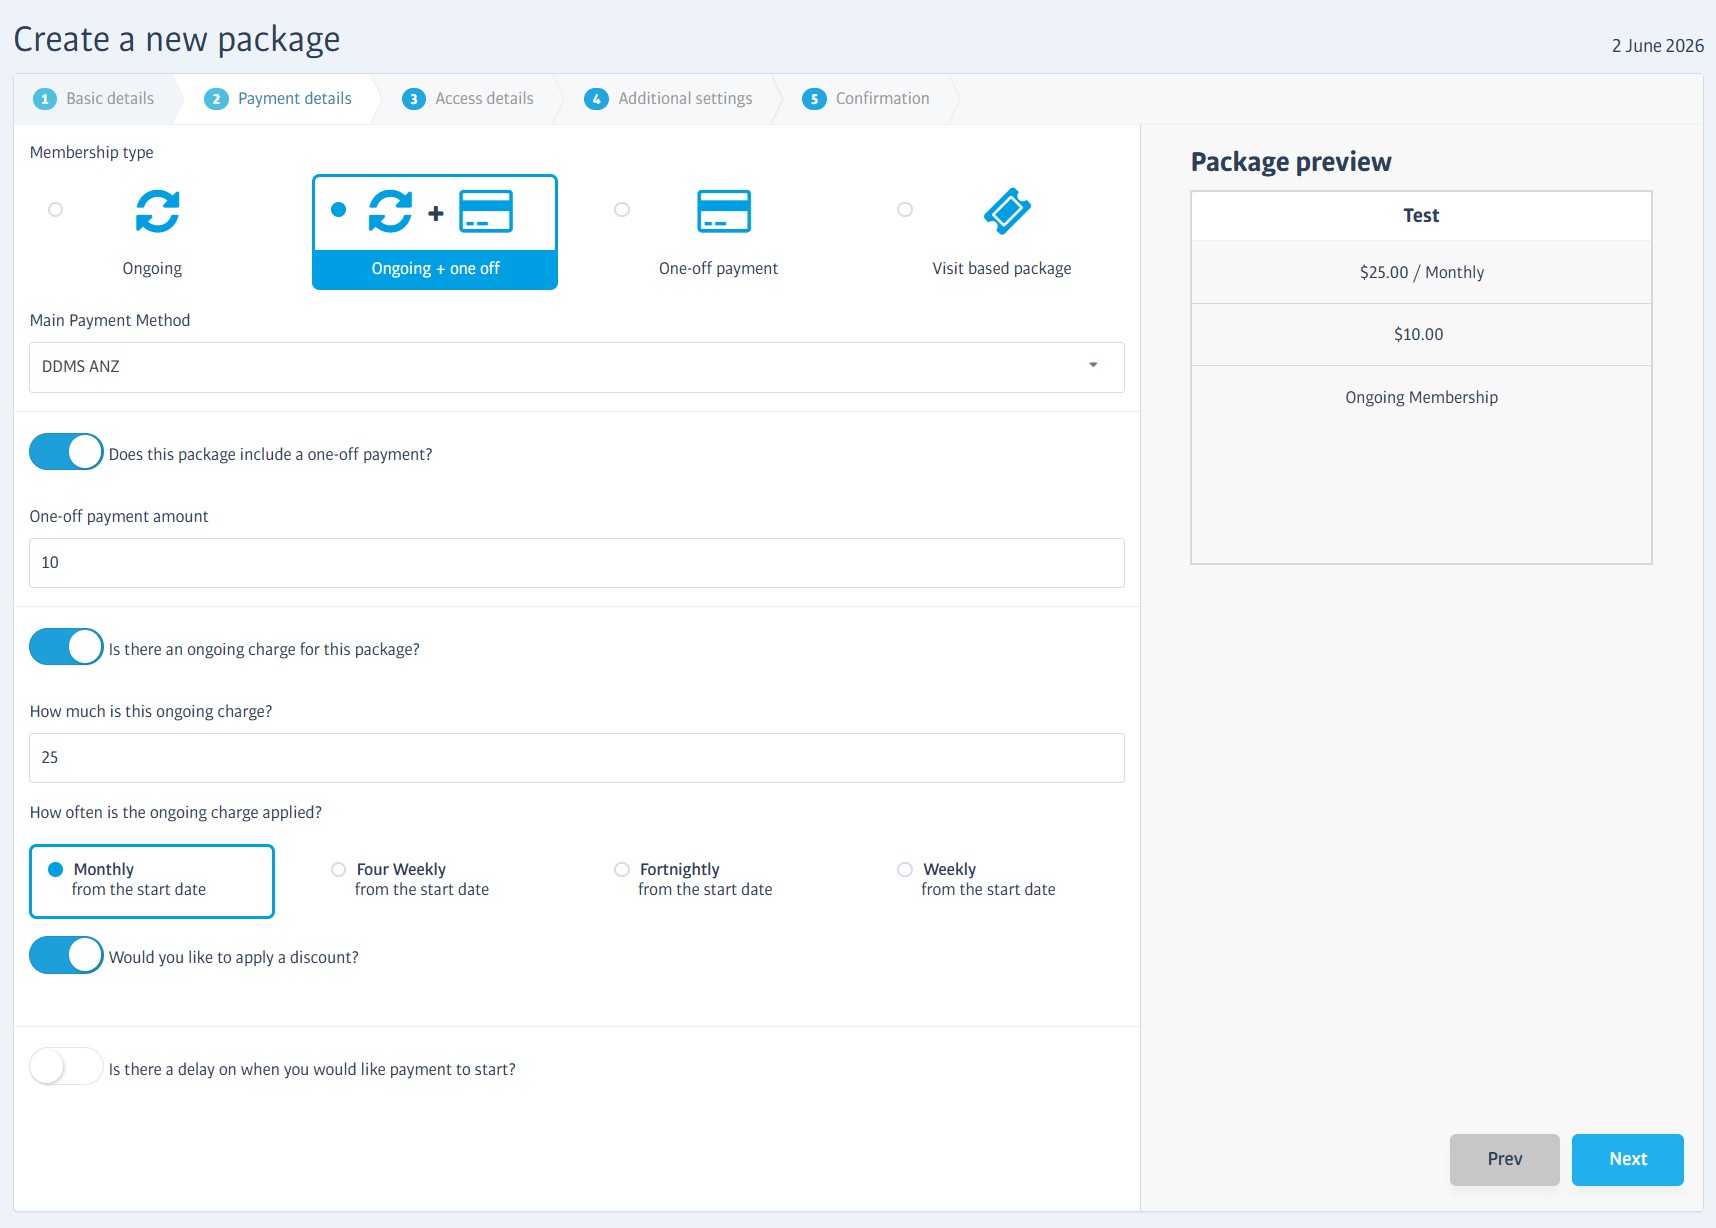
Payment details step
Membership Type - Up to four main types are offered, depending on the installation - not all types are available in all clubs. These include Ongoing (e.g. by regular direct debit), Ongoing and one-off (e.g. regular debit + up-front charge), One-Off only (e.g. up-front charge only), and Visit-based (e.g. to provide a fixed number of visits, after which membership expires)
Main Payment Method - Select the payment integration to use. Use In-club for an immediate POS payment, or select a payment provider, such as DDMS, to schedule a bank transfer/subscription.
You can go on to define the ongoing charge and/or one-off payment as appropriate, in addition to selecting payment frequency (e.g. monthly, weekly, etc.).
- If you would like to offer a free period of membership, you can optionally delay the first payment by a fixed duration, or set it to begin on a certain date.
- If you choose a visit-based package, you will need to provide the number of visits included in the package.
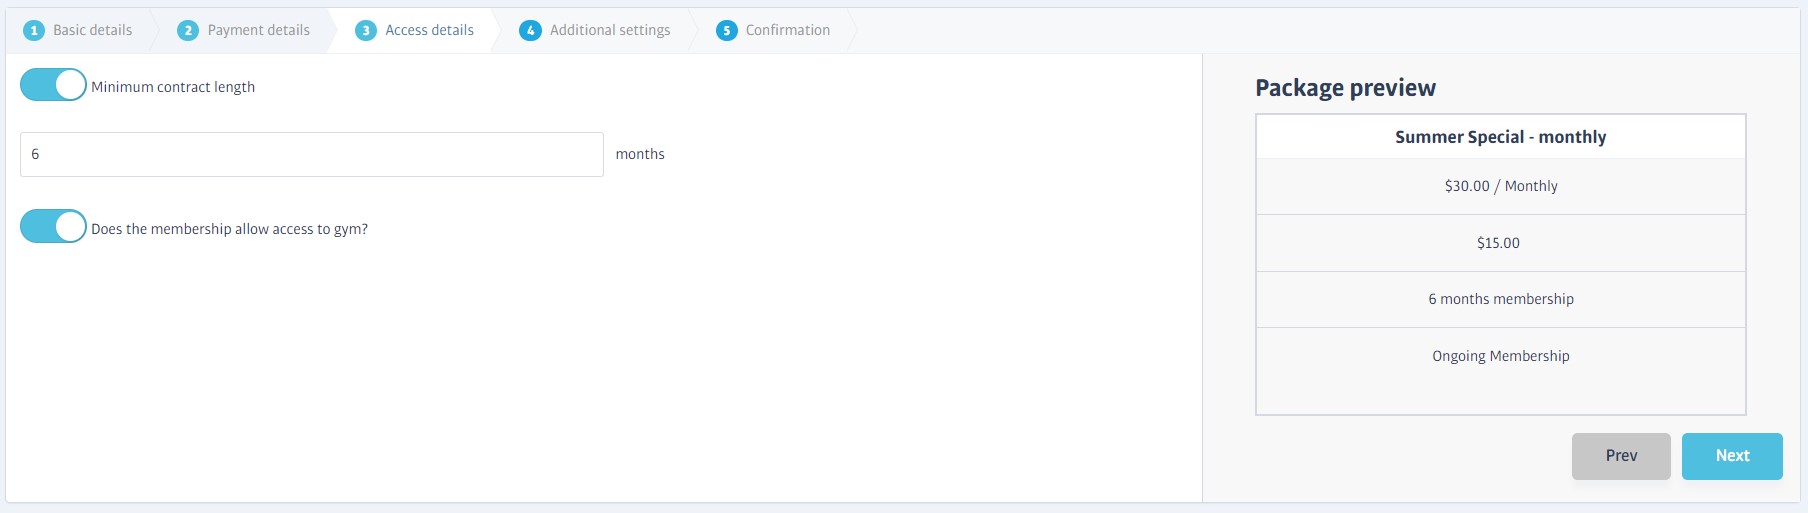
Access Details step
Minimum Contract Length - this specifies the minimum contract length for a membership with an ongoing payment commitment. (This field changes to an expiry date if there is no ongoing element.)
Allow access - this determines if the membership allows access to the main exercise/equipment area or not (you might want to create a classes-only package that excludes access to the main gym, for example)
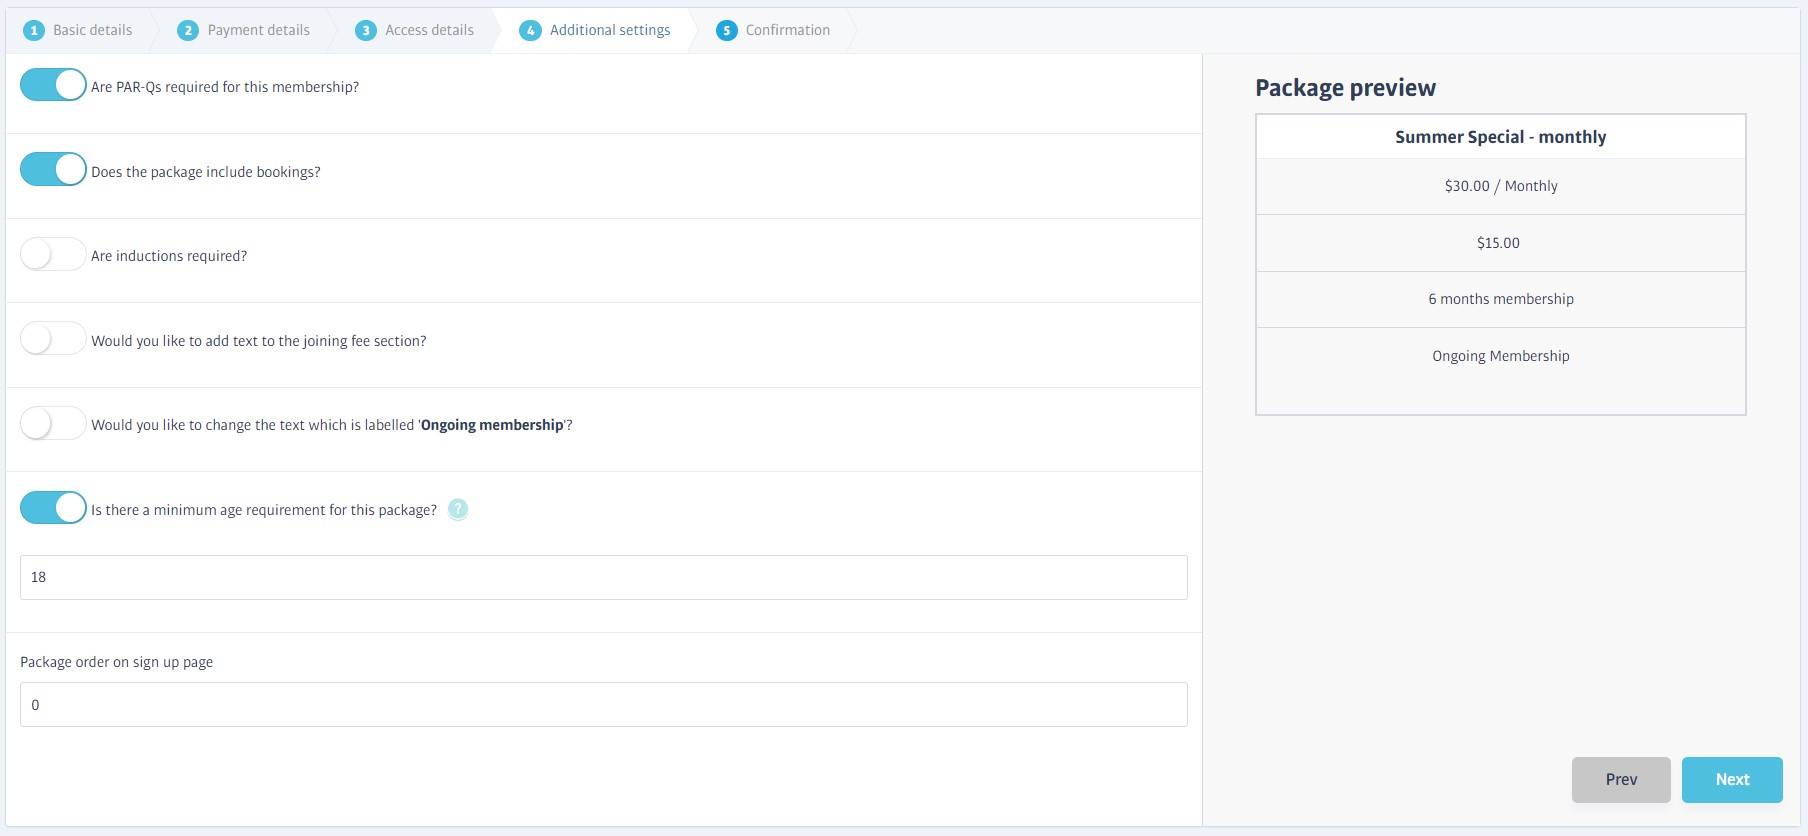
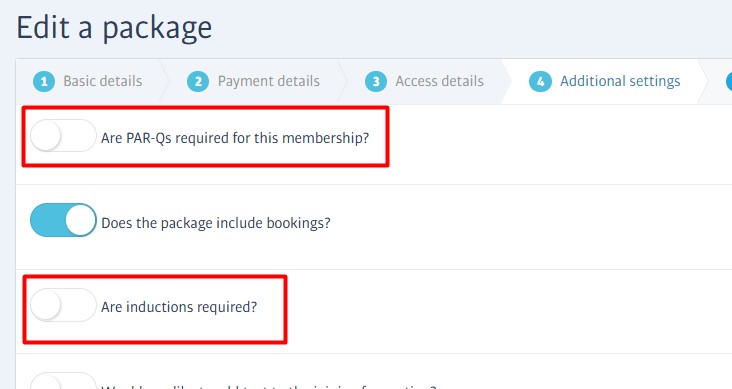
Additional Settings step
Here you can adjust the finer details of the package by turning features on or off to suit, such as the need to complete a PAR-Q form, minimum age requirements etc. You can also change how some of the text will appear in the package's 'tile' as shown in the preview on the right of the screen.
Note
Does this package include bookings?
Memberships can include bookings or exclude them, but all members can potentially join a booking/class if they want to; this setting dictates how they will be charged.
Note
Package Order On Sign-up Page
'0' is the first package to feature on the sign-up page. As all packages default to '0' when they are created, they will appear in creation order (newest first) instead. If you want an older package to appear at the top of the page, for example, you could set a higher number here.
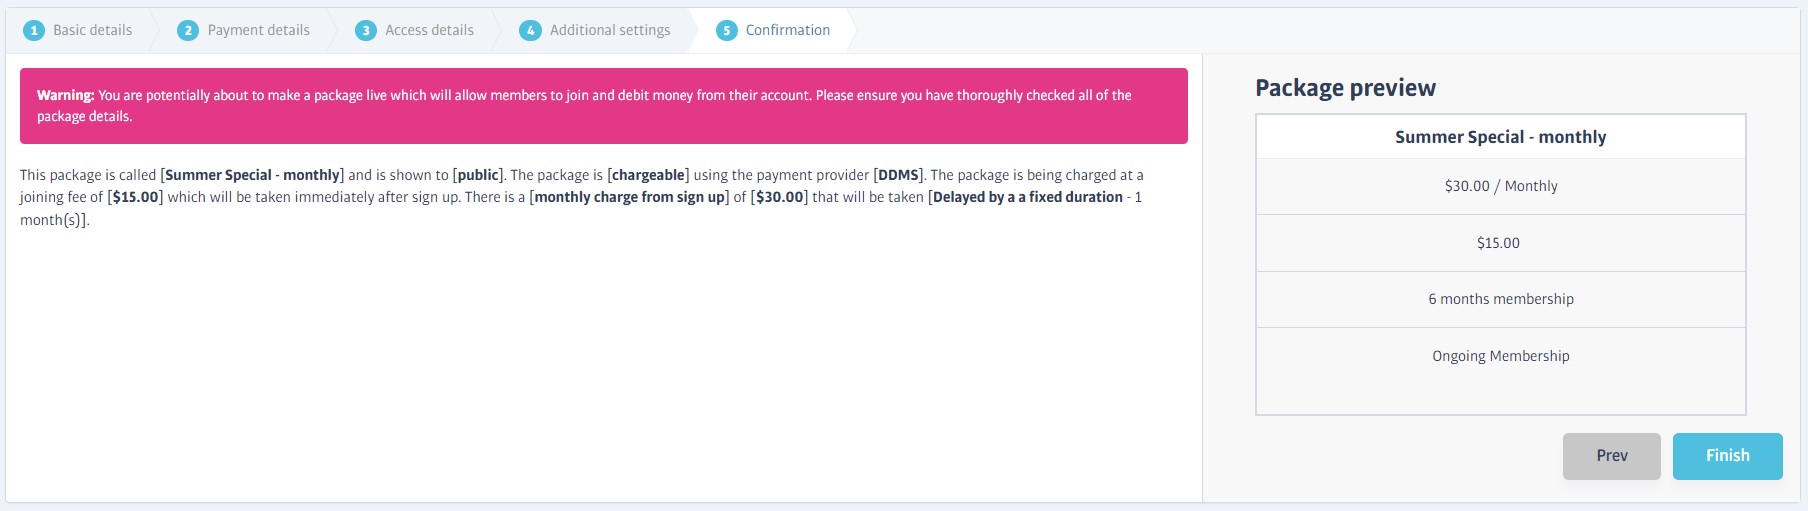
Confirmation step
The final step gives you the chance to review the main settings you made, and gives you an opportunity to make changes (click on the step numbers to visit the previous tabs) before the package is created and offered to members according to the visibility setting you chose.
PAR-Qs & Inductions
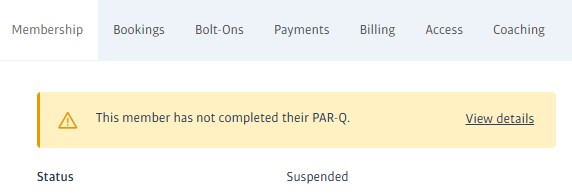
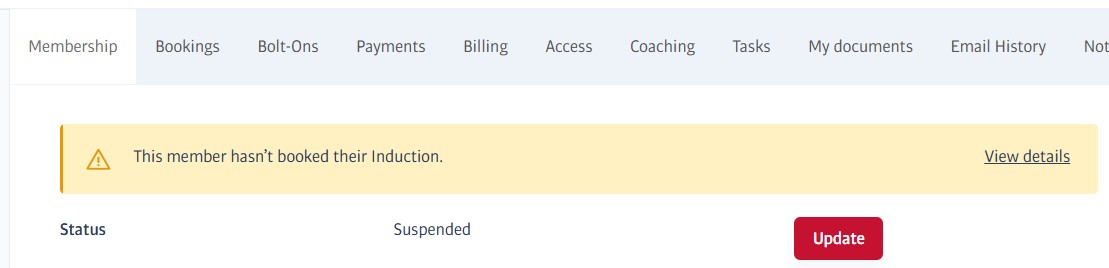
All membership packages can optionally require a PAR-Q, an induction, or both. New members will not have access to the gym if either of these is required (but not satisfied). Their status will initially show as Suspended, and the reason(s) will be displayed on their membership tab:
In addition, a summary of either, where required, is displayed in the member's sidebar:
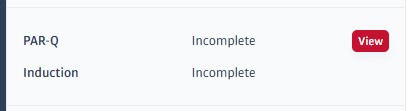
For the member to become Active, the condition(s) need to be met; complete the PAR-Q and/or an induction. Staff can optionally complete a PAR-Q on a member's behalf, or waive any restrictions at their discretion, explanations below.
The PAR-Q, or Physical Activity Readiness Questionnaire, is a short, straightforward set of self-administered questions that aim to identify any potential health risks or concerns before a person starts any physical activity, such as an exercise program.
Clubs can make the completion of a PAR-Q a condition of membership by enabling the setting below (when creating a membership package):

New members who join such packages will initially be in a Suspended state until their PAR-Q is completed and passed.
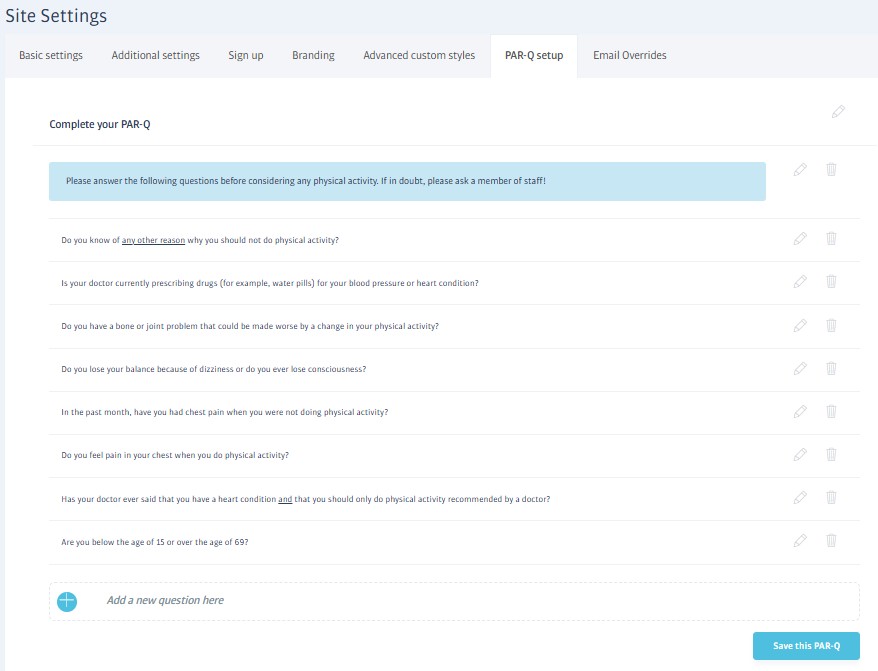
A standard set of questions is generally set up at each club as part of the onboarding process, though club administrators are free to edit these or add further questions if required.
The questions take a yes/no format and are all designed to be answered in the negative for a pass. If any questions get a positive answer, the PAR-Q is failed, e.g. "Do you feel pain in your chest when you do physical activity?"
Head to Setup->PAR-Q setup to make changes to the questions at your club:
Completing a PAR-Q - Members
New members who need to complete a PAR-Q can do so by logging in to their unique Member's Area, details of which they will receive when they sign up. See The Members' Area for details.
Completing a PAR-Q - Staff
If the member gives consent, a member of staff can complete the PAR-Q on their behalf. Clicking either of the View or View details buttons in the related warnings will open up the following window:
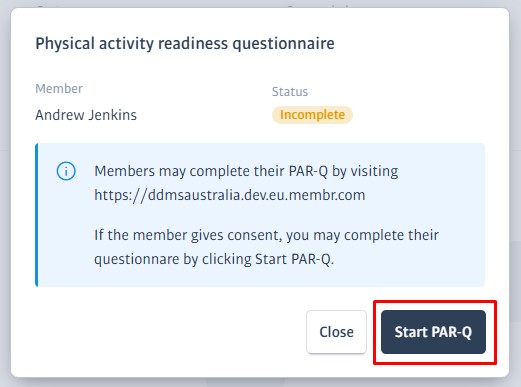
When a completed PAR-Q is successful
If all the answers to the PAR-Q questions are negative, the PAR-Q is passed, and the member is able to continue - if they were suspended solely due to an incomplete PAR-Q, the suspension will be lifted and they will become Active.
Inductions are typically used to achieve one or more of the following:
Welcome a new member to the gym,
Give them a tour of the facility
Advise them about other services and upgrades,
Demonstrate safe operation of equipment,
Establish fitness goals, and build/work through a suitable workout or fitness program.
New members who join packages with an induction requirement will start in a Suspended state, and a suitable warning banner will be displayed on their membership tab:
Clicking the View Detail link will open a dialog to allow you to head to the booking calendar, or to skip the induction completely:
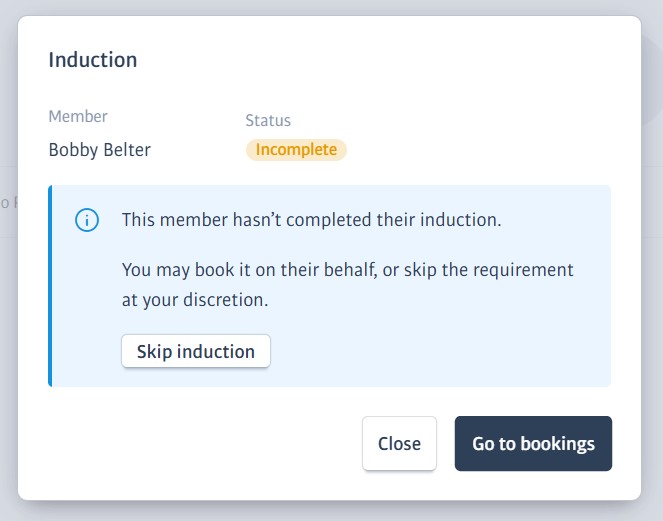
Booking an Induction
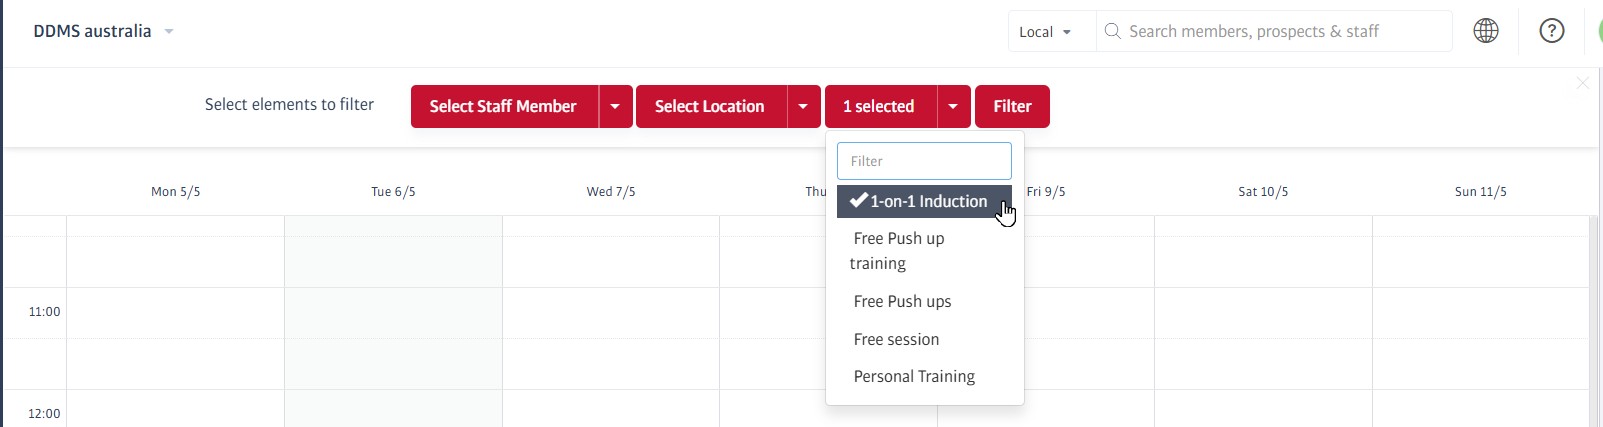
Where a member has yet to book an induction, you should head to your Booking Calendar to find a suitable induction slot for them.
Your club might use a particular colour scheme to make inductions easier to spot on the calendar, but you can always use the View Filter to show only inductions:
Once you book a suitable induction for the member, their membership tab will confirm the booking details, but they will remain suspended until they attend:
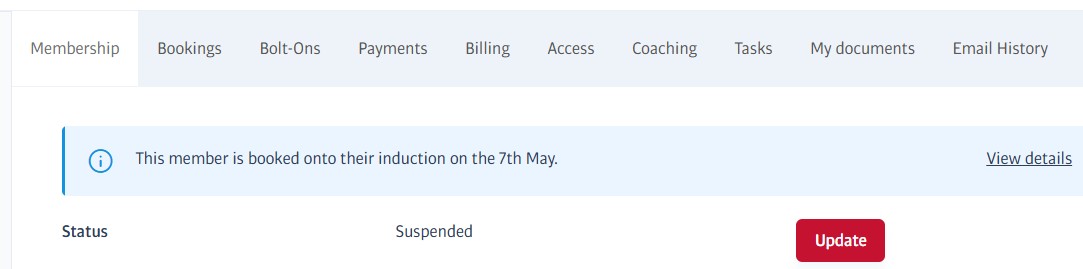
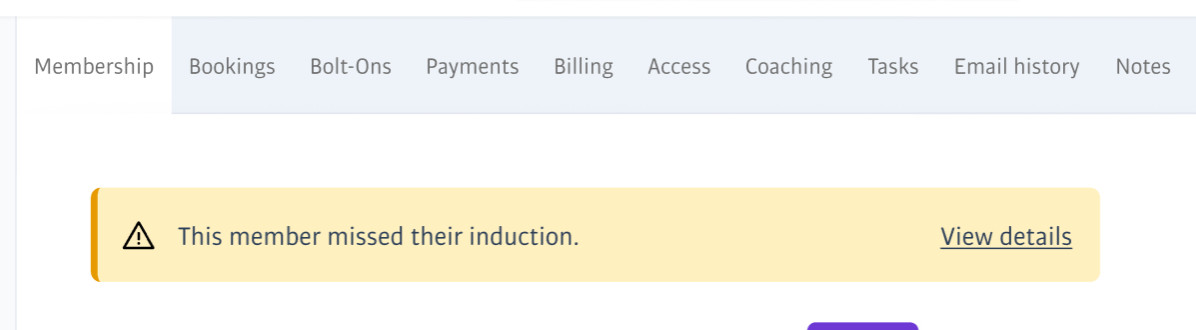
When an Induction is Missed
If a member misses their induction, they will remain in a suspended state and a suitable warning message appears on their profile:
Skipping an Induction - Staff
Staff can skip the induction at their discretion.
Clicking the View Details link on the induction warning message will open a window allowing the requirement to be skipped. Doing so will add a note to the member's profile and mark their induction as skipped in the sidebar.
If the lack of an induction was the only reason for a Suspended state, the member will also be made Active.
Skipping an Induction - Members
Inductions can be set as mandatory or optional during package creation. If the induction is mandatory, the member must attend it.
However, the member can skip an optional induction when they log into their member's area.
Attending an Induction
When the member comes to the gym to attend their induction, they will still be in a suspended state. A member of staff will therefore need to admit them manually.
Once the member has attended their induction, the member of staff needs to find the relevant induction on the bookings calendar and mark the member as attended:
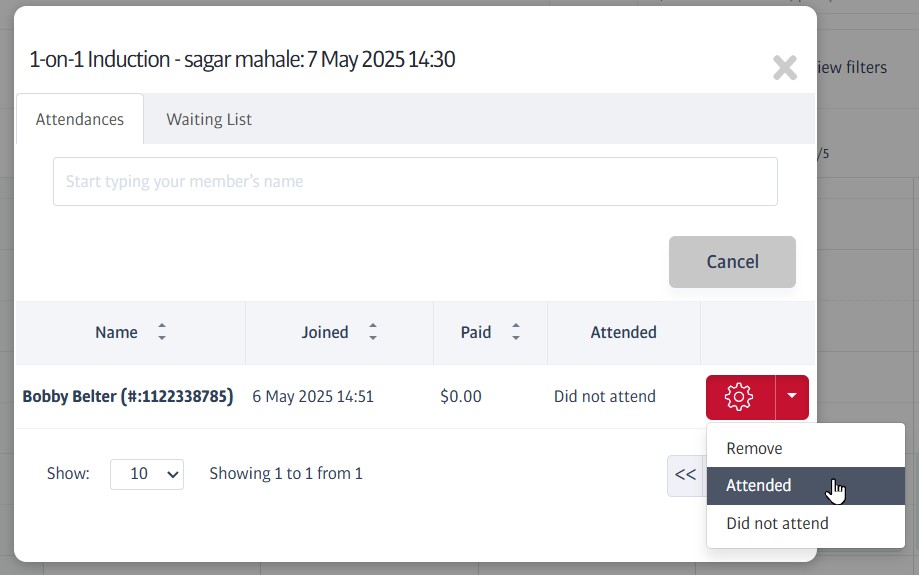
Again, if the lack of an induction was the only reason for a Suspended state (i.e. no PAR-Q restriction), the member will be made Active.
Membership Bolt-ons

Membership Bolt-Ons are additional items you can sell to members to enhance their membership. They can be sold on a one-off ('PIF'), or a recurring basis dependent on gym configuration. There are two main types:
Add-ons - these are things which directly improve or enhance the membership experience at the club, such as fresh towels, water, tanning, locker rental etc.
Session Packs - these are packs of credits to spend on chargeable bookings such as classes or private coaching. One session credit equals one chargeable event on the booking calendar.
Both types are created, managed, and sold in a very similar way, however, they are not both used in all regions, so you might not see some of the related menu options. Where enabled, the main Bolt-on options can be accessed from the Sales menu. Here you create suitable templates for the add-ons and session packs you wish to sell. However, bolt-ons are sold from the member profile:
If Bolt-ons are enabled at the club, they can be sold directly from a member's profile. Locate the member profile to use and then select the Bolt-Ons tab to get started. Either or both types will be available here, depending on club configuration:

Clicking the Buy new session pack/Buy new add-on button will slide out a panel to list the types defined at the club. Again, depending on configuration, a range of PIF and/or ongoing types will be listed.
When the member has purchased a bolt-on, their session packs or add-ons will appear on the corresponding tab:

You can get an overview of your available add-ons (or add more) by accessing Sales->Manage add-ons:
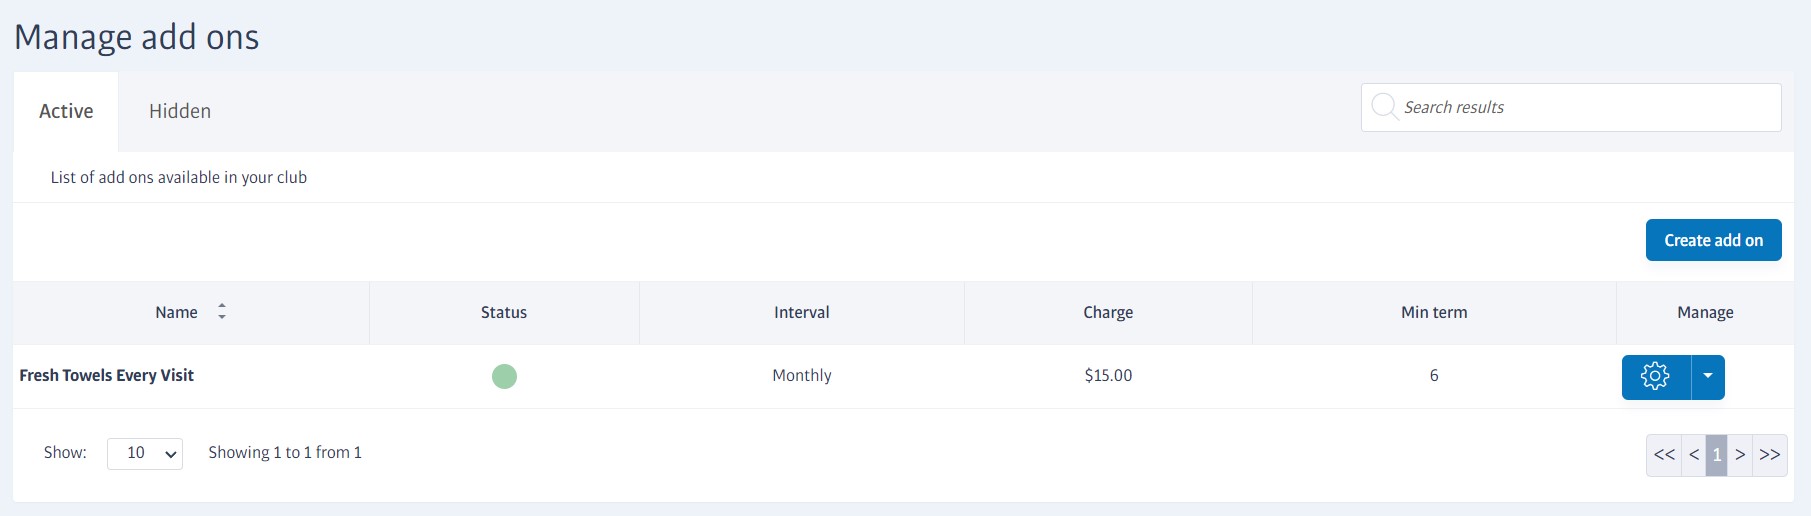
Using the settings menu next to each add-on, you can edit its details, or choose to hide it. When an add-on is hidden, it won't be offered for sale, and can be found on the Hidden tab shown above.
Items on the Hidden tab can be Activated again from a similar menu.
Head to Sales->Manage Session packs for an overview of the packs available at the club, or to create more:
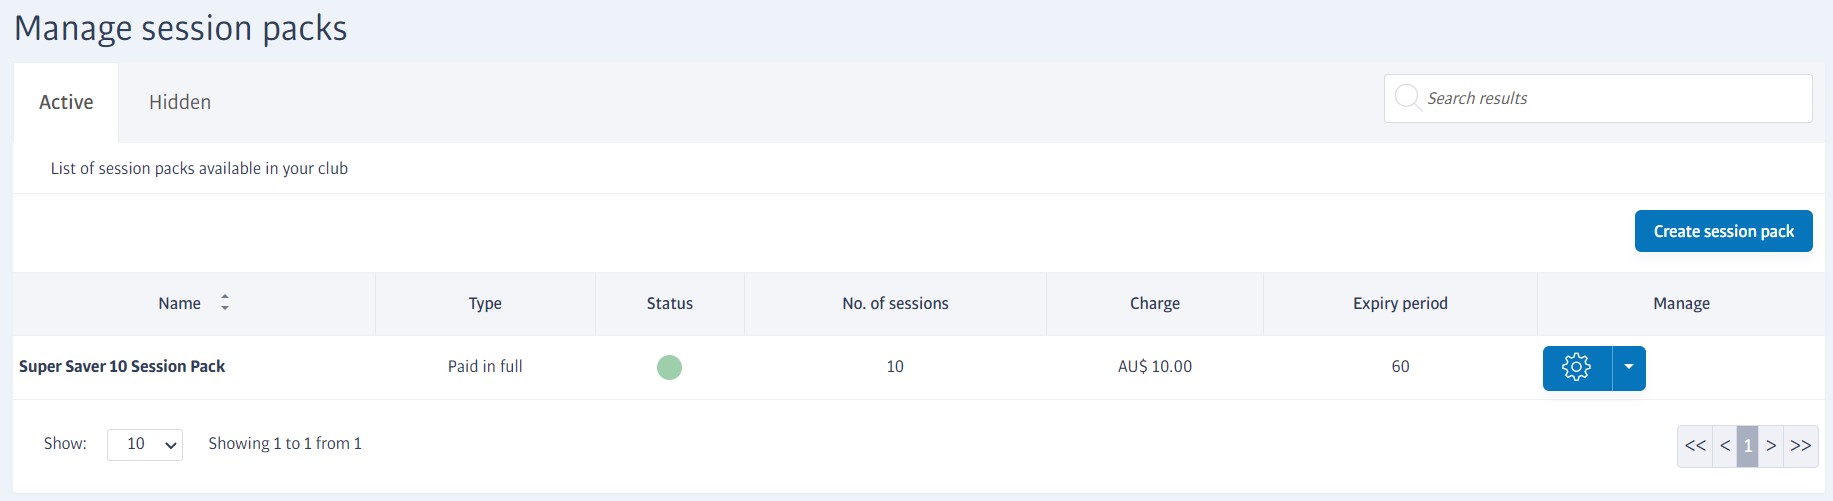
Using the settings menu next to each pack, you can edit the pack's details, or choose to hide it. When a pack is hidden, it won't be offered for sale, and can be found on the Hidden tab shown above.
Packs on the Hidden tab can be Activated again from a similar menu.
Special Offers/Promoting Packages
Though anyone can potentially join your Active membership packages, you can also create special hidden packages that might offer various incentives too. These hidden packages can only be accessed using special Promo Codes to unlock them.
You can then market your Promo Codes on social media or through the press, for example, and even limit the promo code start or end dates so that new members only have a limited time to respond.
Your hidden packages might offer reduced rates to attract members maybe, but there are many other package settings you can adjust to make them more attractive, possibilities include:
Waive any up-front fees such as joining fee and/or keyfob fee
Include free access to classes (if your classes normally have a charge)
Delayed first payment (e.g. first month free)
No minimum contract
To get started with promo codes, you'll need to have one or more packages that are Hidden as opposed to Active. See Membership Packages - Creating for more details.
Tip
You can duplicate and/or convert Active packages into Hidden packages easily using the options menu next to each one, see Membership Packages - About for more details.
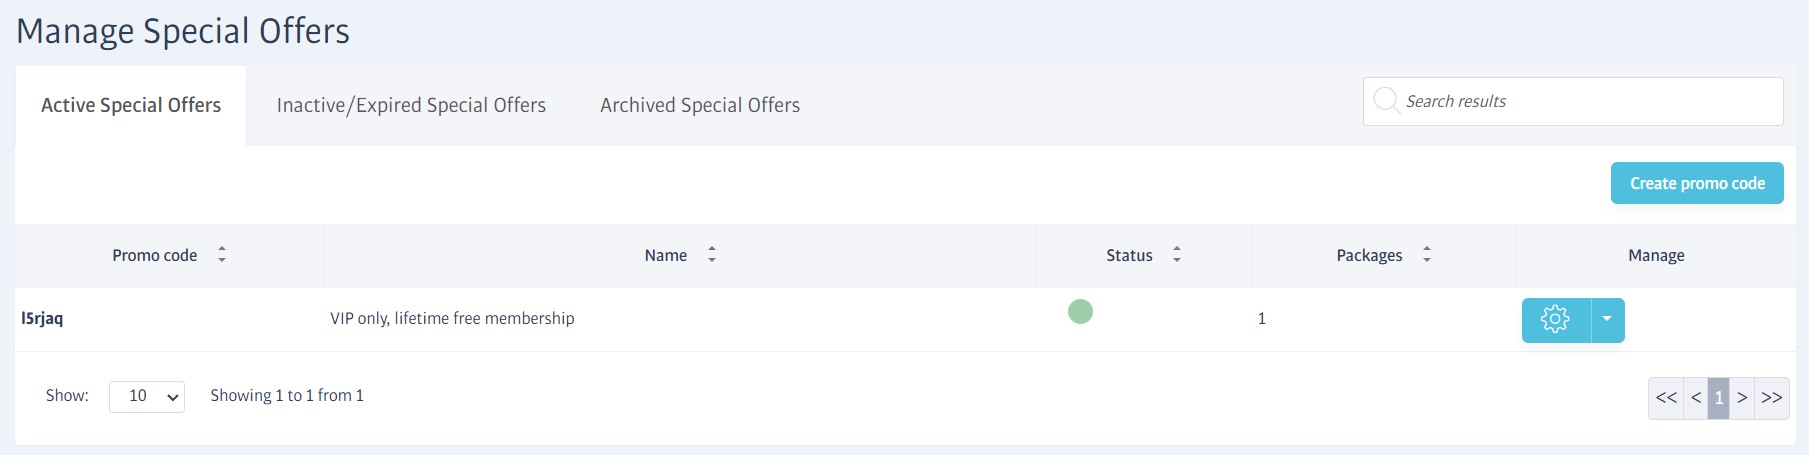
Creating a Promo Code
Head to Sales->Special Offers and click Create Promo Code to get started. The following fields will need to be completed:
Name - This is a descriptive name for the promotion that you can easily recognise later. This is purely for your use and is not the code given to sign-ups.
Code - This is the code you'll promote to new joiners, and that they can enter to unlock the package(s) it relates to. Note that the code cannot contain spaces, but the system can generate a random code for you if you choose not to make one up.
Start and End dates - use the calendar to set your promotional period - after this expires, your code will no longer be valid and no packages will be unlocked.
The list of hidden packages you can promote is listed next; choose the packages you want this code to unlock and then mark the code as Active (if you want it to be valid straight away). Do not archive the code at this point.
If you now click on Create promo code, your code will be added to the Active or Inactive tabs accordingly and the process is complete.

Once your offer code is created, the entry will look similar to the above. If the offer is current/active, you will see a green disc in the Status column. If it is inactive it will show red. If you expand the edit menu, you will see options to:
Edit promo code - Use this to adjust any of the parameters you entered, such as date range etc. If the code is currently inactive, you can set it to active again in here.
Switch off code - This quickly and simply deactivates the code, preventing anyone from using it for sign-ups. The special offer will move from the active list, to the inactive list.
Archive Code - This also deactivates the code but files it in the archive tab instead.
Open Sign Up URL - Use this to jump to your sign up page with the promo code already entered to test it. If the code is active and within the date range you chose, you should see your hidden package unlocked at the top of the page in the Promo section:
Tip
In the same way, you can copy this URL (which conveniently includes the promo code) to direct people to your sign-up page and automatically unlock the hidden package too.
Member Profiles
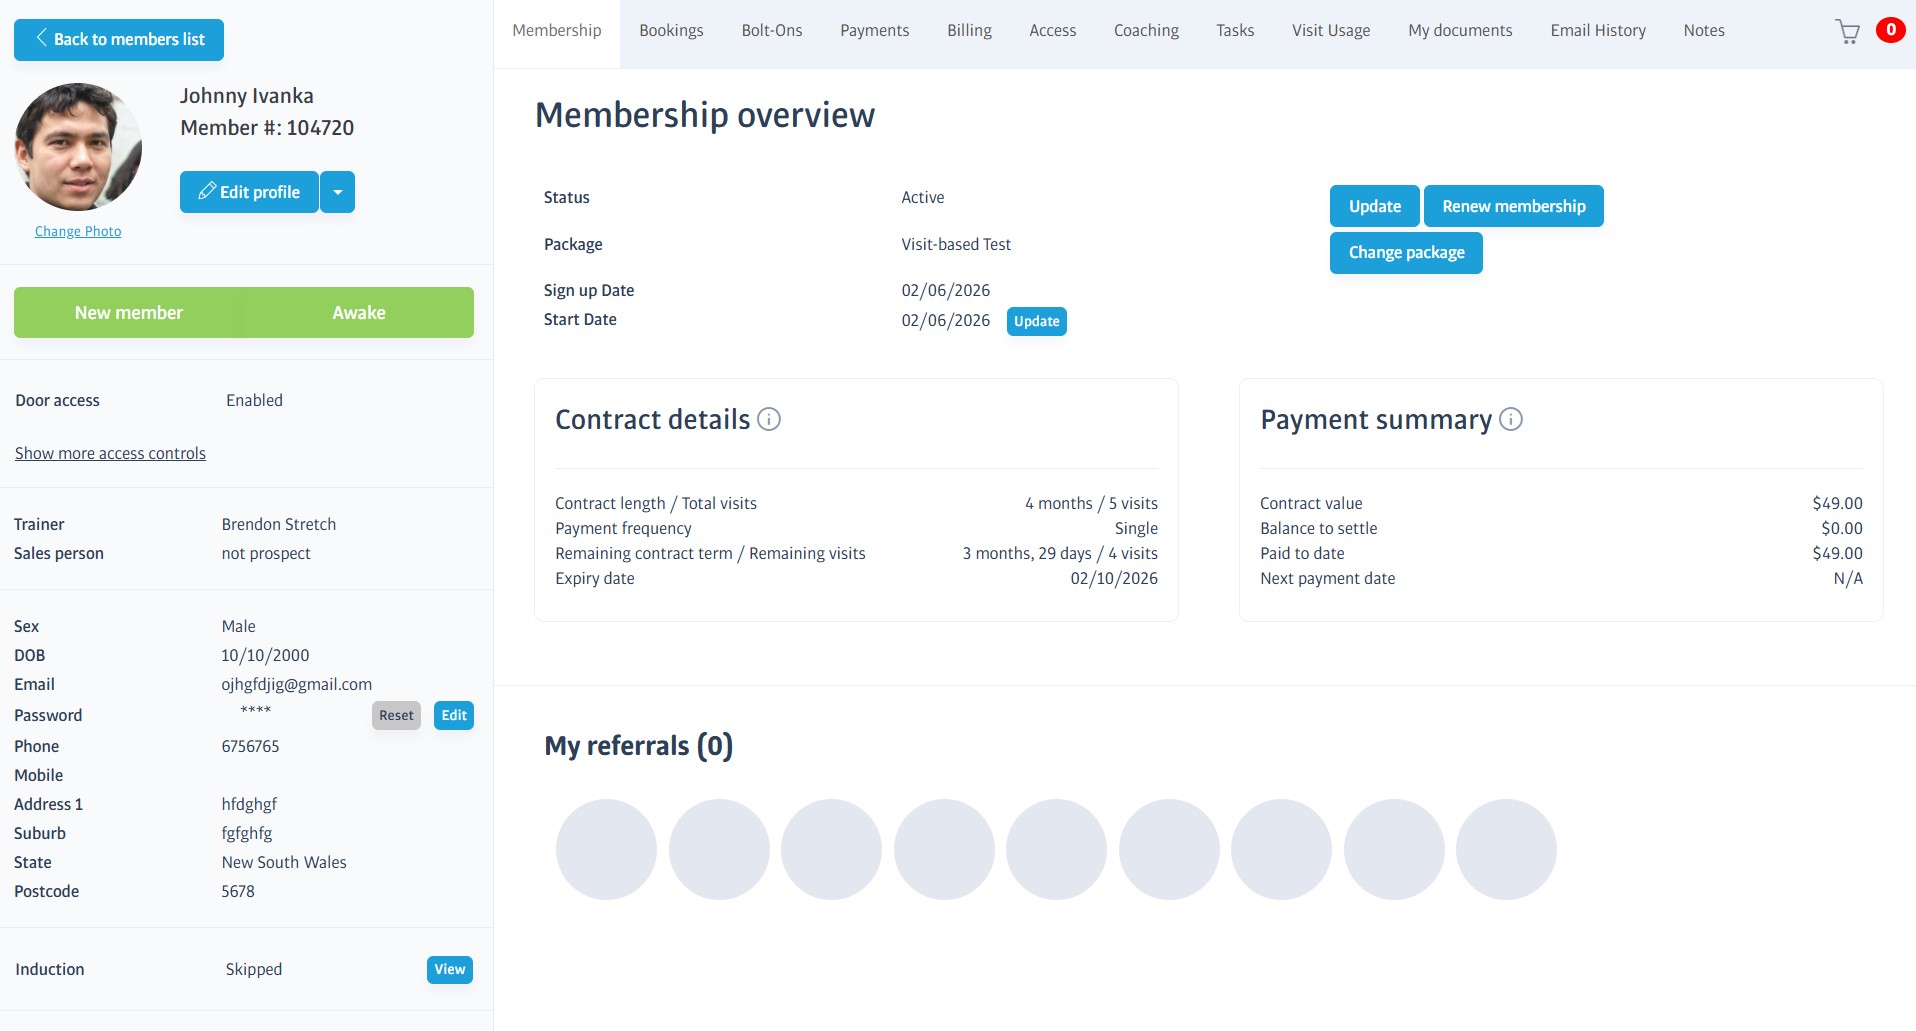
All members have a detailed profile that gathers together everything you might need to know about them. You'll find basic info such as name, address, email, and join date on the left-hand side, along with their access status and photo if you've taken one. See Update Member Details If you need to make changes to any of these!
Across the top of the profile are a variety of tabs that cover all other aspects of the membership. By default, the Membership tab is selected, which displays an overview of the membership and summary of their membership's contract value, remaining term where applicable, number of visits remaining (for a visit-based membership), and many other details as appropriate for the kind of package they've joined.
Just click on the other tabs across the top of the profile to drill down on different aspects - you'll find things like payments, a summary of their gym visits, membership upgrades, and many more.
Finding Members
You can quickly locate a specific member profile by typing part of their first or last name into the search bar at the top of the screen. A list of matches will start to appear once you've typed a few characters; the more you type, the easier it will be to find the profile you want:
You can also view a complete list of your members using the Members->View All Members option.
This can literally list everyone who has ever been a club member, including expired members if needed. By default, however, the view lists active members according to status type.
There are a wide variety of filter types that let you view members according to package, payment issue and many others. Many of the filter drop-downs let you select multiple types:
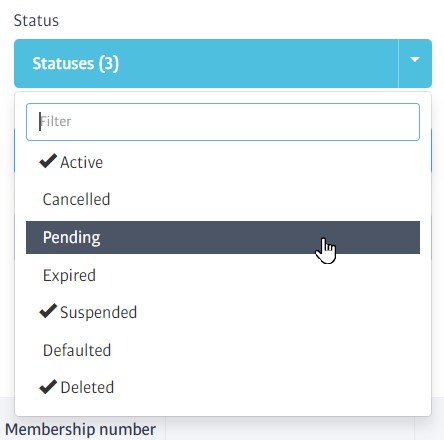
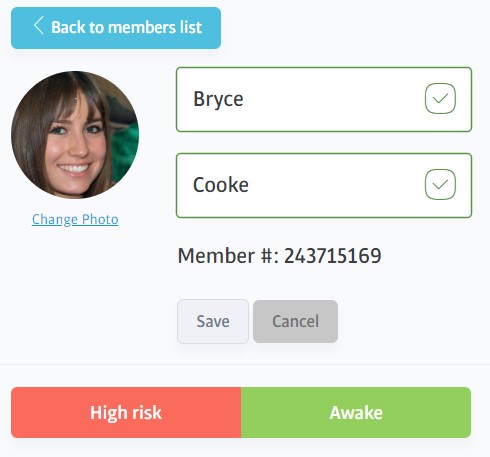
Risk Status & Activity Status
The upper part of the left-hand panel contains the member's name, photo and membership number. Immediately below these are the status indicators for Risk and Activity.
Risk Status: this has nothing to do with a member's physical health, it refers to how 'at risk' this member is in terms of maintaining their membership (based on their gym attendance):
Pending
See New Member below.
New Member
Given to new members whilst their attendance pattern is being assessed. This takes approximately 5 weeks to build.
High Risk
Applied to members with no discernible attendance pattern, or for those members who change their patterns significantly, and are therefore at a higher risk of leaving or cancelling their membership.
Average Risk
Members who use the gym fairly frequently, but who have no strong, regular pattern of attendance.
Low Risk
Members who use the gym frequently, have a fairly regular pattern of attendance, and are at fairly low risk of leaving.
Activity Status: an Awake member is an active member who has visited the gym recently, and at least once (or possibly more) within the time period defined by the gym (typically 30-60 days). A member who is Asleep is also an active member (ie with a current, paid membership), but one who has not visited the gym in that same period.
Tip
If you need to make changes to the user's contact details or assigned trainer etc., you will need to press Edit Profile, but note that some common changes can be made directly for convenience (Change Photo for example)
Note
The risk and activity status swatches ('High Risk' and 'Awake' in the image) are indicators only, and cannot be pressed!
Update Member Details

The member profile is a window onto all the information we hold or track about a member and their activity. Many fields are filled in as part of the signup process, but naturally, some can be edited and updated later as necessary.
The left-hand strip of the profile gathers together all of the member's personal and miscellaneous details, including gym/door access settings. Everything else, such as payments or membership documents, can be found on the specific tabs across the top of the profile window.
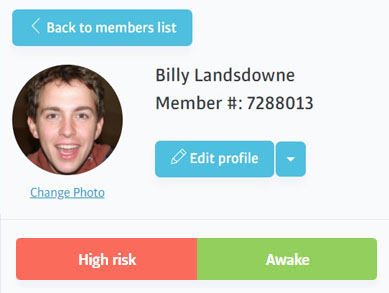
The personal details that can be edited include:
Name
Address
(home) Telephone
Mobile number
Email address
DOB
Assigned trainer
Various marketing preferences, eg 'subscribed to emails'
To update any of the items listed above, click on Edit Profile (next to their photo) to reveal edit boxes around the fields that can be changed:
Note
You might need to scroll the screen to access all the fields; make sure you scroll back to the top and click the Save button when you finish, or else your changes will be discarded!
All profiles store a photo to help identify the member. This is initially a blank placeholder but can be replaced with an image grabbed via webcam in-club, or uploaded from an existing file.
You do not need to click Edit on a member profile to do this as there is a Change Photo beneath the profile picture for direct access to the capture function:
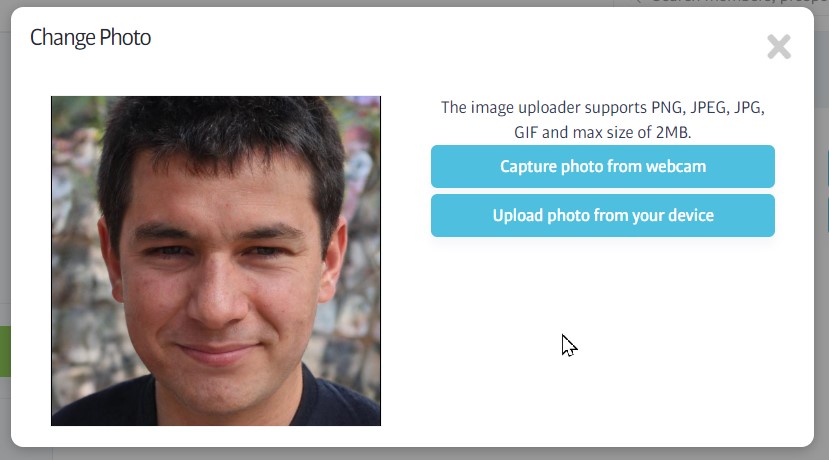
If you choose the webcam option, you'll see a live preview of the camera image in the box; frame the view and click capture when you're happy.
The upload option will allow you to choose a file from your PC up to 2MB in size. You can crop the image using a selection box once the image uploads, and popular formats such as JPG, PNG and GIF are supported.
You do not need to click Edit on a member profile to change their password as there are shortcuts to change this directly:

Click:
Reset to send a password reset email to the member's registered email address. This provides a link that they can use to provide a new password from their PC or mobile device.
Edit to enter a new password in-club now; this needs the the member to either tell you their choice or for you to hand over the keyboard for them to enter it.
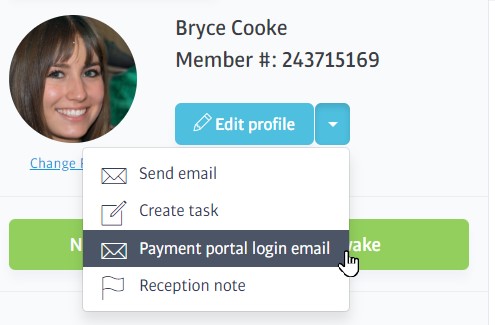
Staff can't directly manipulate member subscription details, but all members with a subscription automatically get a personalized payment portal where they can make changes.
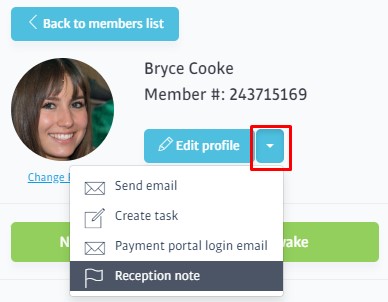
If the member needs a reminder of the details, you can email them a link directly from their profile - head to the small drop-down menu next to their photo::
Members & Gym Access
Our Global Access System supports various entry methods, including QR code, RFID, and more. All types use a numeric code to identify members, either directly (e.g., a PIN they enter on a keypad) or indirectly (e.g., encoded in their keyfob or triggered by their fingerprint).
Consequently, each member has a unique code that can be viewed - and in some cases edited - in the access controls area of their profile, found just underneath the profile picture on their member profile page. This, as well as some other access settings, is initially hidden so that the overall Door access value can be seen more clearly - this will either be Enabled or Suspended:
Clicking Show more access controls will expand the remaining settings:
Warning
The access settings for this member will not operate as expected unless the Access status shows a green Synced symbol.
Keyfob
To issue a new keyfob, simply enter its number and hit the Update button, but note the warning about Access status above.
Access level
Provided the separate Door Access setting shows that access is Enabled, the exact doors that can be opened by this member (and when) are set using the Access level. The different types on offer can vary from club to club, and are set up when the access system is installed.
For example, there may be different access levels for male and female changing rooms, staff-only doors and so on. Here's an example of the types you might find:
Warning
Even if Door access shows that it is enabled, it is possible to choose an Access Level that does not actually open any doors - No access - choose this level if you want to disable gym access manually.
Access Status
Any changes you make to a member's Access settings (and some other member profile areas, see below) must be communicated to a separate server controlling the club's access hardware.
The agreement (or otherwise) between the two systems is indicated by a colour-coded status as follows:
| The two systems are synchronised - the access system has acknowledged the settings you can see in Membr and should work as expected. |
| Changes have been made in Membr (and communicated to the access system), but confirmation has not yet been received - your changes are not yet live. |
| This (much rarer) state can occur when there is a problem communicating any changes. Contact your Success Manager or raise a support ticket for help. |
Changes you make to any of the following settings will trigger an access update/Pending status:
Update/change keyfob
Update/change Access Level
Update/change membership package
Update/change the member's name
Add a new member
See Inclub Signup for details!
Change Package
Members can change the package they are subscribed to at any time*. Their future subscription payments will be updated accordingly, and a note will be added to their profile detailing the change, and who made it.
*If a subscription payment is currently processing the Change Package button will be disabled.
Note
PIF and ongoing packages cannot be mixed; any new package must use the same payment type as the existing one, i.e. an ongoing package must be switched to another ongoing package.
Steps to change package
Locate the member's profile and click Change Package:
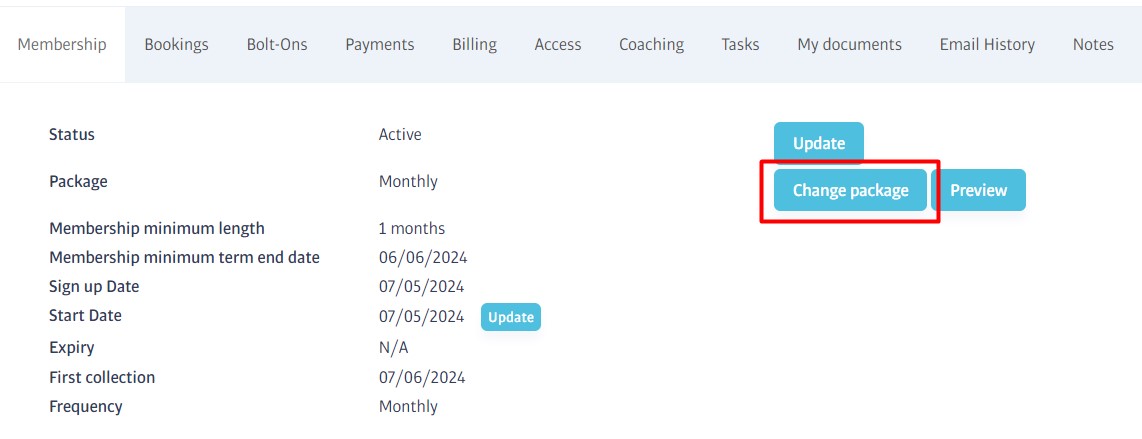
Select the new package from the sidebar that opens - all of the applicable packages that can be chosen are listed, pick one and click the Update package button to confirm:
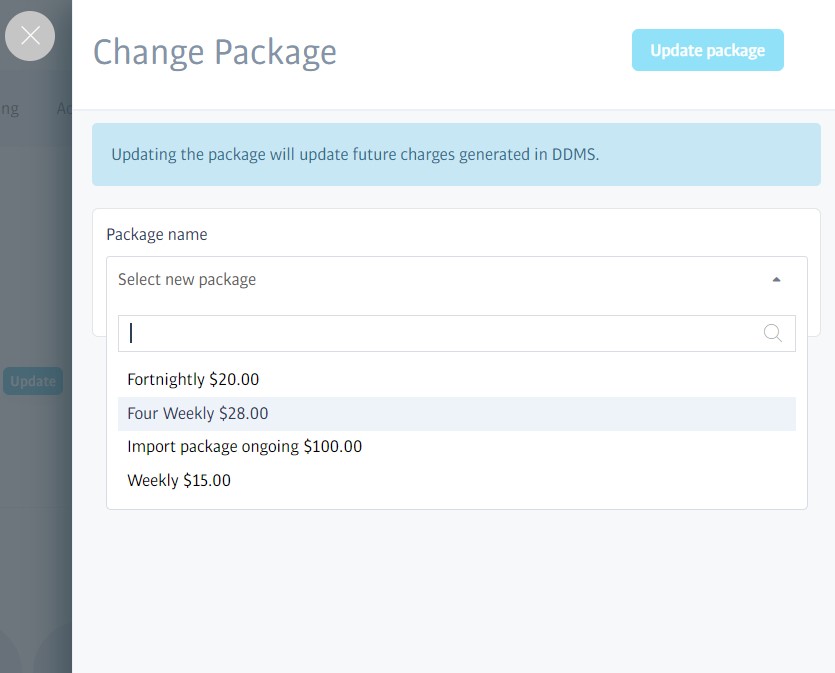
The member's package information on their Membership tab will update, their subscription will be updated, and a note will be added to their profile detailing what changed, and who made it.
Referral Scheme
The referral scheme is a great way to encourage members to recommend family and friends to your gym, thus growing your membership!
It rewards the referring member*, and can provide access to special referral-only memberships for new joiners.
When the referral system is enabled, you will see an entry like this on a member's profile:
*The exact nature of the incentive depends on the gym. We recommend giving a free month of membership to the referring member, but it is entirely up to you. Your onboarding/sales contact will be able to advise you.
All existing members get a unique referral code they can pass on to anyone they want to recommend to your gym. The referral code can be found in the sidebar of a member profile.
When a friend or family member joins the gym using this code (typed in on the signup page), it identifies the member who referred them and unlocks any special referral-only packages (that might offer a special rate or preferential terms).
So long as the new signup enters the referral code on the website, the member who recommended them will be acknowledged; the package they choose is unimportant.
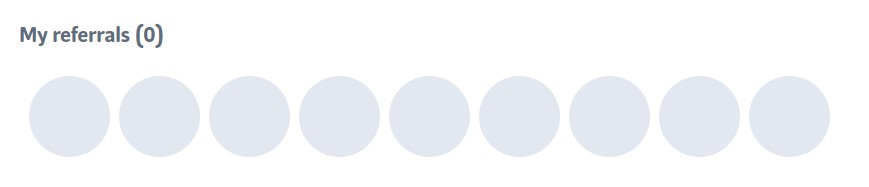
The new signup's name/photo will be added to the My referrals area on the original member's profile page:
New referrals will show with a question mark - these need to be approved by a staff member before any reward/incentive is due to the original member (to allow for new member failed payments, no-shows, etc.). To do this, hover over the picture and choose from the options presented.
Tip
Special, referral-only membership packages can be created as part of the package creation process. These packages only become visible when new joiners enter a referral code into your website. See Membership Packages - About for more details.
Freeze Membership / Payments
A membership freeze temporarily pauses a membership; during the freeze period, any ongoing payment collections are stopped (or optionally reduced) and gym access is disabled.
When the freeze period ends, gym access resumes and normal payment collections begin again (in the case of an ongoing membership). Membership-related dates are also impacted when a freeze takes place as follows:
For a PIF membership, the expiry date is extended by an amount equal to the freeze period.
For an ongoing membership, the minimum term end date is extended by an amount equal to the freeze period (unless it has already been exceeded).
When you apply a freeze, the member's status will change from Active to Active | Freeze Scheduled, and then to Frozen when the freeze period is active. A note will also be added to their profile giving details of the freeze and the staff member who actioned it.
Note
For ongoing packages, a freeze can only be scheduled in multiples of the billing period in use, e.g. if the member subscribes to a fortnightly package, you can freeze for 2 weeks, 4 weeks and so on, but for a monthly package, it would 1 month, 2 months etc.
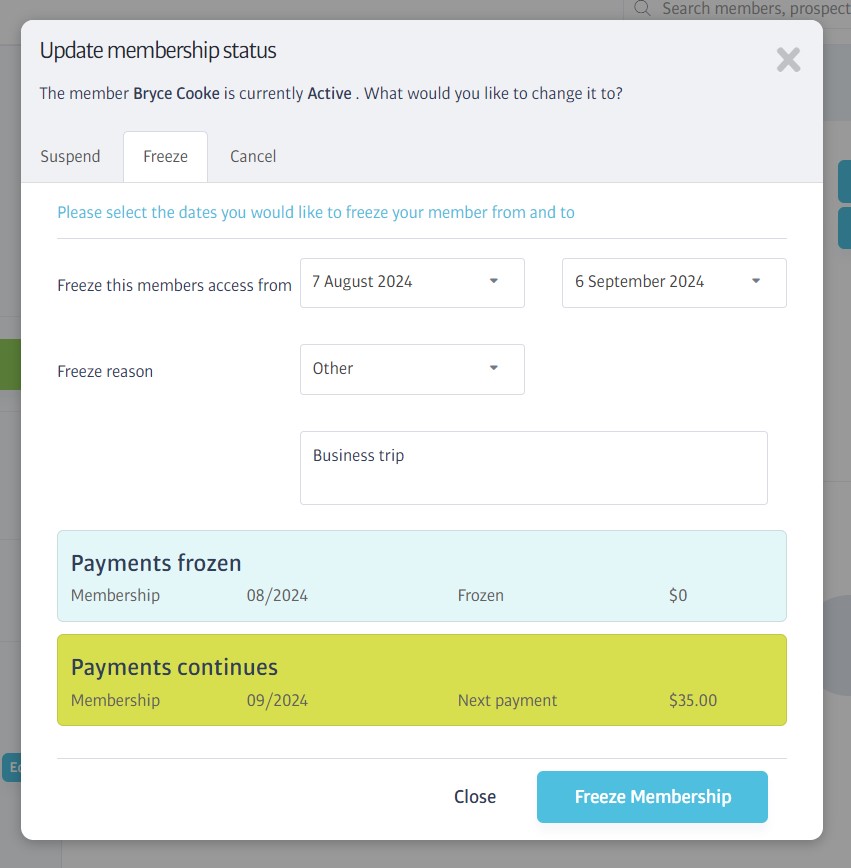
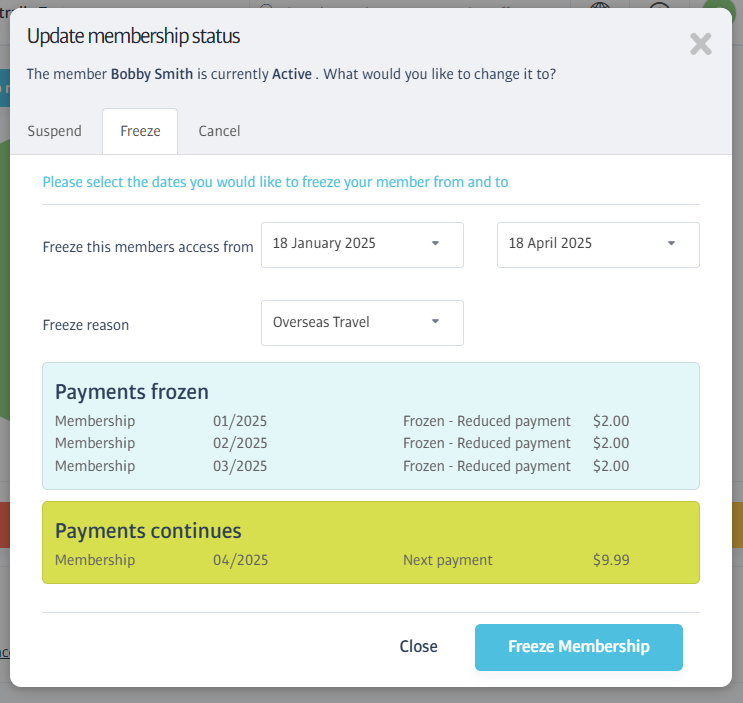
Steps to action a freeze
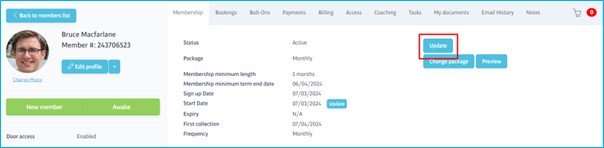
Locate the profile of the member you want to freeze and click the Update button on their Membership tab:
The Update membership status window opens. A freeze can be scheduled to start from the next available billing date, or a billing date further in the future. The end date is set similarly, a day before the start of the next billing period.
Clubs can be configured so that membership payments are stopped altogether, or taken at a reduced rate during a freeze, the window will clearly display the rate being applied.
Note that the freeze button will not become active until you have chosen the dates and provided a freeze reason:
The member status will update to show that a freeze has been scheduled:

Tip
If a freeze is scheduled (but not yet active) you can remove/cancel it using the View Freeze link.
Freezing PIF Memberships
When you schedule a freeze for an ongoing membership, you'll be offered a choice of dates that are aligned to the relevant billing periods for that package.
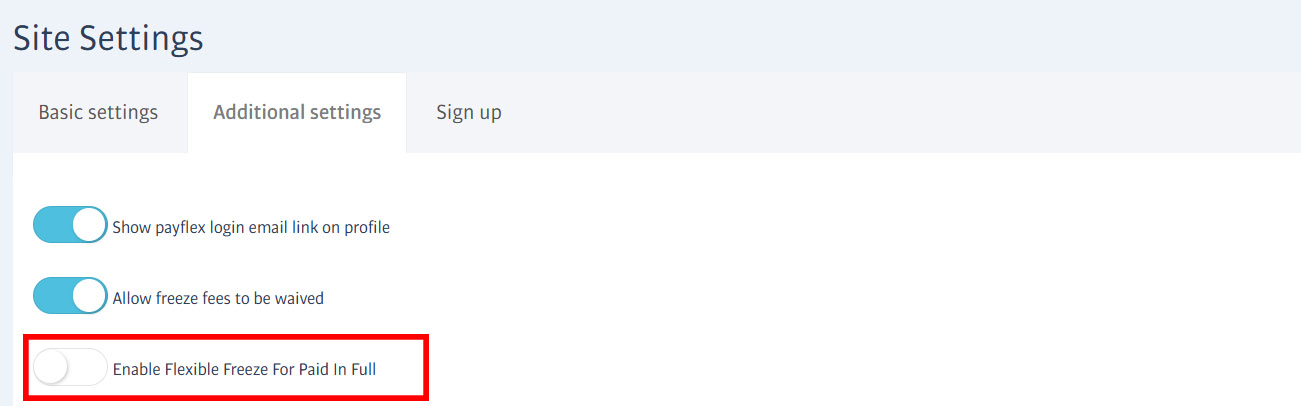
Of course, PIF memberships have no routine billing periods and can therefore be frozen between any dates that you need. After the scheduled freeze period has taken place, the member's expiry date will be extended according to the period you chose. We call this 'flexible freeze'.
Flexible freeze is always offered for in-club packages (i.e. paid in POS).
It does NOT normally apply to PIF packages that are purchased online, however (i.e. paid via DDMS).
If this is something you need to do, there is a switch available in Additional Settings to enable it:
Chargeable freeze Options
In the Setup->payments area, there is a switch to enable or disable chargeable freeze:
When this is disabled, member payments will stop completely during freeze periods.
When enabled, a new field - Freeze product code - is added to membership packages. This provides a drop-down list where you can choose the freeze product to use - the membership charge during the freeze period will use whatever price is attached to the freeze product:

During a freeze operation, the freeze dialog will update to show the appropriate freeze fees:
Tip
You can only 'attach' one freeze product to a membership package, but you can define as many freeze products - and therefore prices - that you like, so different packages can use different rates.
For example, if the gym has a standard $5/week fee for membership freezes, you might create three different products to cover different billing frequencies:
a $5 Freeze product to use on weekly packages,
a $10 Freeze product for use on fortnightly packages, and
a $21.66 Freeze product for monthly packages ($5 x 52 / 12)
Creating Freeze Products
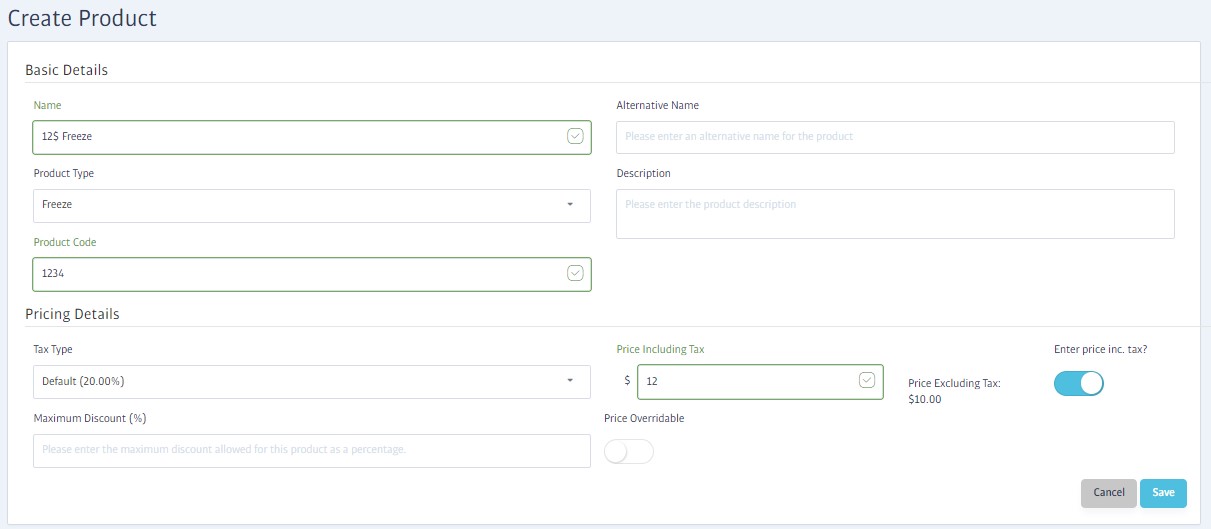
To create suitable products to use for chargeable freezes, head to the POS->Manage Products area and click the Create New Product button:
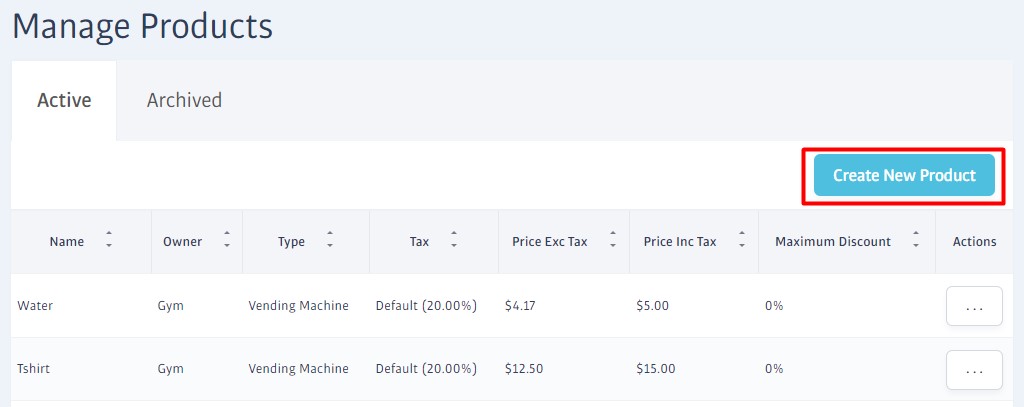
All the settings for a new product are defined on a single page, be sure to set the Product type to Freeze:
Assigning Freeze Products
Once you have created suitable products to use for chargeable freezes, you need to decide which membership packages will use them, and update the package settings accordingly.
Head to Sales->Packages to see the list of packages at the club, and edit any that you want to apply the chargeable freeze to. When you edit the package, on the first tab (Basic details) you'll see the Freeze product code drop-down shown previously, select the appropriate product here:
Keep clicking Next and then Finish to save your changes. Any members who request a freeze on such packages in future will be billed at the rate attached to the freeze product you selected.
Skip a Payment
A member's next subscription payment can be skipped directly from their profile.
Find the profile you want to use and then:
Locate the next subscription payment. This will be a payment with scheduled status at or near the top of their Payments section. From the menu at the right of the payment, select the Skip Payment option:

Read the warning that appears next and confirm your action. The payment status will change to Written Off and collection will no longer be attempted. Note that this cannot be undone.
Suspend Membership
When a membership is suspended, the member is prevented from accessing the gym but their payments will continue to be collected. For example, you might want to suspend a member for a short time because they have been abusive towards staff.
Warning
Freeze and Suspend are separate actions in Membr; if you want payments to stop in addition to door access, use freeze instead.
Note
Suspensions cannot be scheduled; they must be applied manually and take effect straight away.
Steps to action a suspension
Locate the profile of the member you want to suspend and click the Update button on their Membership tab:
On the Suspend tab of the Update membership status window, provide a reason for the suspension and click Suspend Member. There are no dates to choose and the action is immediate:
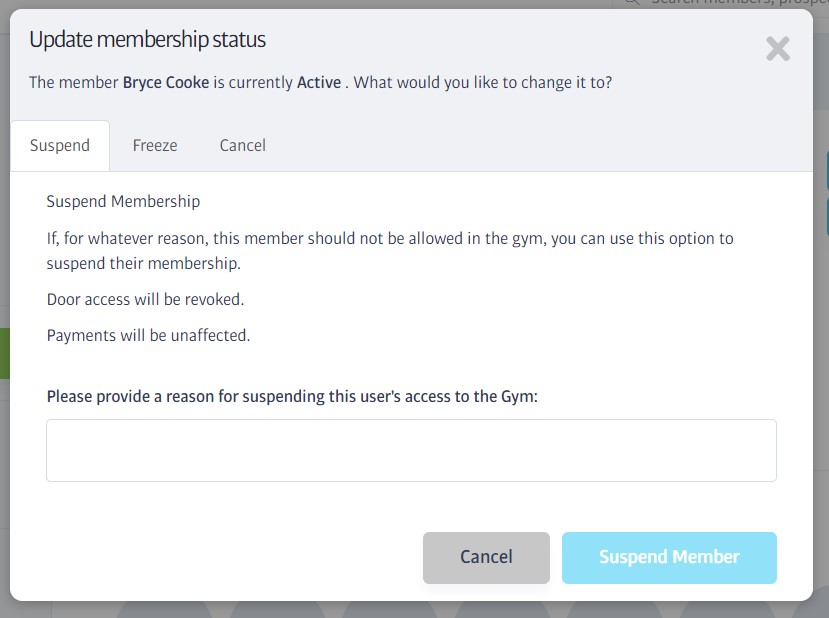
The member's status will change to Suspended and door access will be disabled. A note will also be added to their profile.
When you want to restore access, click the Update button again to find a new Unsuspend option.
Cancel Membership
A membership can be cancelled immediately, or scheduled to end at a future date. Once the cancellation takes effect, door access is revoked, any payment instructions are cancelled and the member's status will change to Cancelled. Their profile will remain in your database so they can rejoin easily at a later date, however.
Note
With an immediate cancellation, it may be too late to stop the current payment if it has already begun processing with the payment provider.
Steps to action a cancellation
Locate the member's profile and press the Update button on their Membership tab:
Choose cancel immediately, or select a date using the date picker. If you cancel a membership within its minimum term, a warning will appear to alert you (but you are not prevented from cancelling the membership).
You will also need to choose a cancellation reason from the choices in the drop-down:
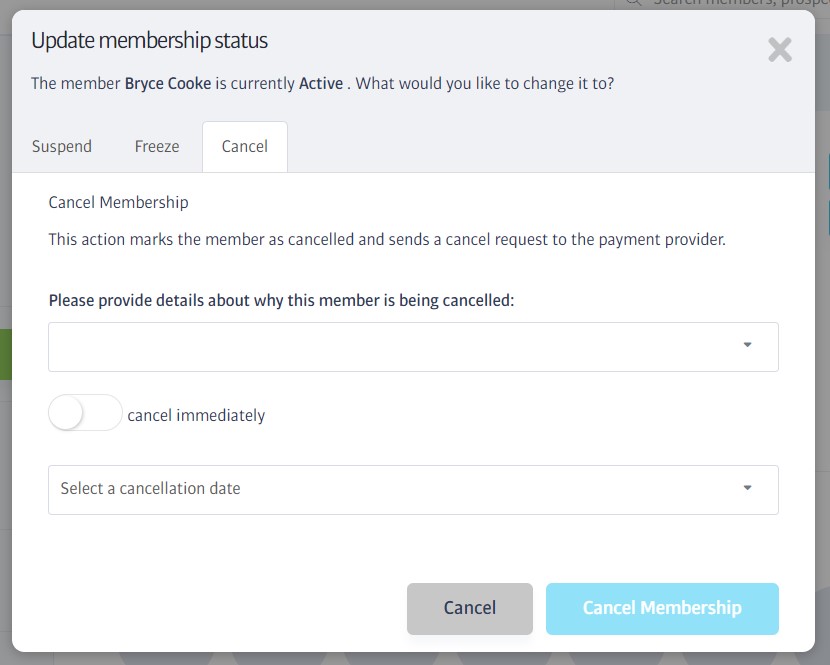
The membership will be cancelled immediately if you chose that option, or scheduled to be cancelled on a future date. For a future cancellation, (pending cancellation) will show in the member’s status field:
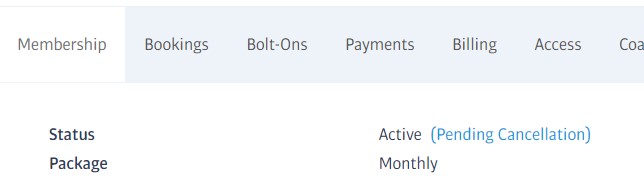
Tip
Before the member's scheduled cancellation date comes around, you have the option to review the scheduled cancellation date, or to remove the pending cancellation completely by clicking on the (Pending Cancellation) text.
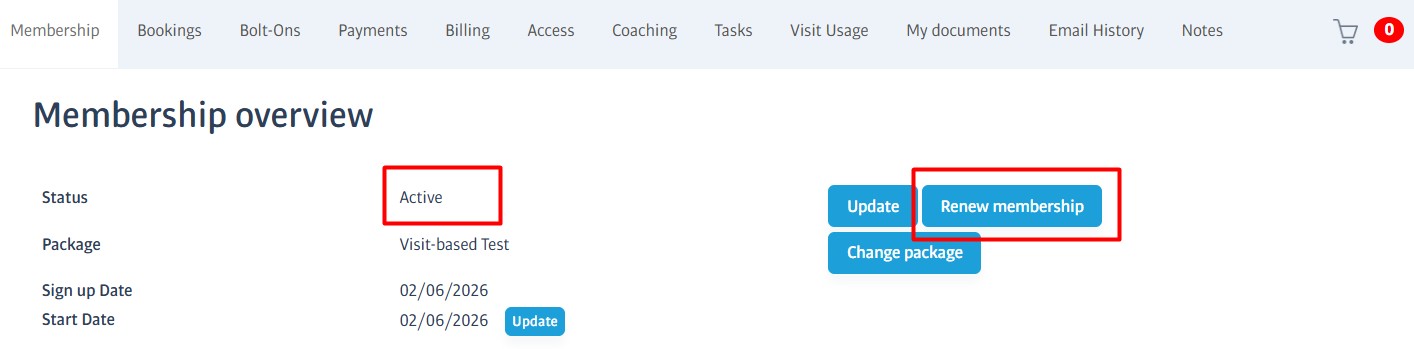
Rejoin/Renew a Membership
An active member can renew their membership before it expires. Once expired, the ex-member would instead need to rejoin; one or other option will be offered directly from the member's profile where appropriate.
Active Members
If an active member is nearing the end of their membership, a rejoin button will appear on their profile allowing you to rejoin the member onto the same package again (if it is still available), or to choose from a list of other, current membership packages.
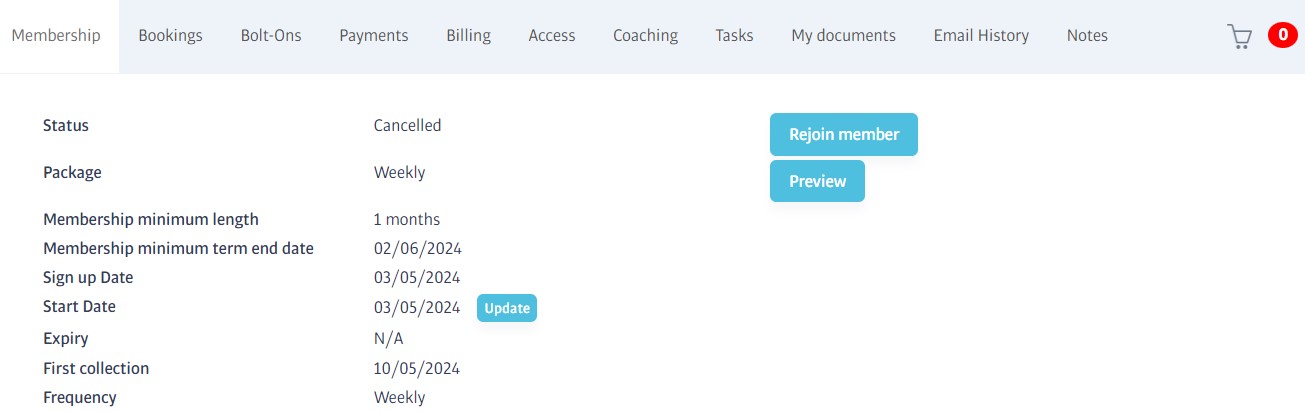
Expired Members
Expired members can restart their membership easily as their profiles (and all their associated information) are kept on the Membr system, ready to be reused if they decide to rejoin.
Note
A single inactive member profile can be found at any time using the standard search bar, however they are not normally visible when you go to View All Members. You need to change the view filters to see them here - see lower down for details.
Steps to rejoin a membership
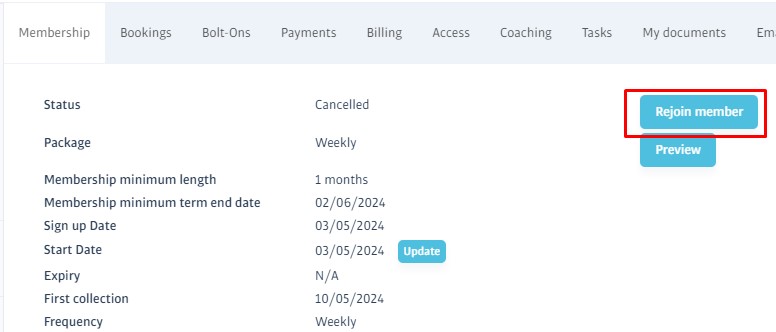
Opening the profile of an expired or cancelled member will reveal a Rejoin member button, click this to get started:
This will take you to the first page of the in-club signup process (package selection). Wherever member data can be reused (eg Name, Address etc.) the forms on the signup process will be pre-filled, however.
See Inclub Signup
Viewing a list of expired members
If you go to the Members->View All Members option, the default behaviour is to list active members. To see expired or cancelled members instead, expand the Status filter and check the types you wish to see - you can toggle as many as you need:
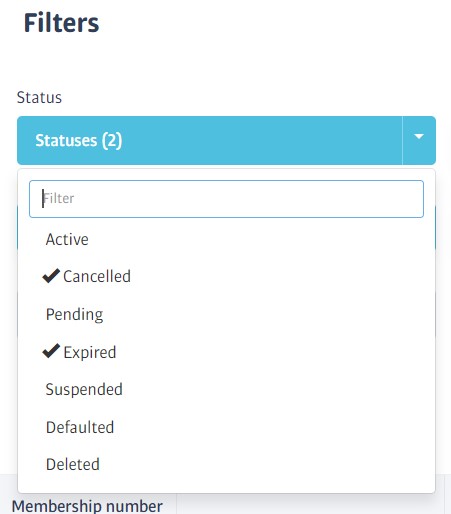
Communicating with Members
There are several built-in tools you can use to keep in touch with your members:
You can email a single member directly from their profile, just click the arrow button to the right of their profile photo.
You can send a group email (e.g. a promotional message) to any number of members at once using the Member Mass Emailer tool.
You can send automated emails at different intervals to keep members engaged using Member Pathways.
Expand any of the sections below to find out more:
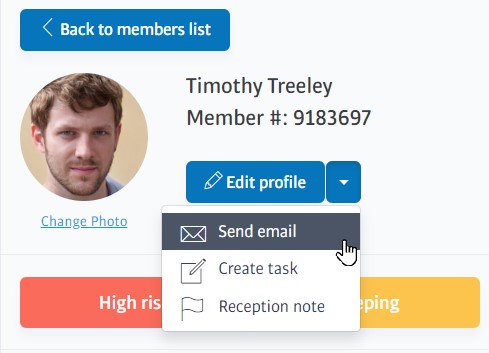
You can contact a member directly with a one-off personal email. From their profile drop-down menu, use the Send email option - this opens a dialog containing a simple editor with font and paragraph settings, as well as numerous personalisation tags can be substituted for the correct values when you send:
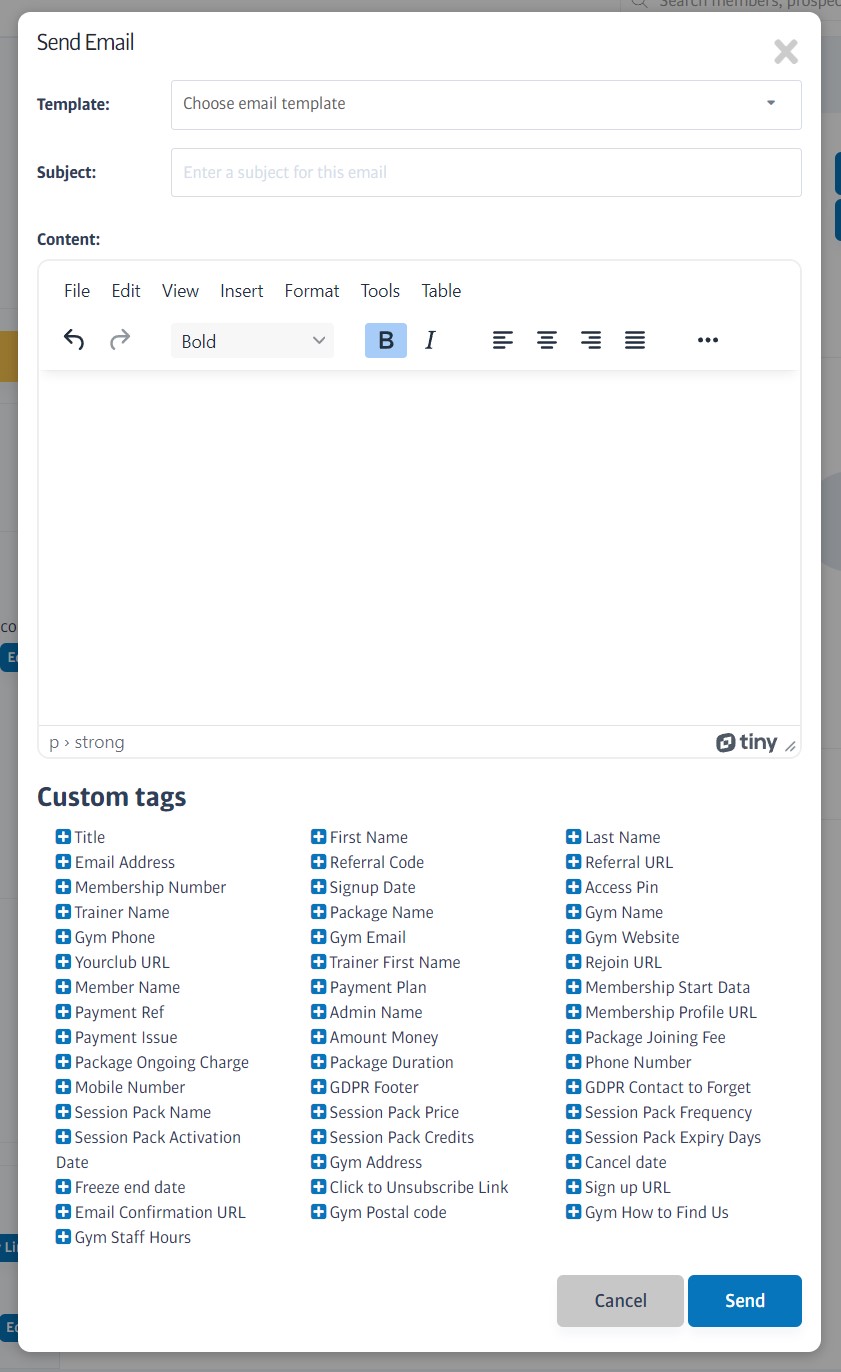
Notice that you can choose any existing system mail to use as a template, for example, you could copy the Class Missed email to use as a quick starting point. You could make it more personal or add a special message - anything you add is for this email only - the template you used will be unchanged:
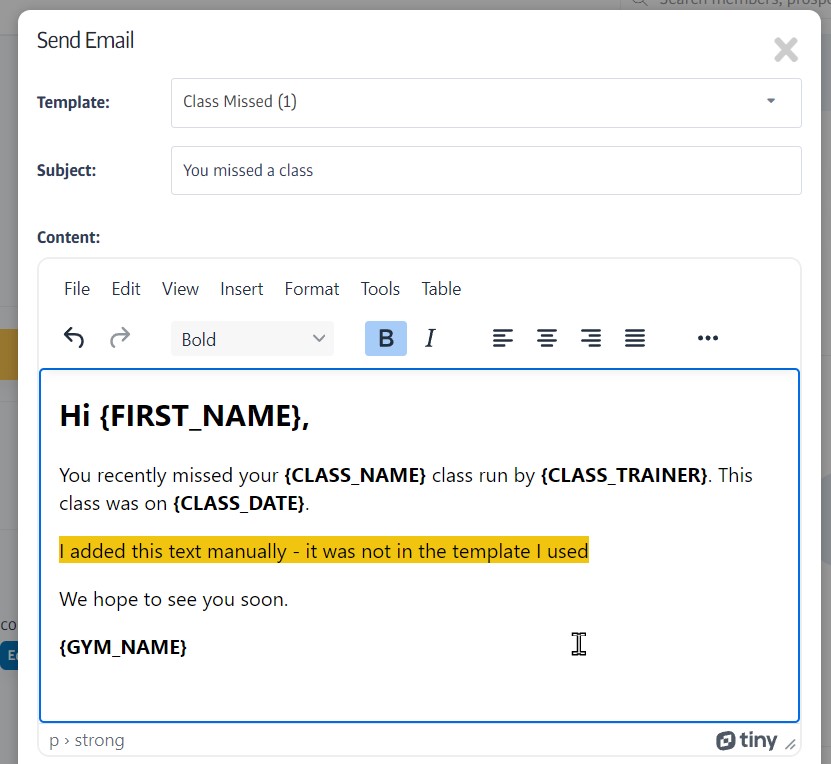
When you send the email, a record of who sent the email along with other brief details will be stored on the member's Email History tab. A full copy of the email will also be kept there, but this is subject to storage limits and may be deleted eventually, typically a year.
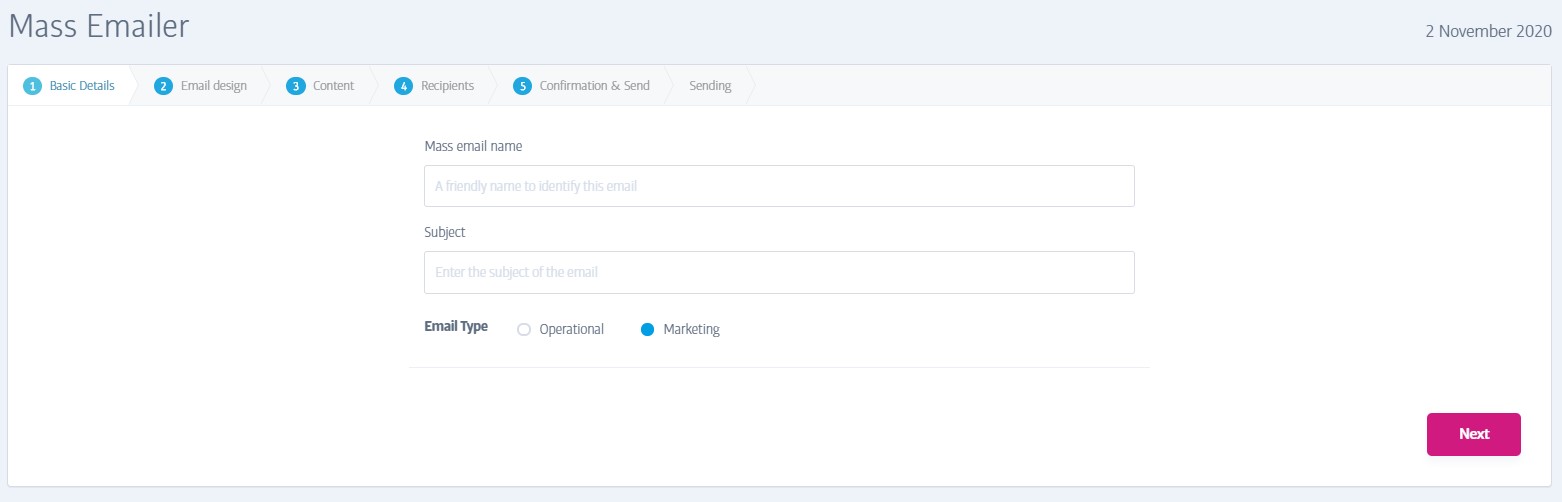
(Find this in Members->Member Mass Emailer)
The Mass Emailer allows you to design an email to send to your members. Once you have an email design you like, you can send it immediately, or schedule it for a date in the future. You can also choose to send the email to some, or all, of your members using the various filtering options to narrow down the recipients.
The email design process is as follows:
The first step involves some basics:
Mass Email Name - A memorable name to remind you what this mail is about later, for example, 'Summer Promo 10% - All Members'
Email Type - This allows you to choose between Operational and Marketing emails (if you don't see the setting, your mail will be sent as a Marketing email).
Operational emails are important emails that are sent to all members, even if they have previously unsubscribed or opted out. Marketing emails only get sent to members who have chosen to receive such mails ('opted in'). - Use operational emails to inform your members about something important that would affect their membership - a change of gym opening hours, or a temporary closure, for example.
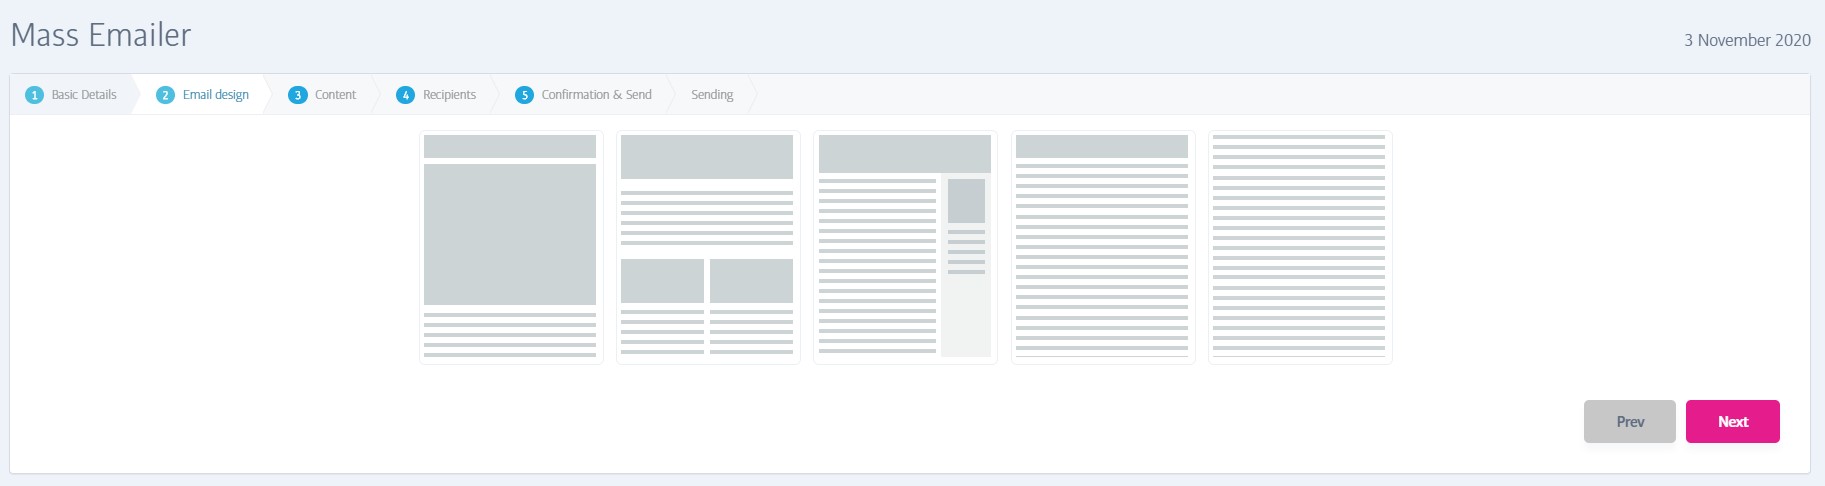
On the second step, you need to choose the layout for your email - most designs usually start with the text-only option on the right, but you can choose designs with one or more pictures as per the visualisations.
If you choose a design with images, take careful note of their number (and relative size), as you will be required to provide them in the next step.
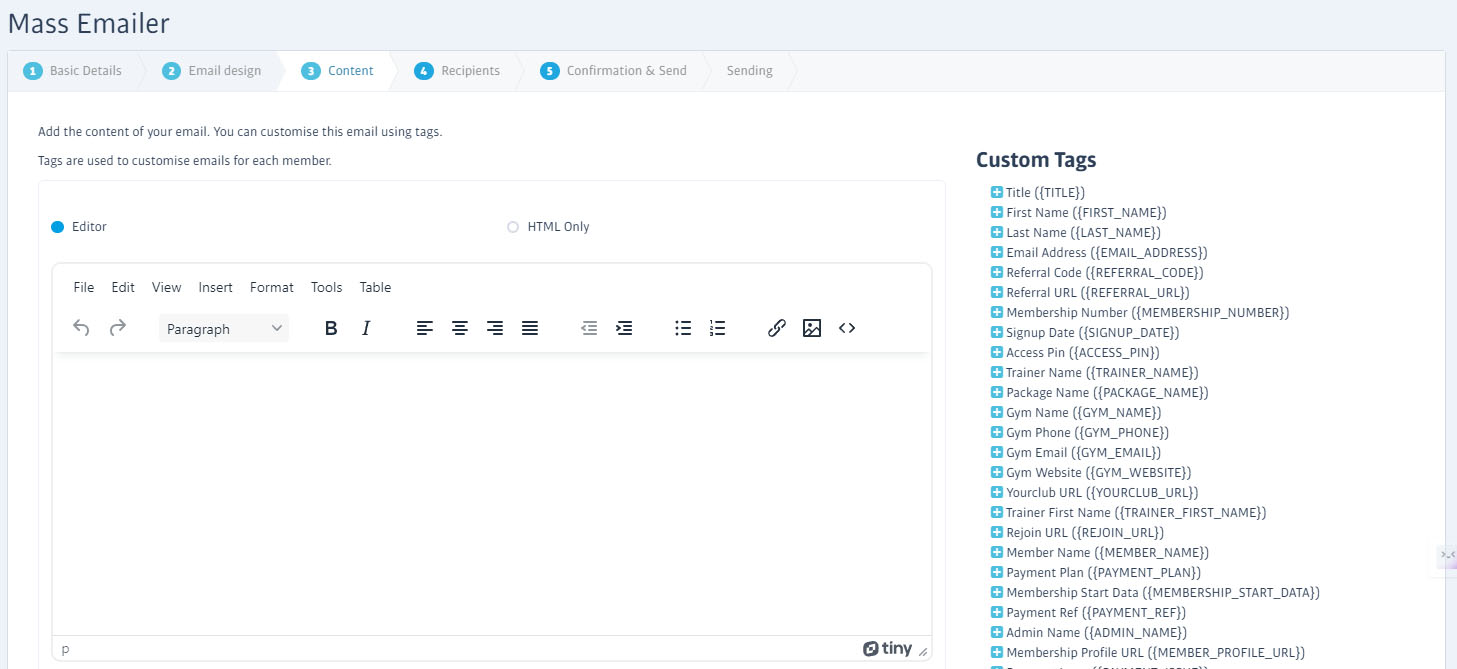
In step 3 you actually build your email content. On the left you'll see familiar tools for styling your text - alignment, bold, italic etc.
On the right, you'll see a list of Custom Tags. These will get substituted when the email job runs.
For example, using Hi {FIRST_NAME}, would result in text saying 'Hi John', 'Hi Sarah' and so on as appropriate, when the email job executes.
Hover your mouse over any of them for a full description of what the tag is substituted for.
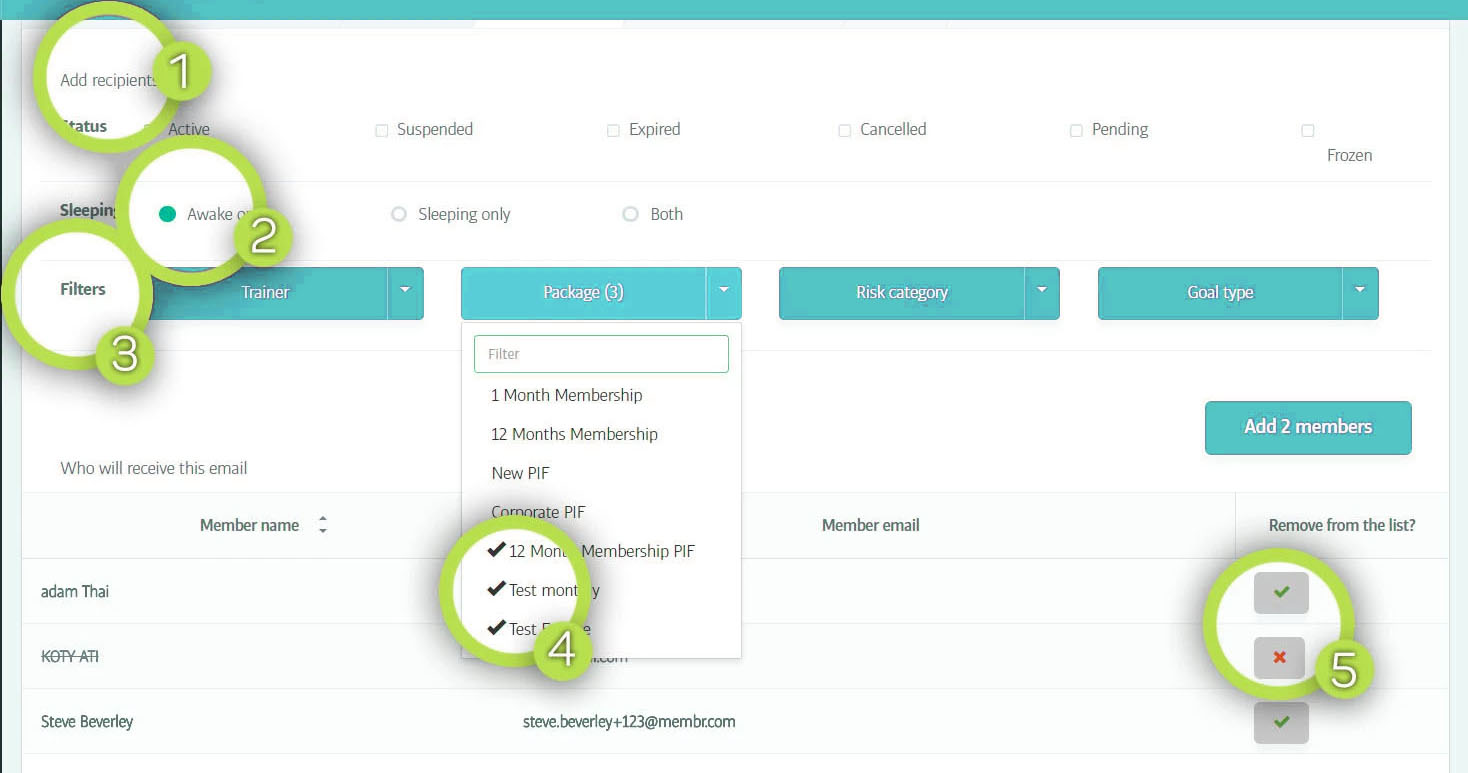
Now it's time to choose who to send the mail to!
(1) Member Status - choose the member status types that you wish to include in your mailshot.
(2) Sleeping Status - choose whether to email members who are Awake, Sleeping, or both.
(3) Filters - a range of other filters that enable you to narrow down your mailing choice to specific types of member. You'll notice that you can enable multiple types in each filter selection.
(4) As you change the filter options, you will see a preview of the selected members at the bottom of the screen.
(5) Member toggles - You can enable or disable specific members from this list by clicking on these checkboxes.
When you are satisfied with your recipient selections, click Next to advance to the final step.
In the final, Confirmation step, you are shown a preview of your email, and given an opportunity to send it to yourself (or another email address) to test how it looks - make sure you have selected a test member to generate the preview/test e-mail.
Sending a test email does NOT mean that the member will receive the test - it only means that the member's details will be used to populate the tags such as {First_Name} and so on. Only the email address filled out in the Test email Field will receive the test email.
If you press Finish at this point, the mass email/mailshot will run immediately, and the members you chose would receive it. Alternatively, you can set a date and time before you press Finish - in this case, the job will be scheduled to run at the date/time you specified.
(You can find and view the progress of any mass email by looking in the Member Mass Email List, also found in the Members menu.)
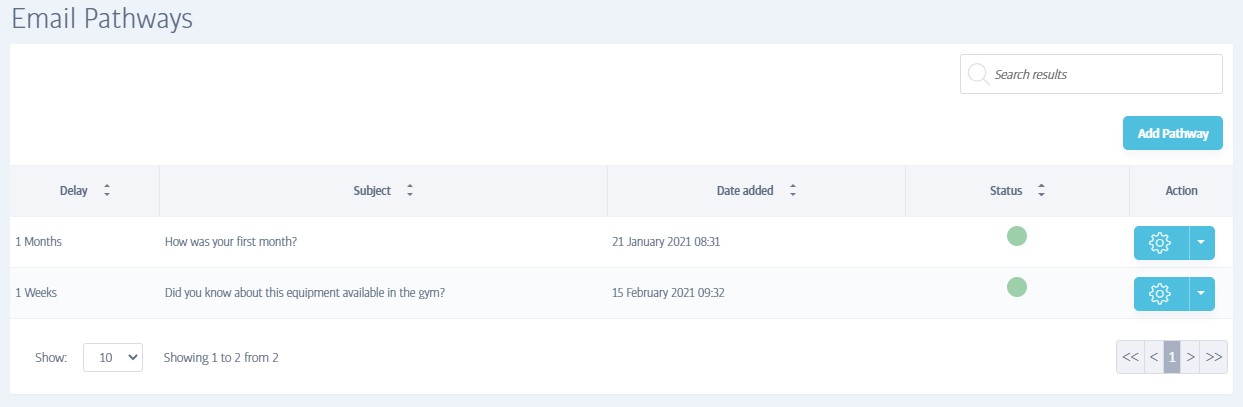
(Find this in Members->Member Pathways)
Pathways help to keep your members engaged by sending them personalised messages at pre-set intervals after they join. You set the intervals and design the content, and then the system automatically sends your emails whenever a new member signs-up, so you can leave the system to work by itself!
These emails are a great way to stay in touch with your members and increase retention - you might choose to mail them a few days after joining to see how they're settling in, then again after a week or two to promote your classes or a 'bring a friend' day etc.
Unlike Mass Emails (which are sent as one-off emails), Pathway emails define an entire series of messages that will get sent to any new members who join your club. So they are better at making new members feel more valued and engaged.
The pathways summary screen shows a list of the pathway emails you have already defined. You can clearly see the delay that is defined before each one gets sent, the subject line and the status - the green dot indicates that the mail is active, and will be sent as per your preferences, and a yellow/amber dot indicates that the mail is inactive or disabled. You can click this status disc to toggle between the two.
From this screen you can also choose to edit an existing pathway mail, or delete it entirely, using the drop-down menu on the cog icon. And of course, you can define a new pathway using the Add Pathway function.
FAQs - Members & Memberships
Member Profile

Payments

We know that collecting and editing payments is a vital part of your business, which is why Membr integrates closely with payment systems around the globe to offer fast and flexible solutions. Common tasks and actions are all covered here:
Update a Subscription Payment
You can easily make one-off changes to the next amount a member will be billed, or you can permanently update their subscription to affect all future payments.
Locate the member profile to get started, and then do either of the following:
Make Changes to the Next Payment Only
If a member has an active subscription, their next scheduled payment can always be found on their Payments tab, in the Payments section. Find the scheduled payment and open its menu to select View Details:
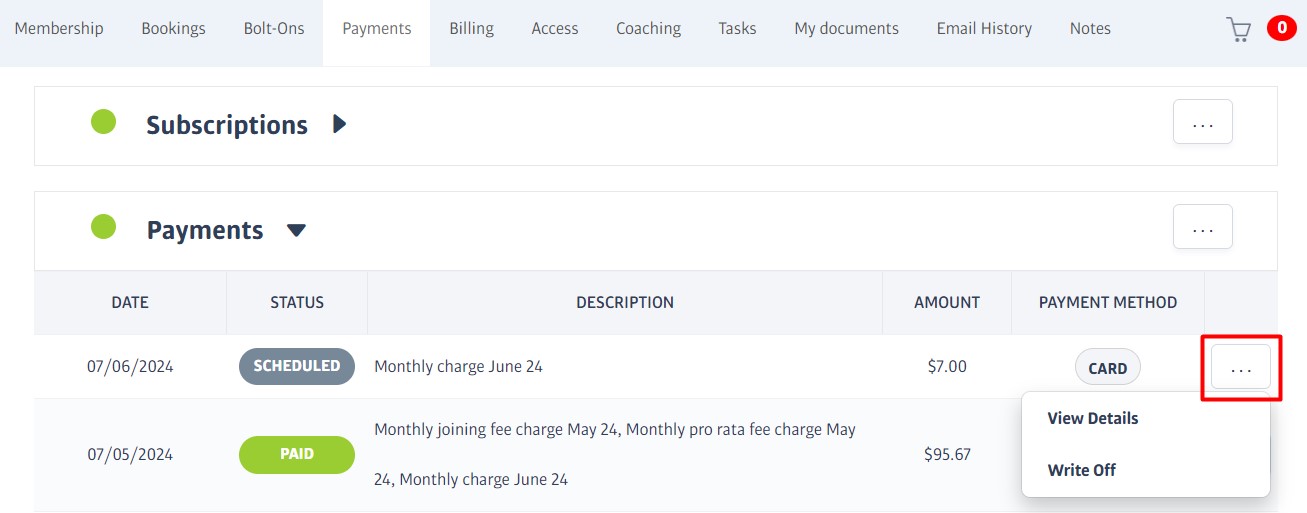
The Payment Details window slides out. Click the Edit button to make changes to the amount (which is the only value that can be adjusted):
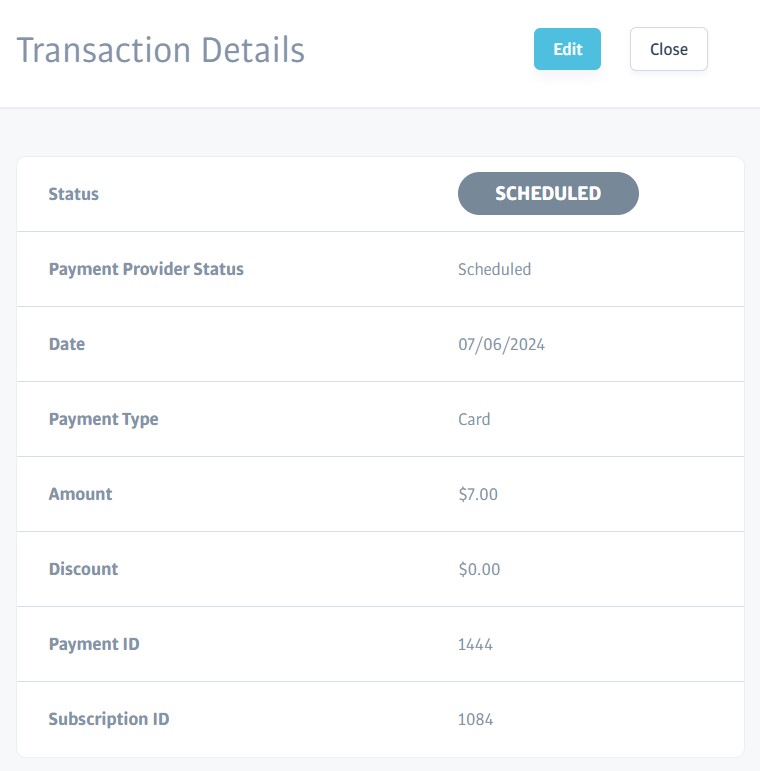
Make Permanent Changes to a Subscription
To make a permanent change instead, head to their Membership tab and click the Preview button:
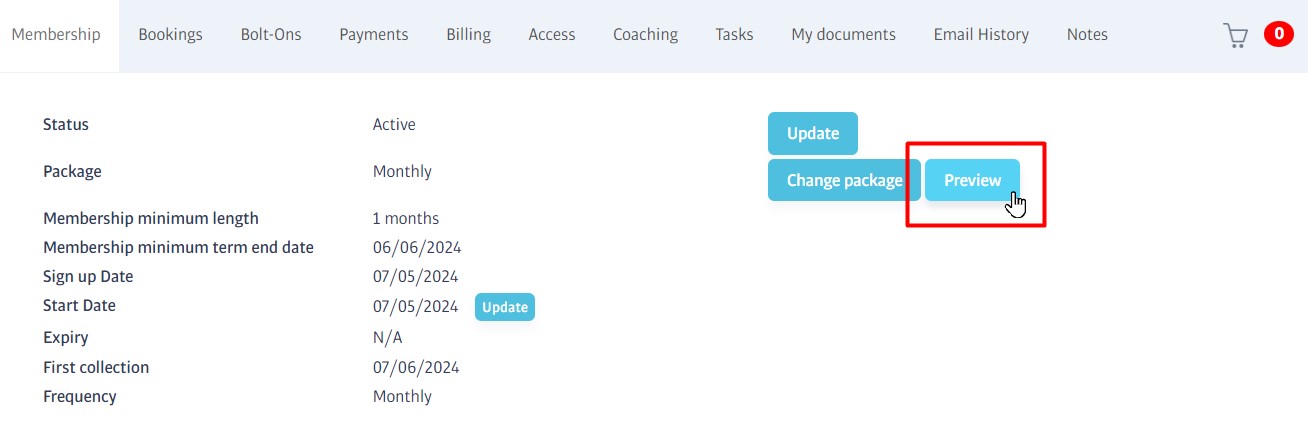
The Membership Details window slides out to give a summary of the member's subscriptions; click the arrow next to the subscription to change:
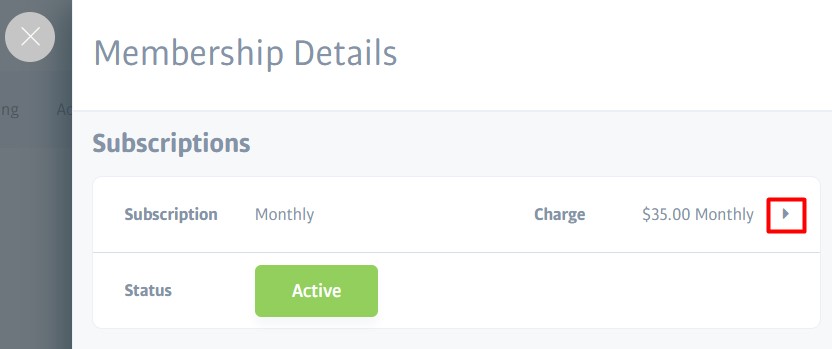
Details for the selected subscription will be shown, choose Edit Subscription from the options menu to make changes:
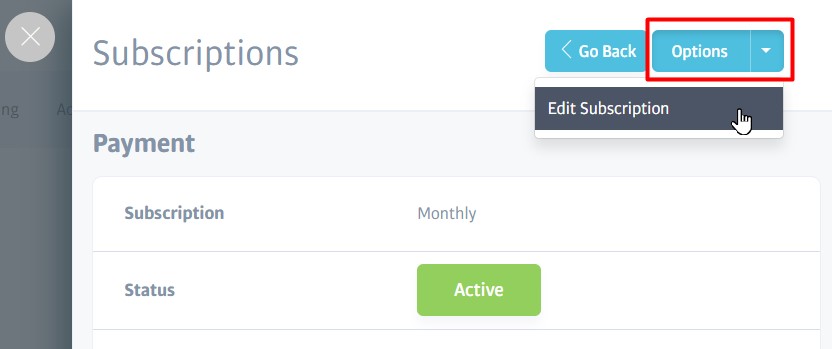
Click Update Subscription to confirm your changes.
Caution
When you edit a subscription, a warning will appear to advise you that the changes will only affect future payments (e.g. payments that are yet to be created). The next scheduled payment has already been created in their payments tab, however, and will need to be manually updated too.
Update a Member's Payment Details
Staff can't directly manipulate member payment details, but all members with a subscription automatically get a personalized payment portal where they can edit these.
If the member needs a reminder of their details, you can email them a link directly from their profile:
Find the member's profile and head to the small drop-down menu next to their photo:
This will send the login details to the member's registered email address. Once they log in, they can update their details as required.
Freeze Membership / Payments
A membership freeze temporarily pauses a membership; during the freeze period, any ongoing payment collections are stopped (or optionally reduced) and gym access is disabled.
When the freeze period ends, gym access resumes and normal payment collections begin again (in the case of an ongoing membership). Membership-related dates are also impacted when a freeze takes place as follows:
For a PIF membership, the expiry date is extended by an amount equal to the freeze period.
For an ongoing membership, the minimum term end date is extended by an amount equal to the freeze period (unless it has already been exceeded).
When you apply a freeze, the member's status will change from Active to Active | Freeze Scheduled, and then to Frozen when the freeze period is active. A note will also be added to their profile giving details of the freeze and the staff member who actioned it.
Note
For ongoing packages, a freeze can only be scheduled in multiples of the billing period in use, e.g. if the member subscribes to a fortnightly package, you can freeze for 2 weeks, 4 weeks and so on, but for a monthly package, it would 1 month, 2 months etc.
Steps to action a freeze
Locate the profile of the member you want to freeze and click the Update button on their Membership tab:
The Update membership status window opens. A freeze can be scheduled to start from the next available billing date, or a billing date further in the future. The end date is set similarly, a day before the start of the next billing period.
Clubs can be configured so that membership payments are stopped altogether, or taken at a reduced rate during a freeze, the window will clearly display the rate being applied.
Note that the freeze button will not become active until you have chosen the dates and provided a freeze reason:
The member status will update to show that a freeze has been scheduled:
Tip
If a freeze is scheduled (but not yet active) you can remove/cancel it using the View Freeze link.
Freezing PIF Memberships
When you schedule a freeze for an ongoing membership, you'll be offered a choice of dates that are aligned to the relevant billing periods for that package.
Of course, PIF memberships have no routine billing periods and can therefore be frozen between any dates that you need. After the scheduled freeze period has taken place, the member's expiry date will be extended according to the period you chose. We call this 'flexible freeze'.
Flexible freeze is always offered for in-club packages (i.e. paid in POS).
It does NOT normally apply to PIF packages that are purchased online, however (i.e. paid via DDMS).
If this is something you need to do, there is a switch available in Additional Settings to enable it:
Chargeable freeze Options
In the Setup->payments area, there is a switch to enable or disable chargeable freeze:
When this is disabled, member payments will stop completely during freeze periods.
When enabled, a new field - Freeze product code - is added to membership packages. This provides a drop-down list where you can choose the freeze product to use - the membership charge during the freeze period will use whatever price is attached to the freeze product:
During a freeze operation, the freeze dialog will update to show the appropriate freeze fees:
Tip
You can only 'attach' one freeze product to a membership package, but you can define as many freeze products - and therefore prices - that you like, so different packages can use different rates.
For example, if the gym has a standard $5/week fee for membership freezes, you might create three different products to cover different billing frequencies:
a $5 Freeze product to use on weekly packages,
a $10 Freeze product for use on fortnightly packages, and
a $21.66 Freeze product for monthly packages ($5 x 52 / 12)
Creating Freeze Products
To create suitable products to use for chargeable freezes, head to the POS->Manage Products area and click the Create New Product button:
All the settings for a new product are defined on a single page, be sure to set the Product type to Freeze:
Assigning Freeze Products
Once you have created suitable products to use for chargeable freezes, you need to decide which membership packages will use them, and update the package settings accordingly.
Head to Sales->Packages to see the list of packages at the club, and edit any that you want to apply the chargeable freeze to. When you edit the package, on the first tab (Basic details) you'll see the Freeze product code drop-down shown previously, select the appropriate product here:
Keep clicking Next and then Finish to save your changes. Any members who request a freeze on such packages in future will be billed at the rate attached to the freeze product you selected.
Pay for Future Payments
Using the POS system, you can take payment now for forthcoming scheduled membership payments.
Locate the member's profile and head to their Payments tab. Expand their Subscriptions section and click on the menu next to the active subscription. Here you can choose to pay for one or more future subscriptions using the selector:
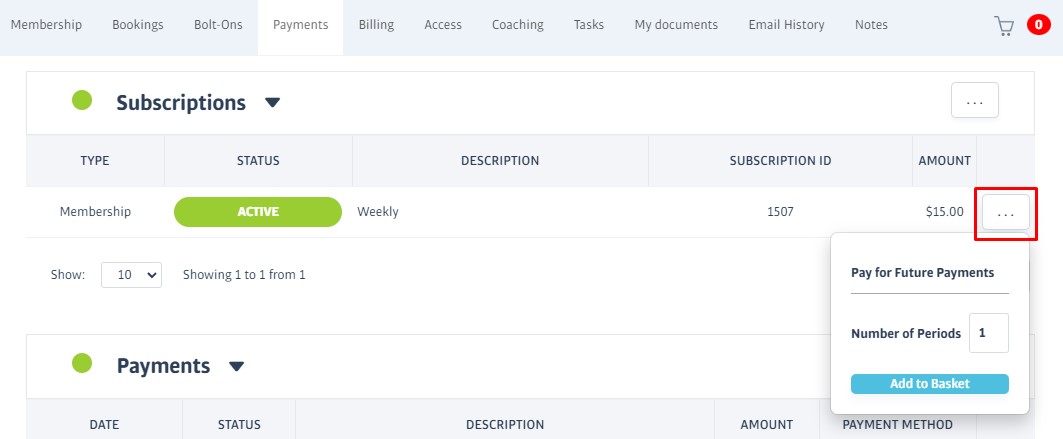
When you've added them, click on the member's basket and take payment in-club as usual:
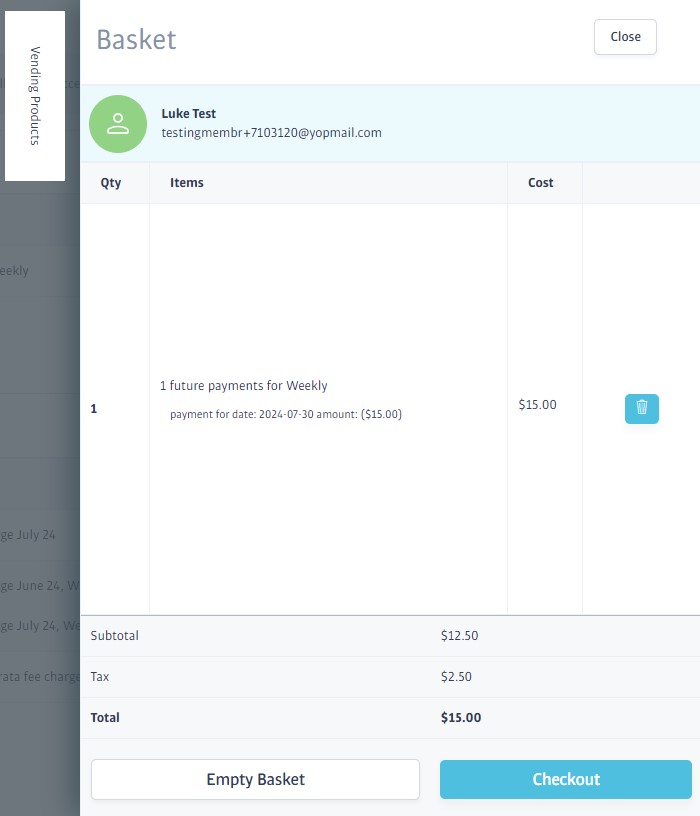
The period(s) you chose to pay will show as Paid, and a new scheduled payment to cover the next membership period will be generated:

Skip a Payment
A member's next subscription payment can be skipped directly from their profile.
Find the profile you want to use and then:
Locate the next subscription payment. This will be a payment with scheduled status at or near the top of their Payments section. From the menu at the right of the payment, select the Skip Payment option:
Read the warning that appears next and confirm your action. The payment status will change to Written Off and collection will no longer be attempted. Note that this cannot be undone.
Refunding a Transaction
You can issue a full refund* for any completed (i.e. paid) transaction stored in your Membr system, but card or bank transactions can only be refunded to the original payment source.
To clarify:
If a transaction was originally paid for in cash, the Refund in POS option will be available in the options menu next to the transaction.
If it was paid for by bank transfer, the Refund to Bank option will be shown instead.
If it was paid for by card, the Refund to Card option will be shown instead.
*It is only possible to refund complete transactions at this time (ie no partial refunds if there were multiple items in the original purchase)
To Issue a Refund
All member transactions* can be found on a member's profile. Enter the member's name into the search bar, select their profile, and open their Payments tab.
Locate the transaction in the Payments section, and choose Refund in POS, Refund to Bank, or Refund to Card option according to the original transaction type.
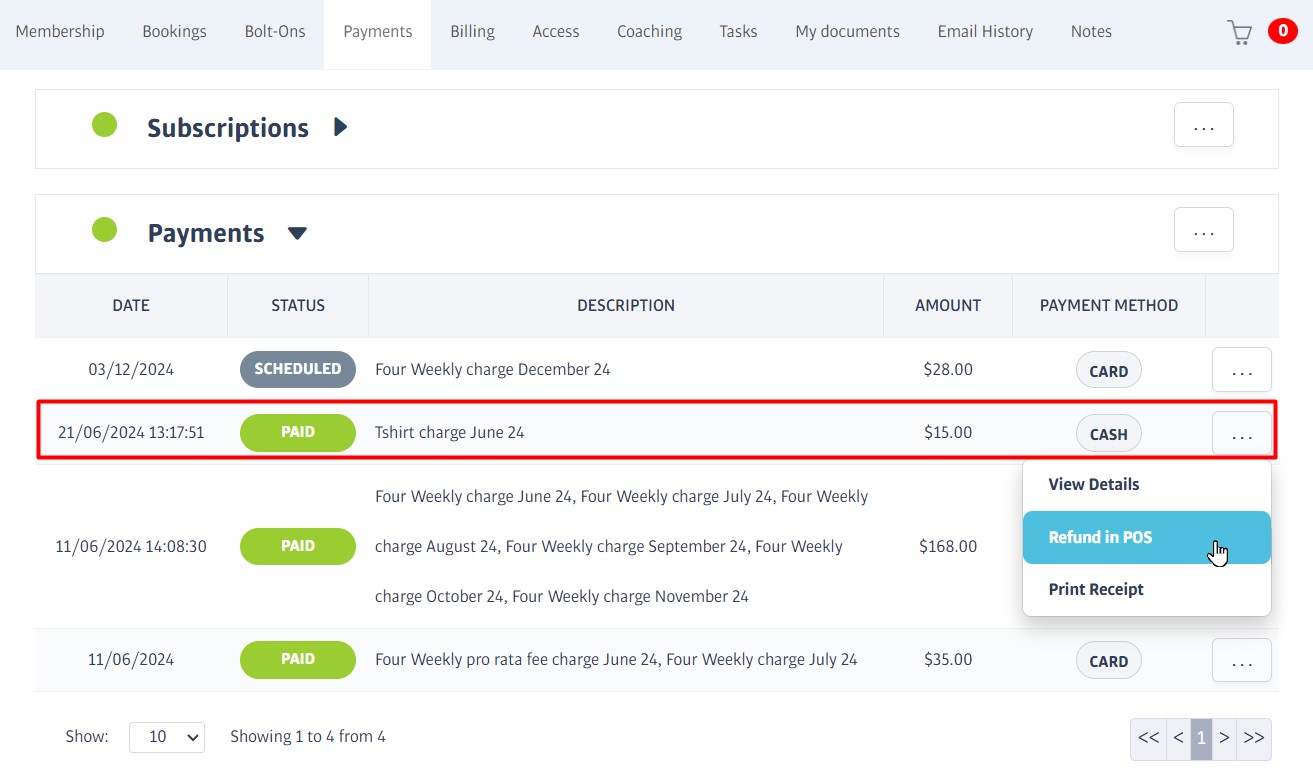
*Guest sales, where enabled, can be found the POS->Guest Refunds menu instead; see section below this one.
For card and bank refunds, accept the confirmation box to finish.
If this is a POS refund, a credit will be added to the member's basket and you'll need to proceed to the Checkout in the usual way to issue the refund.

The transaction status will change to Refunded/Refunding (in the case of pending bank or card refunds), and a new transaction will be added for the actual Refund:

To Issue a Refund - Guest Sales
The POS->Guest Refunds area lists all guest sales ever made at the club. The view defaults to the current day, but you can use the date selectors to view older transactions.
(If this option can't be found in the POS menu, then guest sales are not enabled at the club!)
Locate the transaction and choose Refund in POS from its menu:
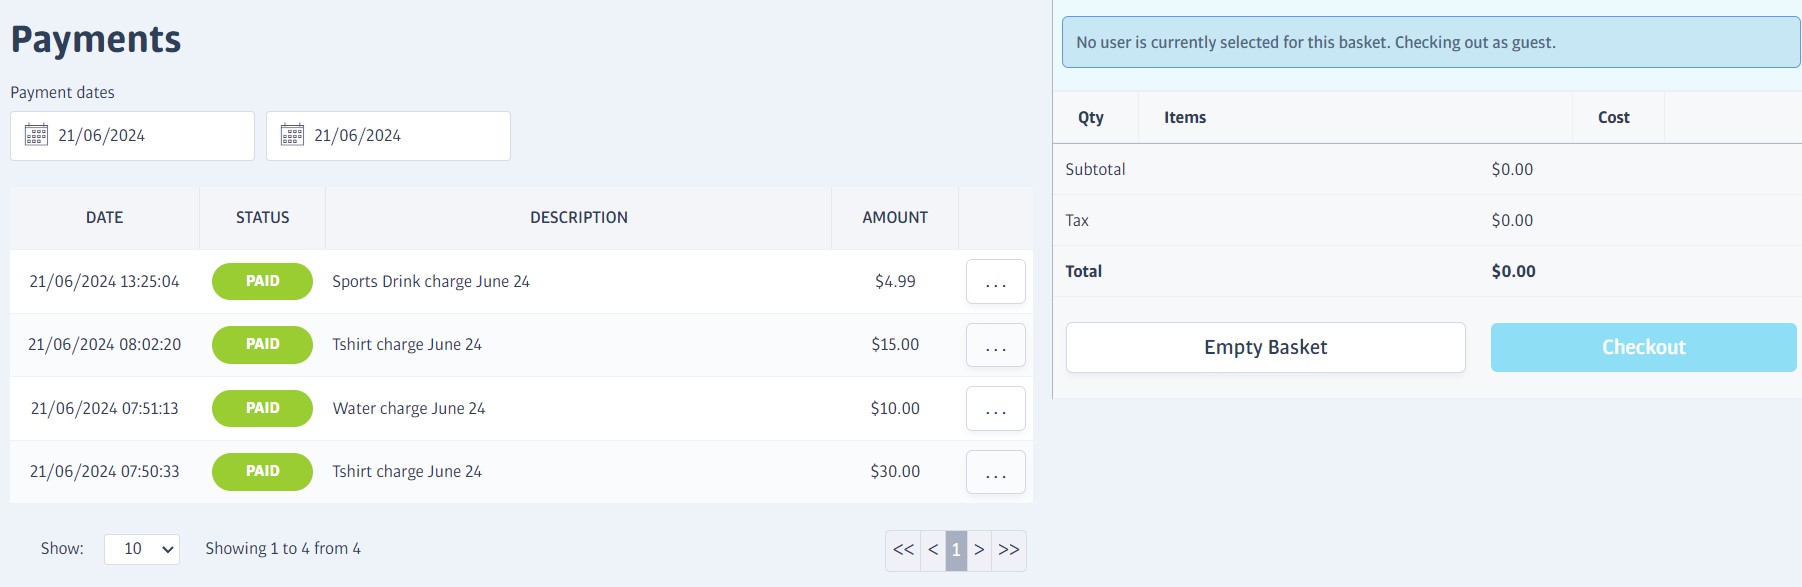
Proceed as per step 2 above.
Chargebacks
A chargeback (sometimes called a dispute), occurs when a cardholder files a claim with their bank to reverse a charge they think is incorrect for some reason.
When a chargeback is triggered, the payment handler will typically levy a small dispute fee. This, and the value of the disputed payment will be retrieved immediately.
Such transactions will show a status of Refunded. If you view the transaction details you'll see a payment provider reason of 'Chargeback':


Chargebacks cannot be challenged via the software at this time, and take place immediately.
FAQs - Payments
Bookings/Scheduling

The Bookings tab is the place to go whenever you need to schedule (or add attendees to) inductions, classes, consultations, and other events you hold at your gym - you can set up a spin class for example, assign a trainer, and then sit back and allow members to book themselves onto the class online (and take payment too if the class has a charge)
If a class gets too full, the system even creates a waiting list specific to that class. It will automatically transfer and notify waiting members when spaces become available too.

Bookings Overview
Fundamental to the operation of the booking system is the Booking Type. These are the coloured strips listed down the right of the calendar in the screenshot above.
A Booking Type contains everything you need to schedule a class quickly and easily; what it's called, who will run it, where it will be held, how many attendees it can have etc. However, a booking type is only a template for a class, it is not an occurrence of a class.
To schedule an actual class, you just drag the Booking Type you want onto the calendar area at a specific date and time. You can tweak many aspects of your individual class, such as trainer, price, number of places, daily/weekly/monthly repeats etc., but these will all begin with the 'recommended' values from the booking type to get you started quickly.
Getting Started with Bookings
Before you can schedule any bookings at all, you'll need to create at least one of each of these in the software:
A Staff member - The PT/coach responsible for the class/induction/etc. Head to Setup->Manage Staff to view/edit/add more.
A Location - Where the class will take place; the gym floor, a separate dance/fitness suite, outbuilding, external sports hall etc. - you can define as many types as you wish, and each one must have an associated capacity to ensure that the location isn't overbooked. Head to Bookings->Location Manager to view/edit/add more.
A Booking Type - The class template itself; create one for each kind of class or event you'll want to schedule on your calendar; 'Spinning for Beginners', 'Body Pump Advanced', 'Gym Induction' etc. Head to Bookings->Booking Types to view/edit/add more.
Schedule a Class/Event
Note
Before you can schedule an event, you'll need one or more Booking Types to choose from, see Bookings/Scheduling for details.
Head to Bookings->Bookings Calendar to view the bookings schedule. Use the forward/backward arrows to find the date if you don't want to schedule an event for this week:
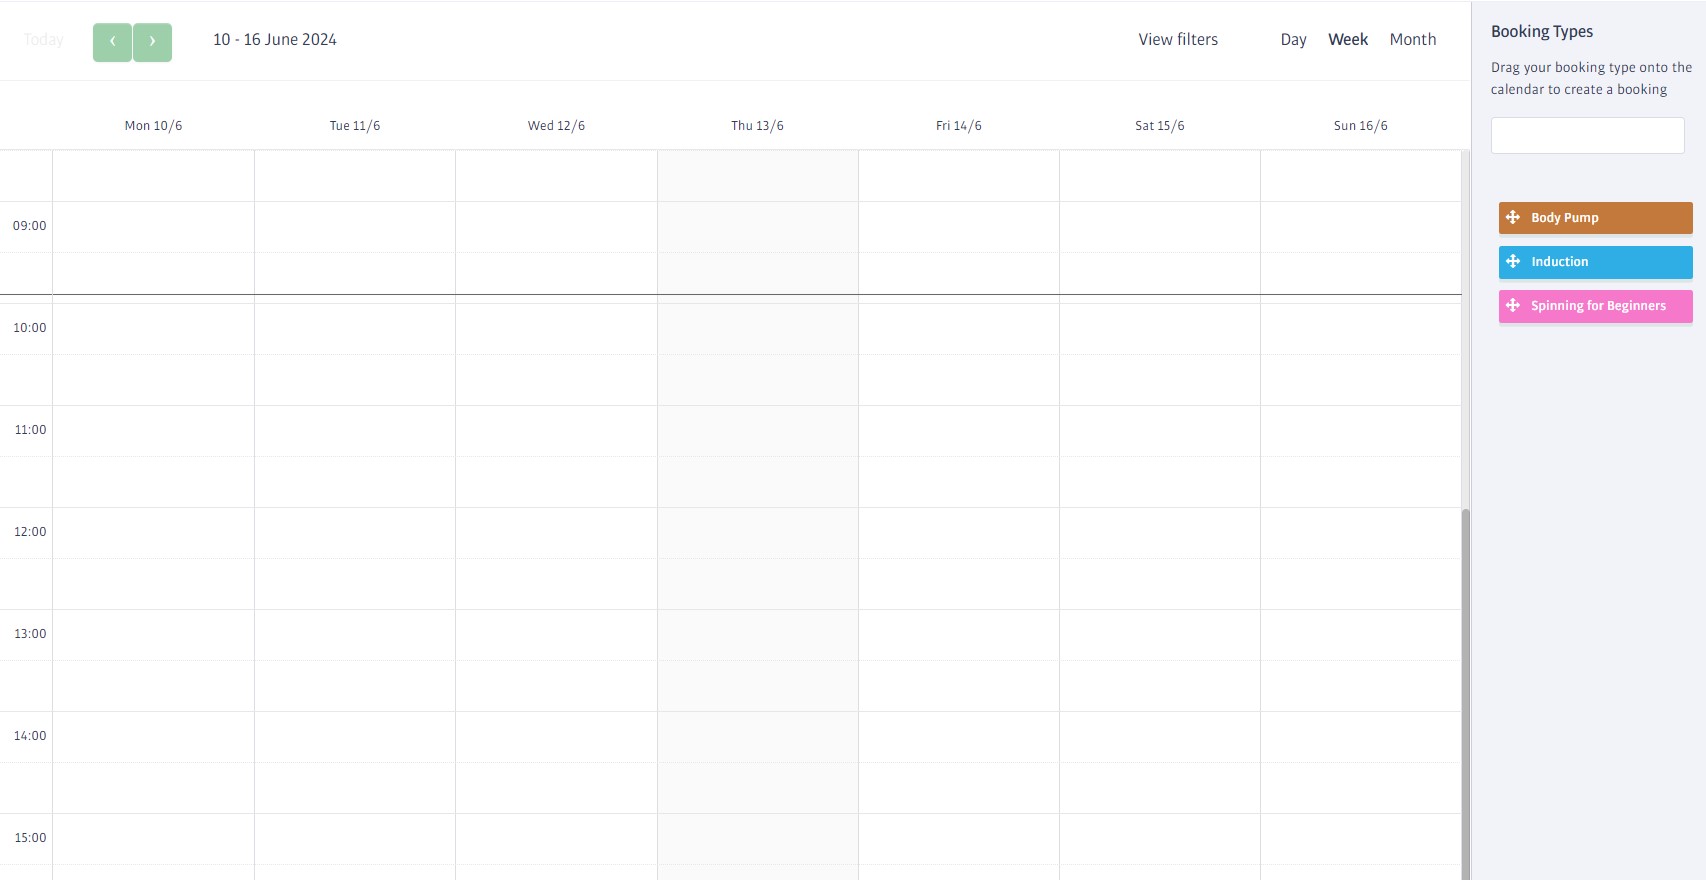
Drag the Booking Type you want to schedule over to the calendar area and drop it onto the highlighted time slot. A window will appear next; you can fine-tune the date and time here, so the exact time you dropped it on doesn't need to be perfect.
Adjust any of the default values as necessary, then click Next to continue:
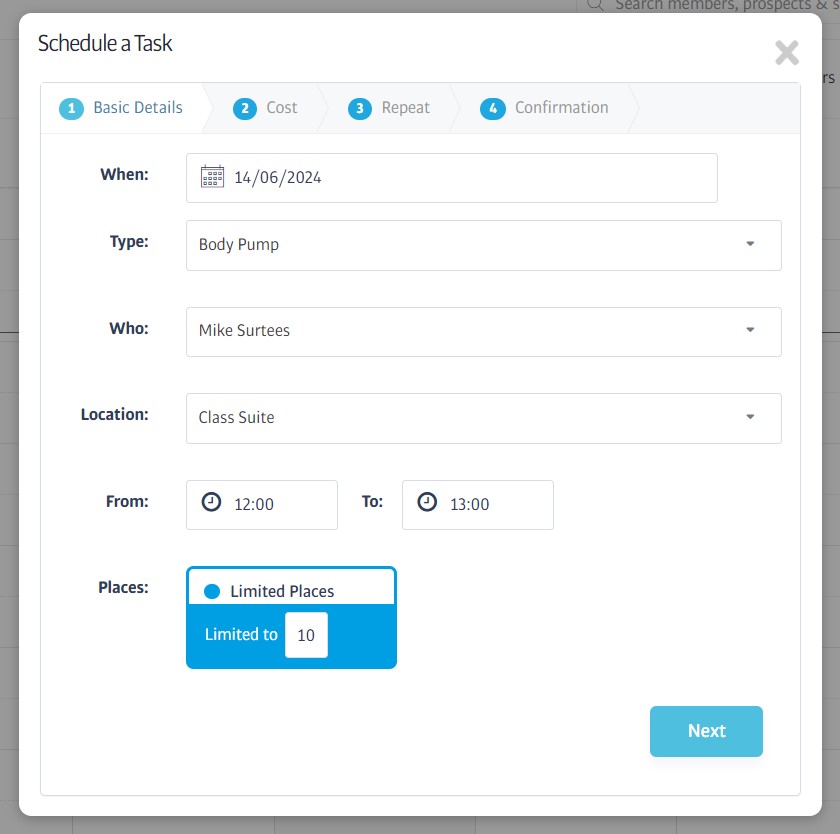
Adjust the prices in the next step:
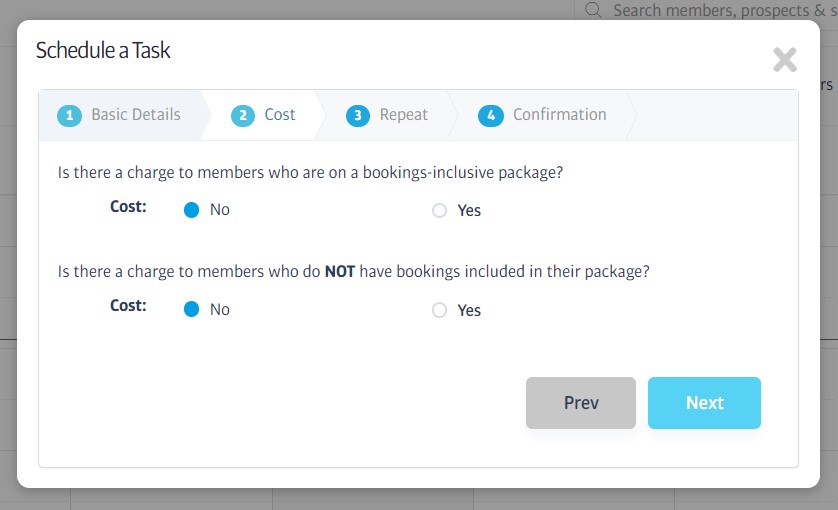
The Repeat step allows you to repeat this booking as often as you like - every day, a few times a week, once a month, whatever you need. Note that you can set a specific number of repeats, or provide an end date and let the system repeat the booking until the date is reached:
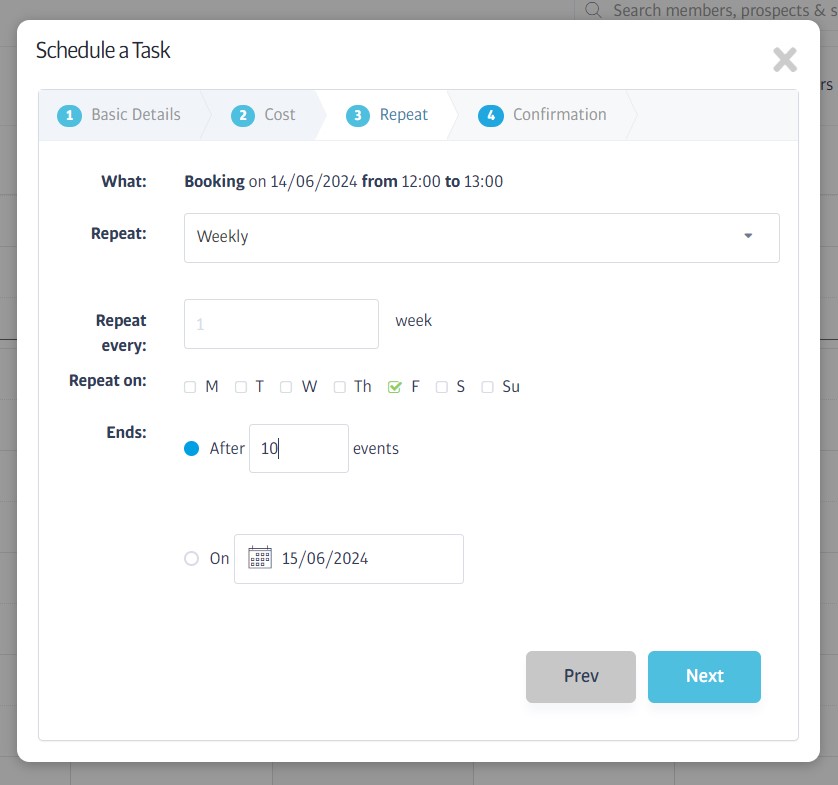
Confirm all the details in the final step, or click the numbered tabs to go back and make edits. When you're happy, your booking(s) will be added to the calendar.
Add or remove attendees
To avoid the Booking Calendar getting too cramped when there are many classes, booking tiles will expand when you click on them, and contract again when you move the mouse away:
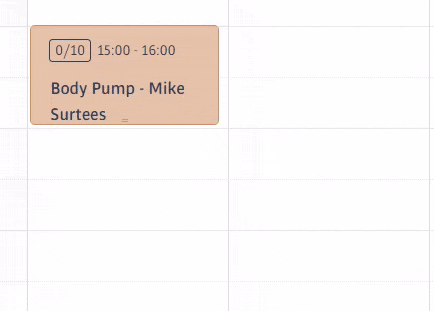
Adding an Attendee
To add a member to a booking, locate the booking you want and then:
The booking will display the number of places booked and the number of total places in their top left corner - 0/10 in the image above means no places booked, 10 total. When the tile expands, click on the + symbol to add or remove attendees:
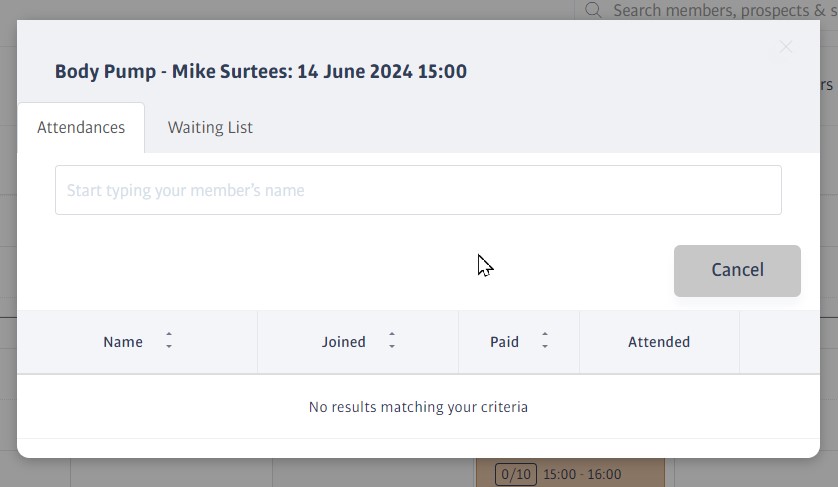
Note
If the booking is full, you can continue to add the member in the same way, but rather than be added to the booking immediately, they will be added to its waiting list (which you can view by switching the tab at the top)
Enter a part of the member's first or last name into the search box; a list of matches will appear - select the member from the list
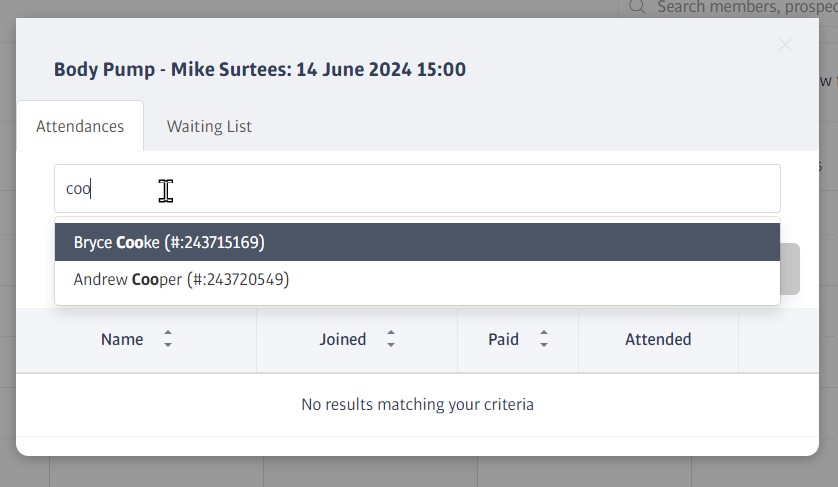
When you select a member, several payment options might appear if the booking has a charge, such as 'use a session credit' - pick which one you want to use. Our example here is free (or included in their membership) and so no payment choice is offered:
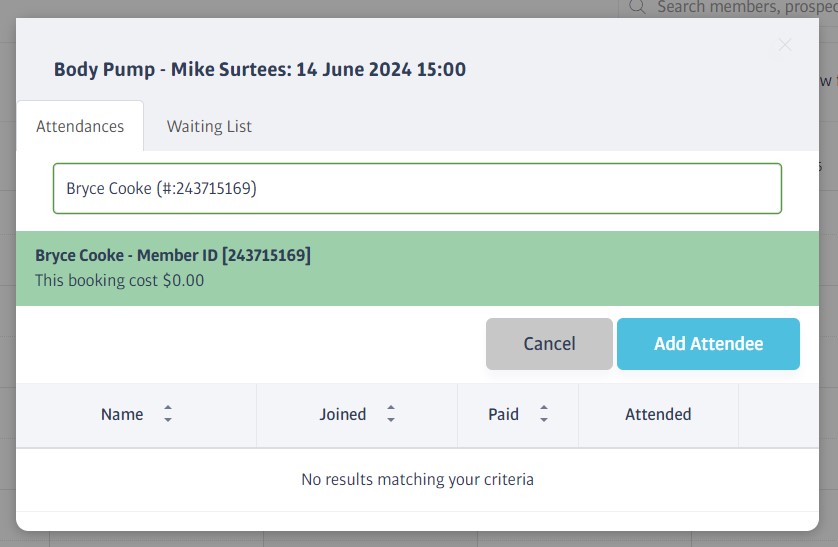
Note
If a chargeable booking is full, the member will be added to its waiting list instead. However, they will still be charged, but the charge or session pack credit will be returned to them if a space does not become available.
Once you click Add Attendee, they will be added to the guest list (or waiting list) for this booking:
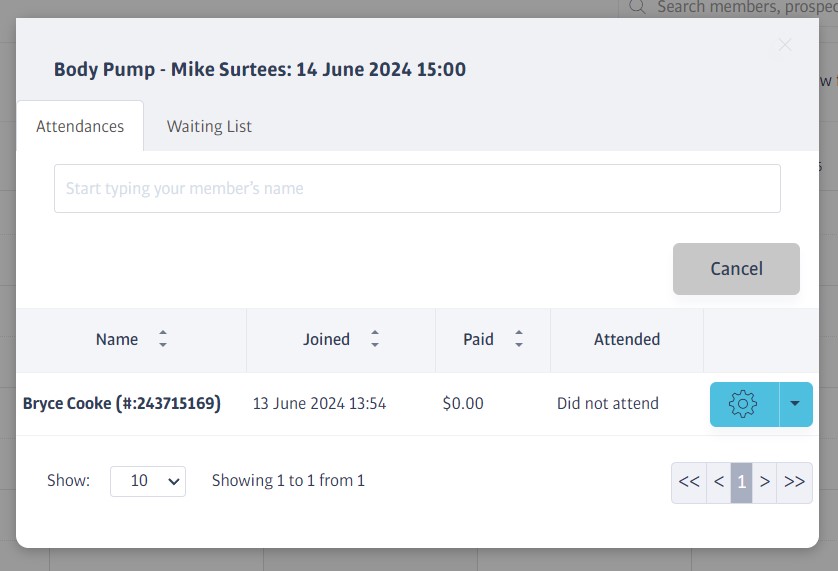
Removing an Attendee
Locate the booking and click on the plus symbol to reveal the guest list for this booking:
Click the cog menu belonging to the member you want to remove, then click Remove attendee:
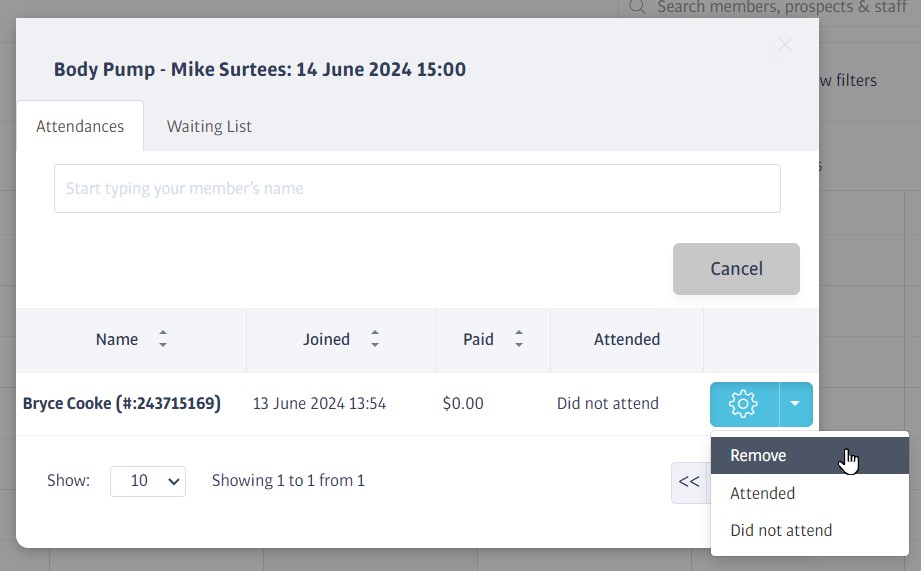
Waiting Lists Explained
Each booking on the calendar has a unique list of attendees, and a separate waiting list in case the class gets full. Both can be viewed and edited using the corresponding tabs visible in the screenshots above.
Waiting Lists operate on a first-in, first-out basis; if a space becomes available on the main booking for any reason, the member who has waited the longest will be notified by email and transferred to the list of attendees.
If the booking has a charge, the member will need to pay (or use a session credit) even if they are added to the waiting list. If a space does not become available, their fee will be returned shortly after the class takes place.
Editing a booking
Once a booking has been created on the calendar, you can still adjust its start date/time or duration. You can also edit its parameters, perhaps to increase capacity, change location or trainer etc.
Note
If you make changes to a recurring booking, the following warning will be displayed, giving you the choice to edit just one, some, or all instances of the class:
Directly on the Calendar
You can drag bookings around in the calendar area to reposition them, perhaps affecting the start or end times, even moving them to start on a different day.
Editing the booking tile
You can choose the Edit option in the booking's settings menu. This exposes the original menu used to create the booking, and allows you to adjust all aspects of it (except for the repeat behaviour):
FAQs - Bookings
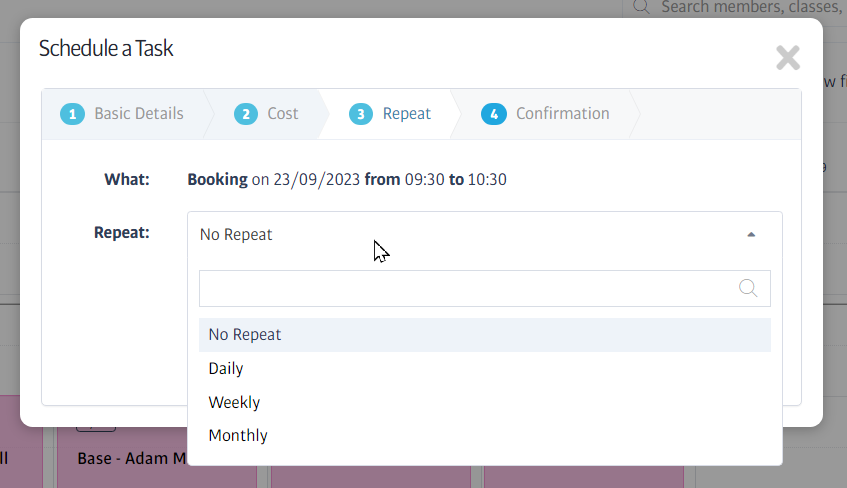
When adding a class to the calendar, change the Repeat for the booking (No repeat, daily, weekly or monthly). Then you will be able to pick every day, or selected days in the week in which it will take place etc.
You can also tell the system how many events you want to create or let them repeat until a specific end date has been reached.
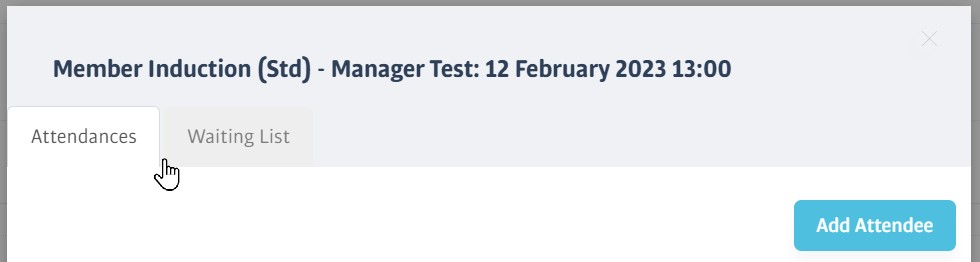
Yes - if the class is full, they will be added to the dedicated waiting list for that class instead - if the booking has a charge, however, they will still need to pay.
If/when a place in the class becomes free for any reason, the system will automatically email the longest-waiting member to let them know, and then move them off the waiting list and onto the main list of attendees.
(If a space does not become available, any charge they paid will be returned)
In-club Sales (POS)

Any time you need to take immediate payment in the club, the POS system lets you accept cash or a wide variety of debit and credit cards.
You can sell physical products like snacks and merchandise, or services such as membership upgrades and related fees.
There are no limits to what you can sell, but almost all products must exist/be defined in the system before they can be sold. Each product must also belong to a product type to make it easier to find later - you can name the types to suit whatever you need; for example, 'Large towel' and 'Baseball cap' might both be categorized as Merchandise, but you might also have product types called Snacks, Fitness Accessories and so on.
Getting Started with POS
Aside from products and product types, there are two other important concepts in the POS system; the Cash Register and the Shopping Basket.
The Cash Register
This system helps you keep track of physical cash by logging every transaction and updating the contents of a cash drawer. Because of this, it's also a handy accounting and reporting mechanism.
The virtual Cash Register has to be open to make a sale, but it doesn't need closing every time like a real cash drawer does. Instead, it is recommended to open the virtual Cash Register once at the start of the day/trading period (and record the notes and coins you put in the real cash drawer), and to close it again once the day is done.
When you close the register, you can view or print a Closing Report summarising the day's cash and credit transactions, and the system will also help you reconcile the contents of the real cash drawer/identify any discrepancies.
The Shopping Basket
You must add a product or service to someone's Shopping Basket to sell anything. Shopping Baskets always belong to a member (or a default 'guest' account if guest sales are enabled). When a member's name is provided, the system can also store a record of any purchases they make against their profile.
When everything you want to sell is in someone's shopping basket, you hit the Checkout button to move on to payment collection. A wide variety of payment types are supported, and once payment is successful, the basket is emptied.
Every single member has a unique shopping basket, and you can switch between them as often as needed to add or remove products before going to the Checkout stage. Handy if you need to cope with several sales at once using the same PC.
The Cash Register
The Cash Register is a virtual, computerized reproduction of a traditional cash register; it has a virtual drawer that can be opened and closed, and it will keep track of the money stored in a physical cash drawer).
When the cash register is open, transactions can be carried out at the club using any supported payment method, and they will all be logged on this screen.
Note
The cash register system helps keep track of the cash in the drawer; only cash sales will affect this figure of course, but all non-cash sales will also be logged on this screen.
Warning
When the cash register is closed, no in-club transactions of any kind can be made. If you try to purchase items through the POS system, a warning will pop up to remind you to open the drawer first.
Tip
Open the virtual cash register when you start in the morning, being sure to log the starting amounts of notes and coins. Leave it open for the rest of the working day and then, at the end of the day, you can close the register, reconcile the virtual register total with the actual cash you have, and log any discrepancy.
Other Cash Register Operations
There are three other operations you can perform on the Cash Register at any time, provided that it is Open:
Recount
Use this if you want to perform a spot check on the contents of the cash drawer; a summary of the total that should be in the drawer is shown, and if you input the quantity of notes and coins you actually have, any discrepancy will be shown.
Add
Use this to put money into the drawer without logging it as a sale - when you add more notes or coins to use as change for example.
Withdraw
Use this to log any cash you remove throughout the day - when there are too many notes or coins of a given type, and you need to draw some off to make room for example.
Closing Report
This button only becomes enabled when the cash register is closed. Clicking it will print a summary of all the payment types taken throughout the last trading period (we had a $5 cash shortfall in this one):
Products & Product Types
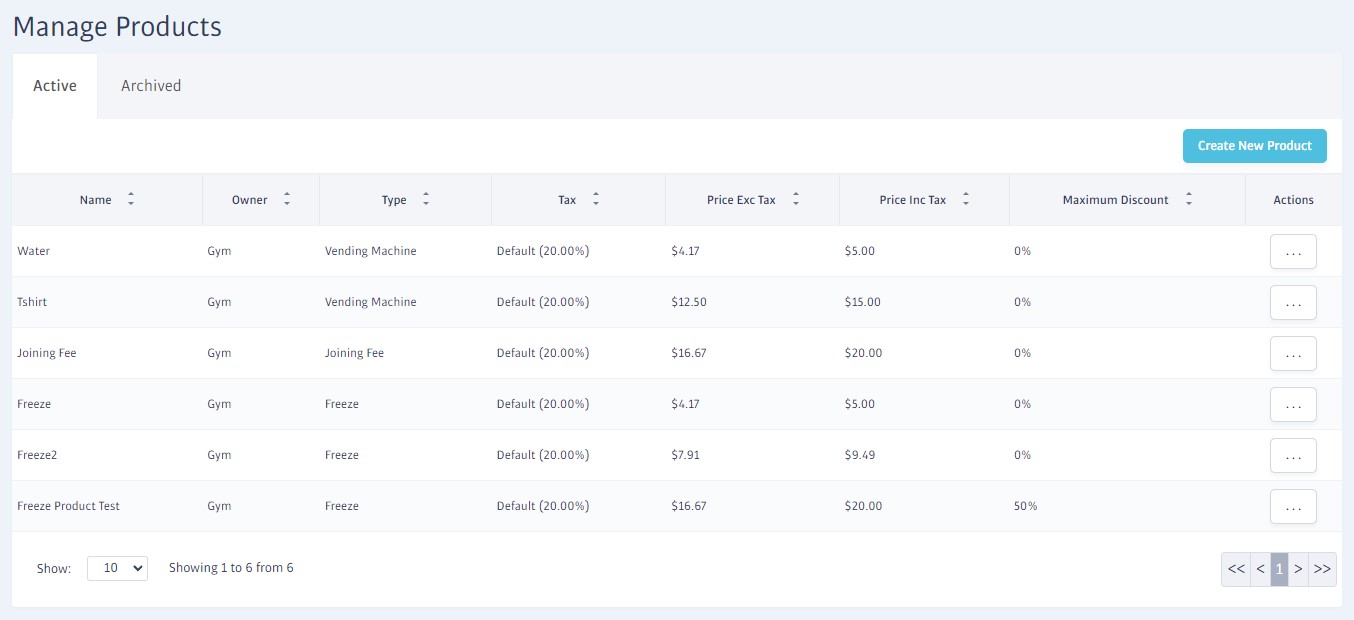
The POS system uses a Product definition to provide the recommended price, tax type and various other items of information about something you sell at the club.
In contrast, a Product Type is much simpler - it is nothing more than a named grouping, or folder, into which Products are categorized to make it easier to find them at sales time.
You can view a complete listing of all the products or product types available at your club, or create new ones by heading to POS->Manage Products, or POS->Manage Product Types respectively.
Note
A limited selection of Types and Products may have been created for you by your onboarding team, but there is no practical limit to the number that you can add.
Creating New Products
The fields that need defining for a new product are fairly self-explanatory, but note the following:
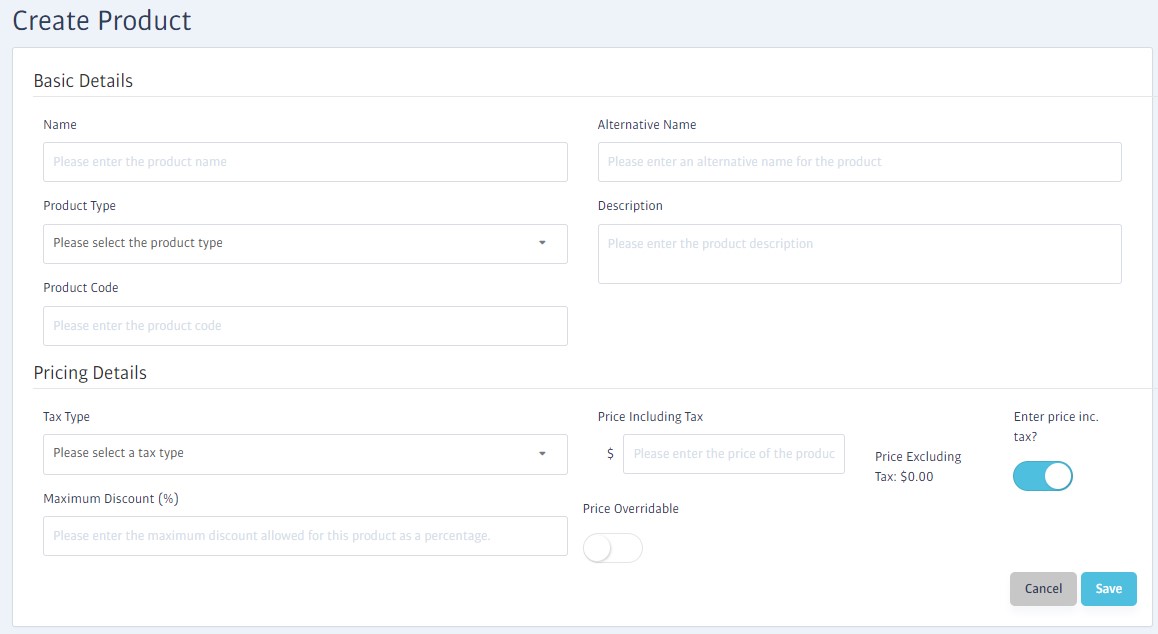
The Product Type drop-down will show all the existing Product Types at your club; make sure the one you need is available before you create the product with this dialog!
The price you provide for the product here will be rigidly applied at sales time, but if you provide a maximum discount %, or enable Price Overrideable, staff will be able to adjust the price at the checkout if required.
Note that these are two separate settings; if you provide a non-zero amount for maximum discount, staff can discount the product up to this limit. If you enable Price overrideable, staff will be able to override any discount limit and set any value at all.
Product Code is purely for your use, and can be used to help with reporting.
Making a Sale
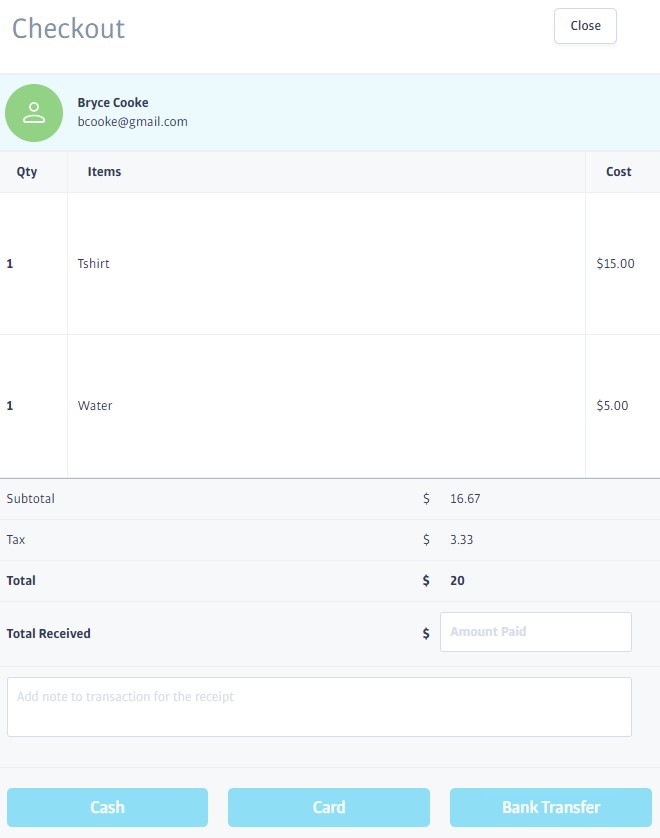
Every time you make a sale, you'll wind up at the Checkout screen, and there are two ways of getting here; 1) Via the POS Sales screen, or 2) directly from the Shopping Basket on a member's profile. The actual checkout process is identical for both, let's look at POS Sales first:
POS Sales
Head to POS->POS Sales when you only need to sell physical items (many service-related products like membership add-ons or early membership payments can't be added from here.)
When you select the POS Sales option, you'll see a screen similar to this:
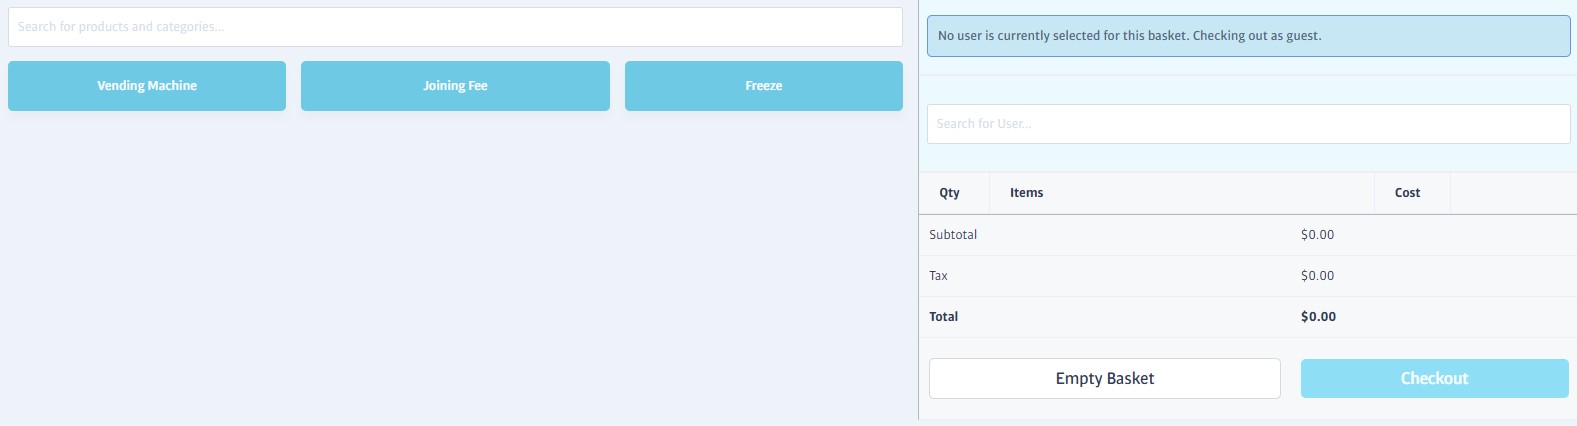
The screen is split into two sections; on the left are the product types and products that are available for sale, and on the right is the shopping basket.
The owner of the shopping basket is displayed at the top of the basket area:
If guest sales are enabled, the basket will belong to a 'guest' by default, meaning you can sell items to anyone immediately without providing an owner for the basket. This is for convenience, but you can still provide a member name if you want to.
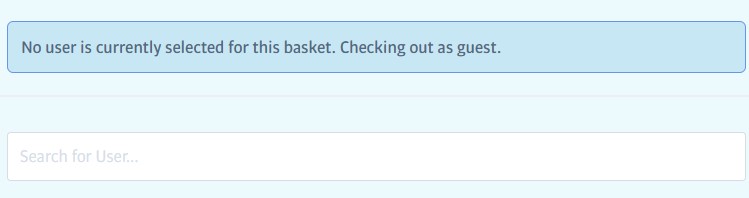
If guest sales are disabled, you must always provide a member name before you can add items to the basket. Type a part of the member's name in the search box, then pick from the list of matches.
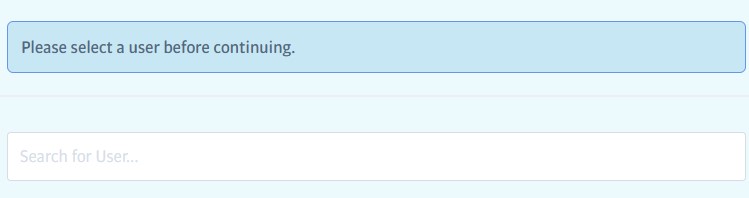
Note
Even if guest sales are enabled, it is a good idea to provide a member name where you can; this adds a record of the sale to their profile, improves accountability, and makes the process of issuing refunds more straightforward.
Note
Speak to your Success Manager if you want to enable or disable guest sales.
Adding Products
To start selling products, you can expand any of the Product Types listed on the left to reveal the products they contain. All items for sale will display the price you set during product setup:
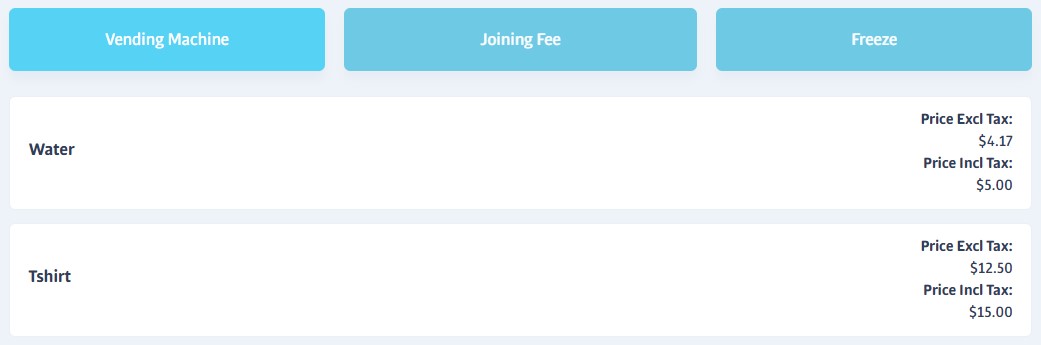
Just click once on the item you want to sell, and one of that item will be added to the basket. If you want to sell multiple items, click the product multiple times.
Products in the basket have a trashcan icon to remove them from the basket, and a pencil icon to edit the quantity or price/discount (if the product's definition allows price changes):
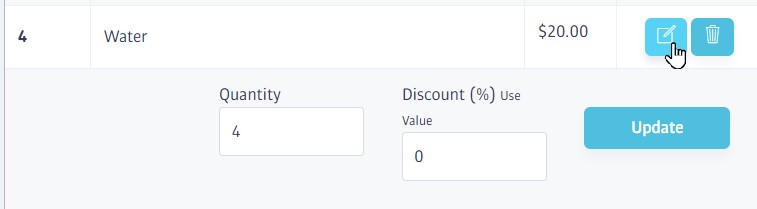
When you are ready to take payment and complete the sale, click the Checkout button.
Member Profile Shopping Basket

To the right of the tab strip on every member profile, you'll see a shopping basket, with a red item count displayed next to it.
Clicking this will open an identical shopping basket to the one already described, except the member will automatically be set as the owner, and the 'ordinary' items for sale are packed away in the Vending Products button (click it to expand):
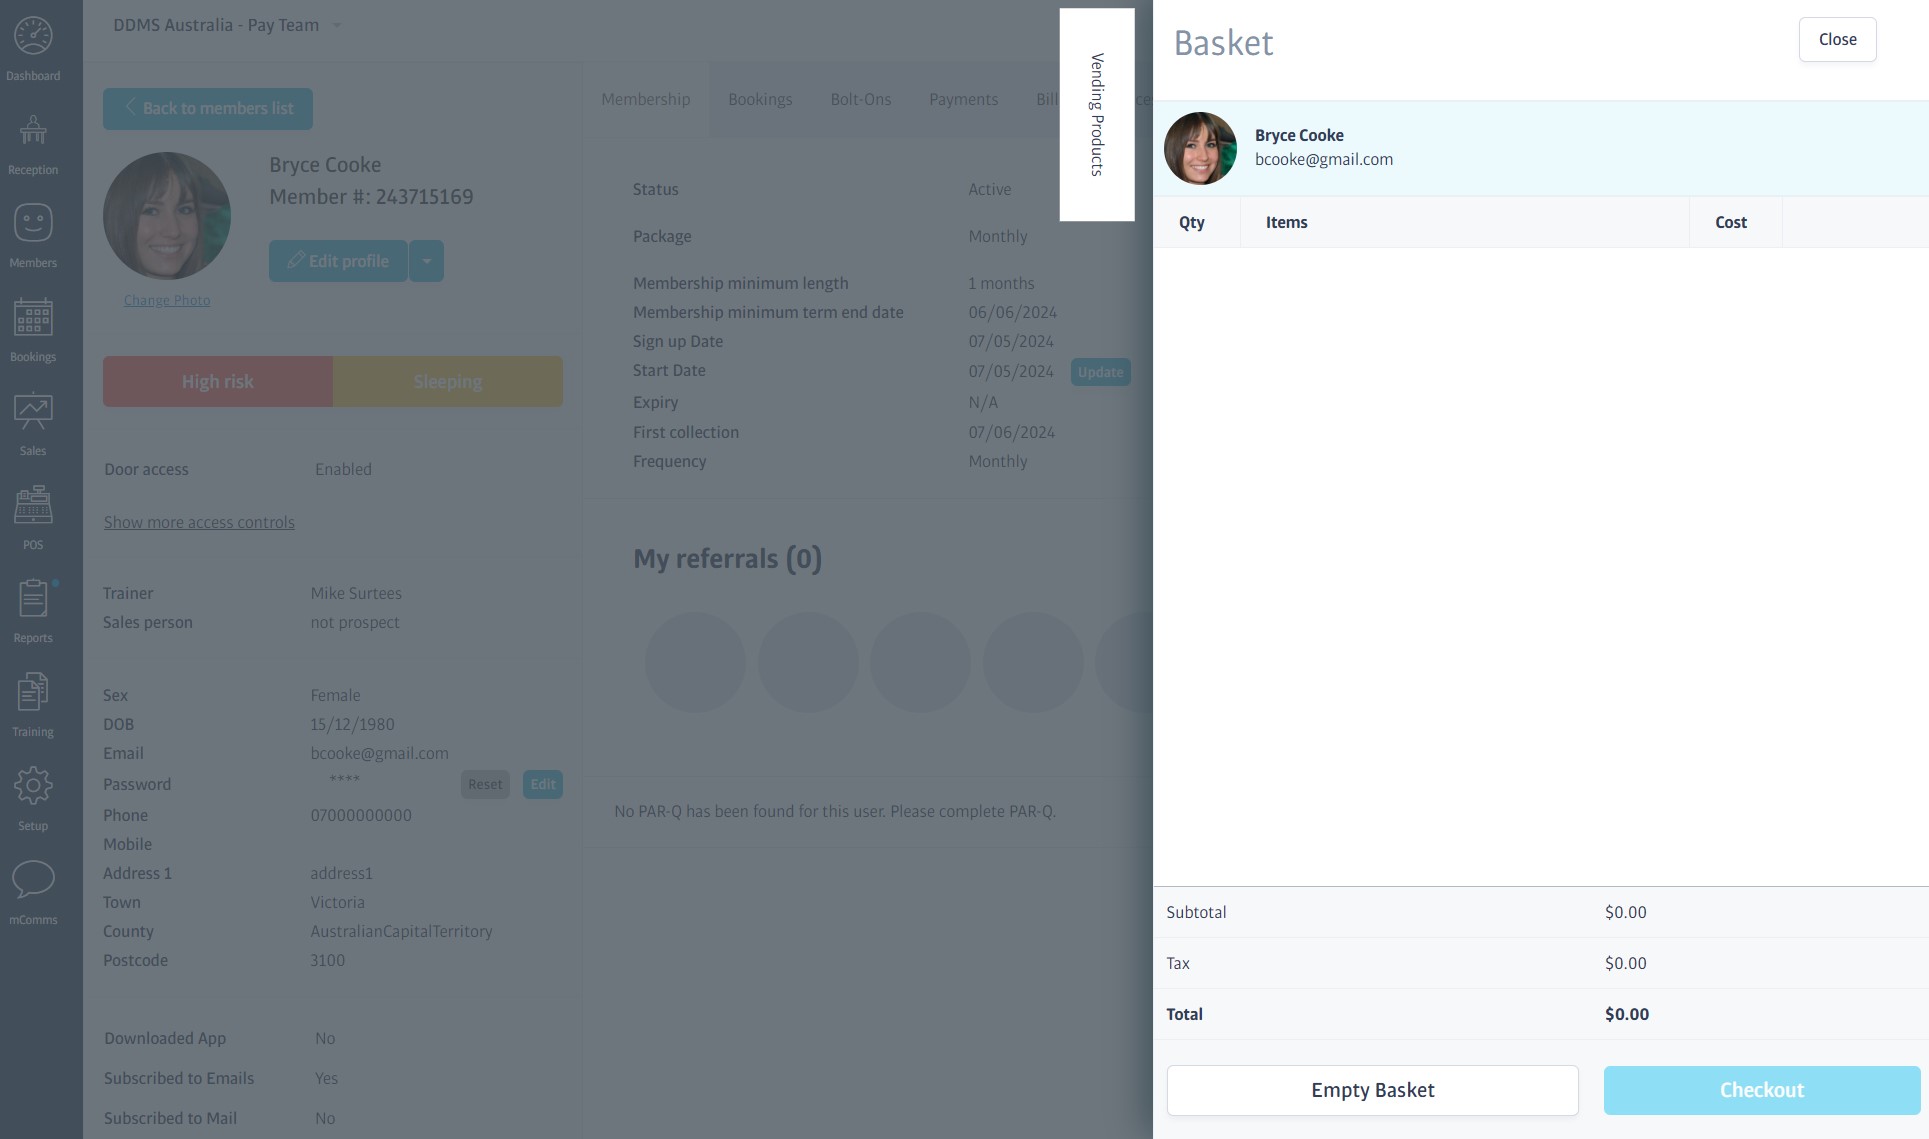
Importantly, however, using the various tabs on the member profile you can also add membership-related purchases such as add-ons and session packs, pay off scheduled payments and more besides.
As before, click the Checkout button when you are ready to collect payment.
Note
The shopping basket here is a more powerful version of the one on the POS Sales screen, but it takes a couple more clicks to get to, and can only be used to sell to the chosen member.
The Checkout
Whichever sales route you take, the checkout process is the same; the Checkout screen will slide out and show the sales total.
None of the payment types at the bottom will be enabled until you enter a figure in the Total Received box (if you enter a higher amount, the system will tell you how much change is due, handy for cash sales).
Select the payment method used and complete any additional steps for credit/debit options as necessary.
You can add a note to the transaction if you want - this will be stored with the transaction and printed on the receipt.
When payment is successful, a sales receipt can be printed, and the basket is emptied.
Refunding a Transaction
You can issue a full refund* for any completed (i.e. paid) transaction stored in your Membr system, but card or bank transactions can only be refunded to the original payment source.
To clarify:
If a transaction was originally paid for in cash, the Refund in POS option will be available in the options menu next to the transaction.
If it was paid for by bank transfer, the Refund to Bank option will be shown instead.
If it was paid for by card, the Refund to Card option will be shown instead.
*It is only possible to refund complete transactions at this time (ie no partial refunds if there were multiple items in the original purchase)
To Issue a Refund
All member transactions* can be found on a member's profile. Enter the member's name into the search bar, select their profile, and open their Payments tab.
Locate the transaction in the Payments section, and choose Refund in POS, Refund to Bank, or Refund to Card option according to the original transaction type.
*Guest sales, where enabled, can be found the POS->Guest Refunds menu instead; see section below this one.
For card and bank refunds, accept the confirmation box to finish.
If this is a POS refund, a credit will be added to the member's basket and you'll need to proceed to the Checkout in the usual way to issue the refund.
The transaction status will change to Refunded/Refunding (in the case of pending bank or card refunds), and a new transaction will be added for the actual Refund:
To Issue a Refund - Guest Sales
The POS->Guest Refunds area lists all guest sales ever made at the club. The view defaults to the current day, but you can use the date selectors to view older transactions.
(If this option can't be found in the POS menu, then guest sales are not enabled at the club!)
Locate the transaction and choose Refund in POS from its menu:
Proceed as per step 2 above.
FAQs - POS
Reports

The Membr platform offers powerful reporting capabilities to help you gain insights into your gym's performance and member data. The Reports system launches in a separate browser window and provides a user-friendly interface for accessing and generating various reports.
Key features include:
A wide range of built-in, preset reports for quick access to common data
Create custom reports tailored to your specific needs using raw club data
Multi-gym selection for chain operators
Ability to export report results in CSV, XLSX, or JSON formats
The User Interface
When you select the reports option, a new browser window opens to show a screen like the one above.
The logged-in username is displayed on the far right, and you can choose a different UI language using the drop-down arrow to the right.
All reports are triggered using the drop-down menus at the centre of the screen:
My Data
Head here to create customised reports using raw club data. New users are recommended to try out the built-in reports in My Reports first.
My Reports
A wide variety of preset, ready-to-run reports that suit common requirements can be found here. This is the quickest and easiest way to access club data.
Viewing Preset Reports
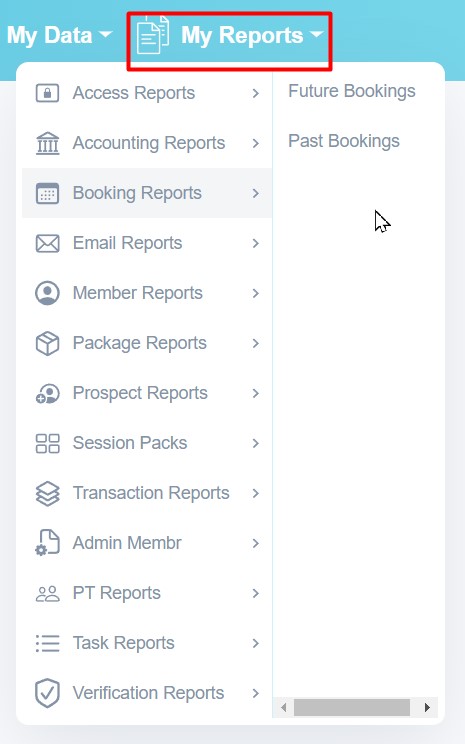
A wide range of preset reports can be found in the My Reports menu. The left-hand side of the menu lists the report categories, and the available reports in that category are shown on the right.
(Your menu may be shorter than shown, as the variety of report types varies according to login type.)
Choose a report from the menu and hit the Run report button in the lower left - that's all there is to it:
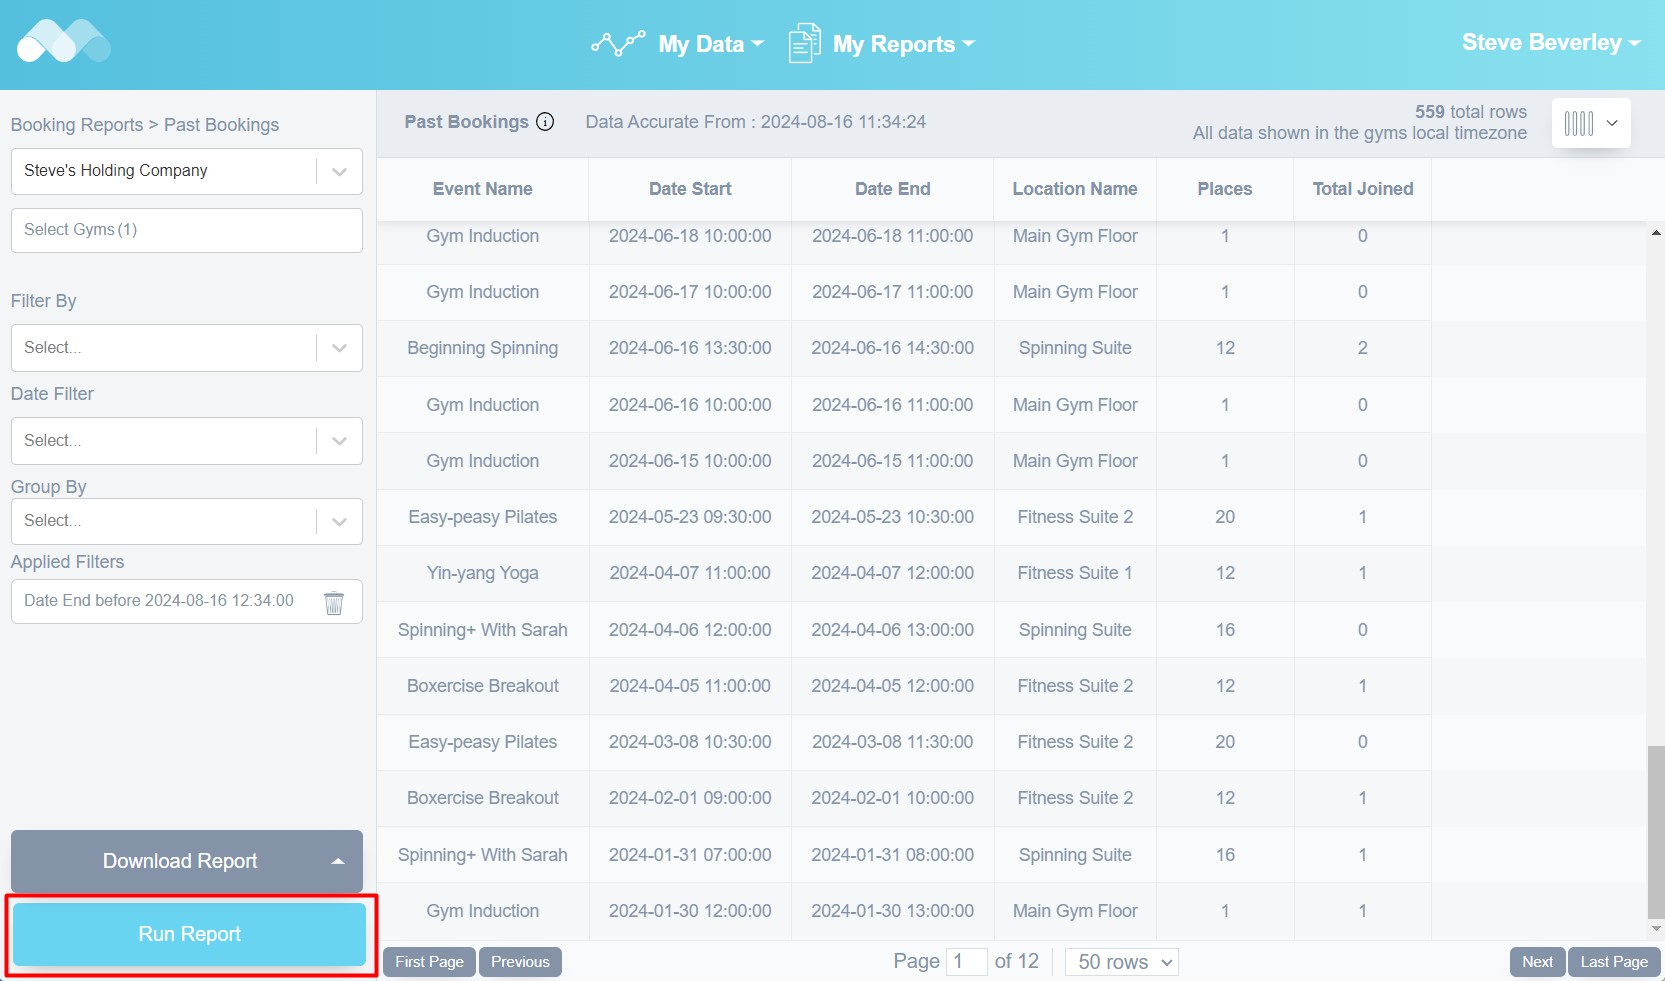
Customising Your View
Once a report is selected, several other interface elements will appear giving you additional control. The status bar at the top shows the report name and age of the data (some data types are only refreshed periodically):

If you hover over the i after the report name, you will be given a more complete description of what the report contains.
In addition, to the right is an icon to adjust which data columns are included in the report. All reports include a predefined selection of relevant columns; clicking this icon will allow you to change which columns are being displayed:
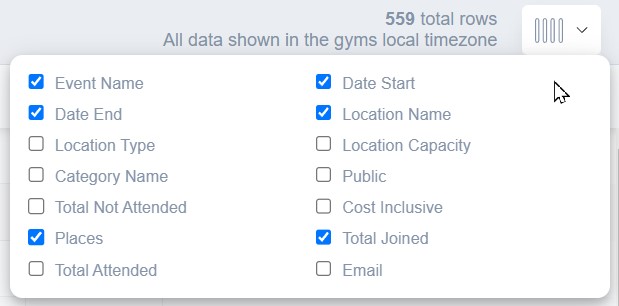
Many reports use a date range to narrow their results. This is often the current month-to-date or the last full month, depending on the report type. For such reports, a date range will be displayed in the left sidebar - you can click either date to modify it:
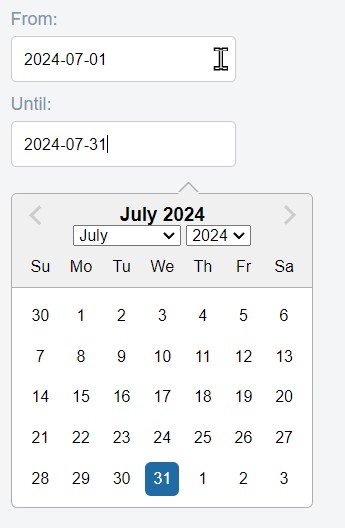
Creating Custom Reports
By using the flexible filtering options to analyse raw club data, you can effortlessly generate customized reports to help you make informed decisions about your business.
For example, let's create a report that helps us find out the most popular source of new prospects.
To do this, we need to choose which type of raw data to use from the list in the My Data menu, in this case Prospects (raw data is literally the raw, unfiltered data containing everything you might need to know about the type you select).
If we press Run Report at this point, we will see screen after screen of information about all of our prospects (this club has 100s). There is a Prospect Source column to tell us where the prospect came from, but we'd have to scour the entire list to get a feel for which was most popular:
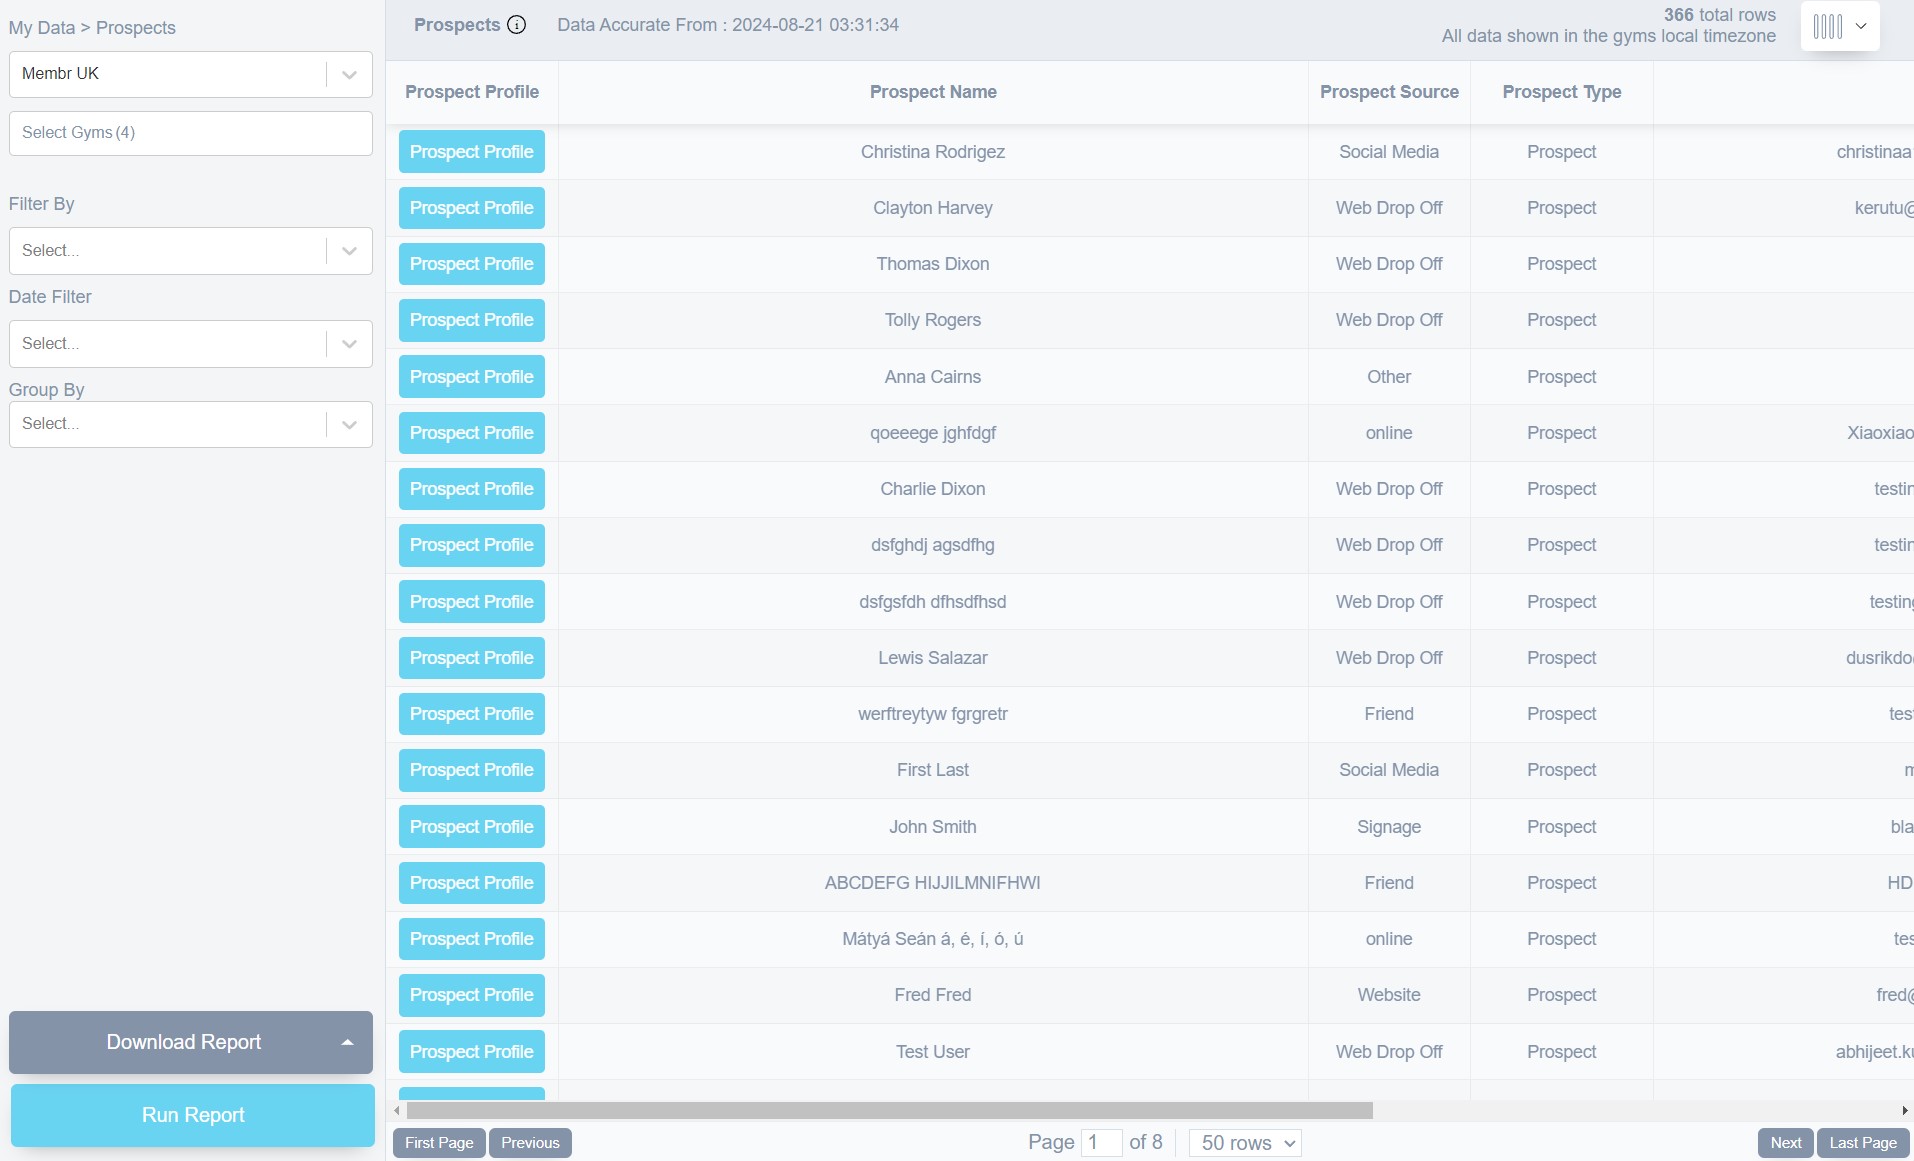
Just by adding a Group By rule for Prospect Source (found in the Group By drop-down), we can have the system create an easy summary for us like this:
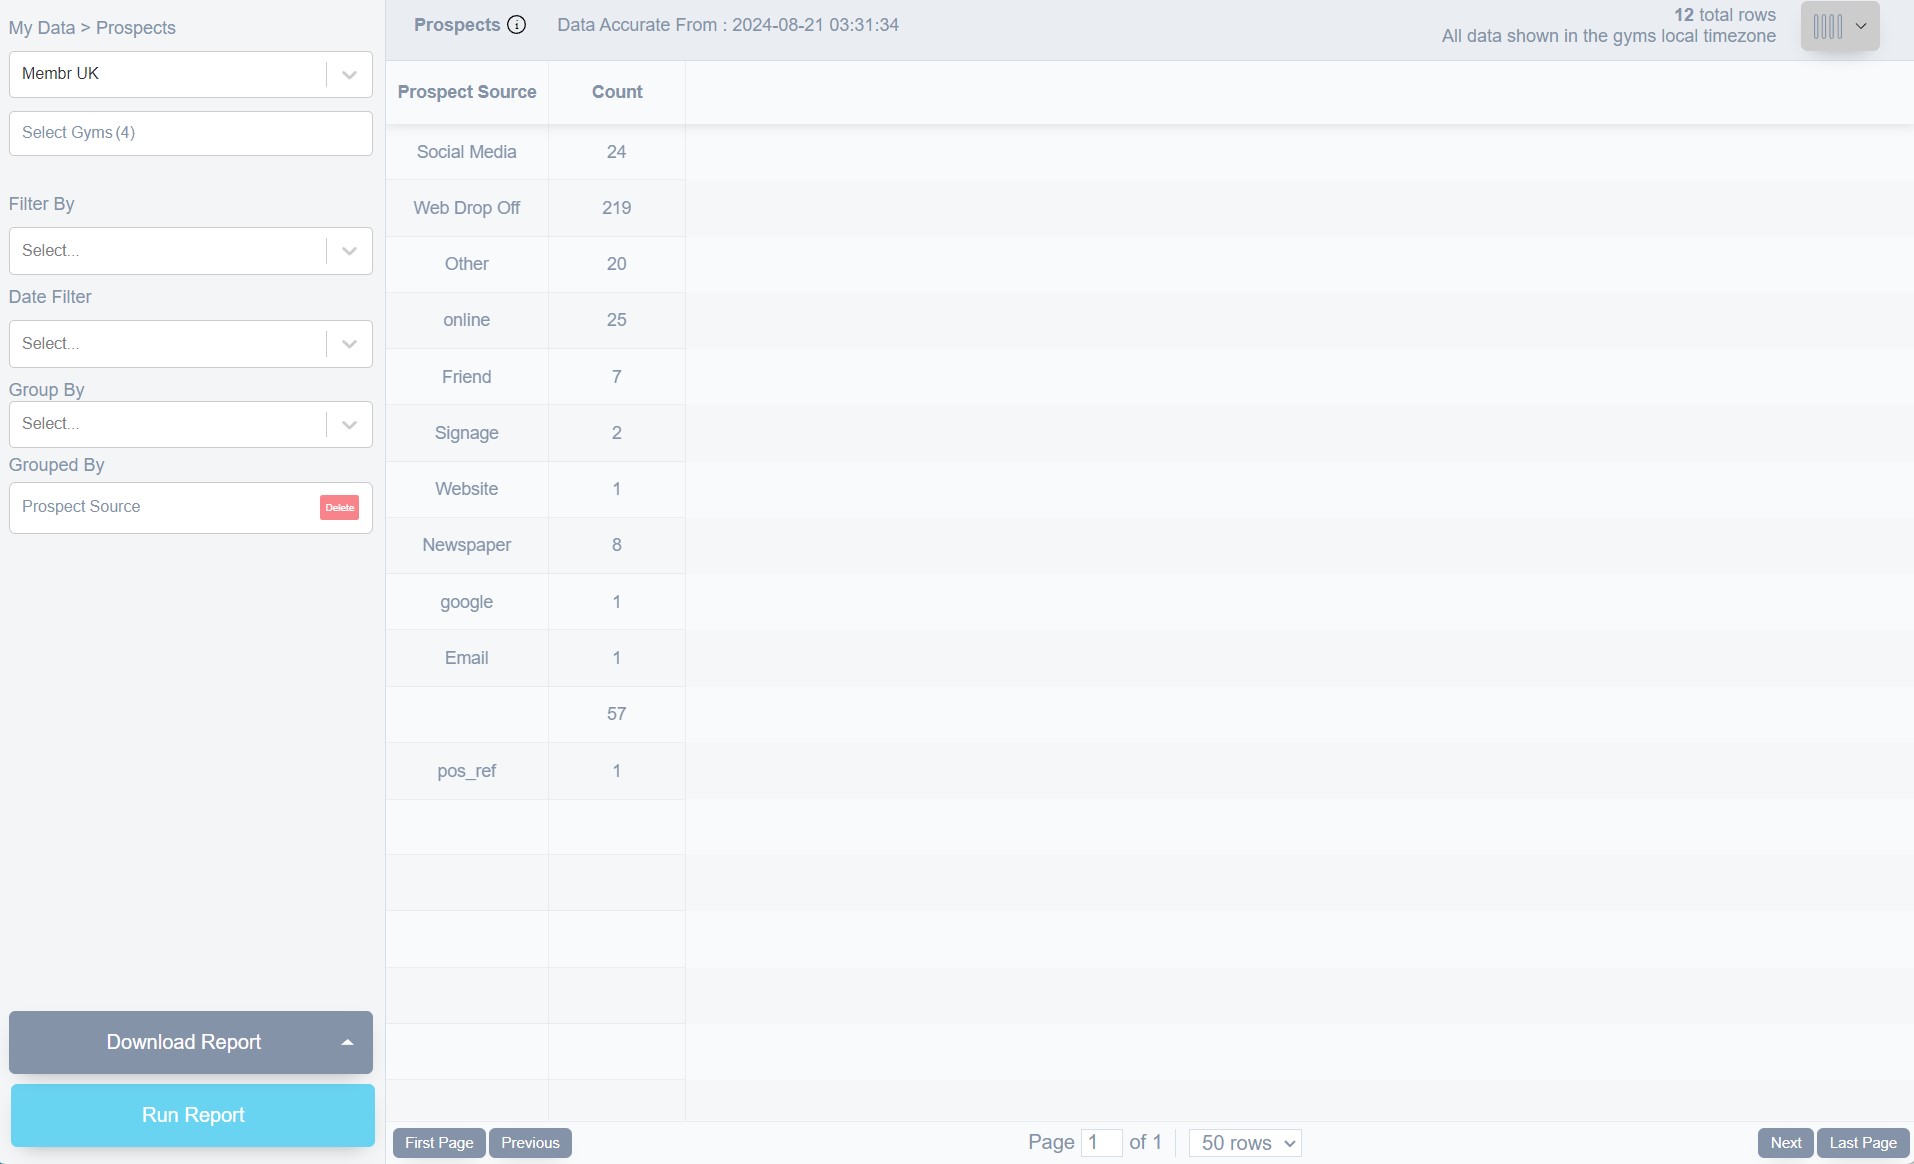
This makes the information much easier to digest; it went through all 300+ prospects at this club in less than a second. We can still do better though; the list is in a fairly random order but if we click the Count heading it will sort the list into ascending or descending order (click again to toggle):
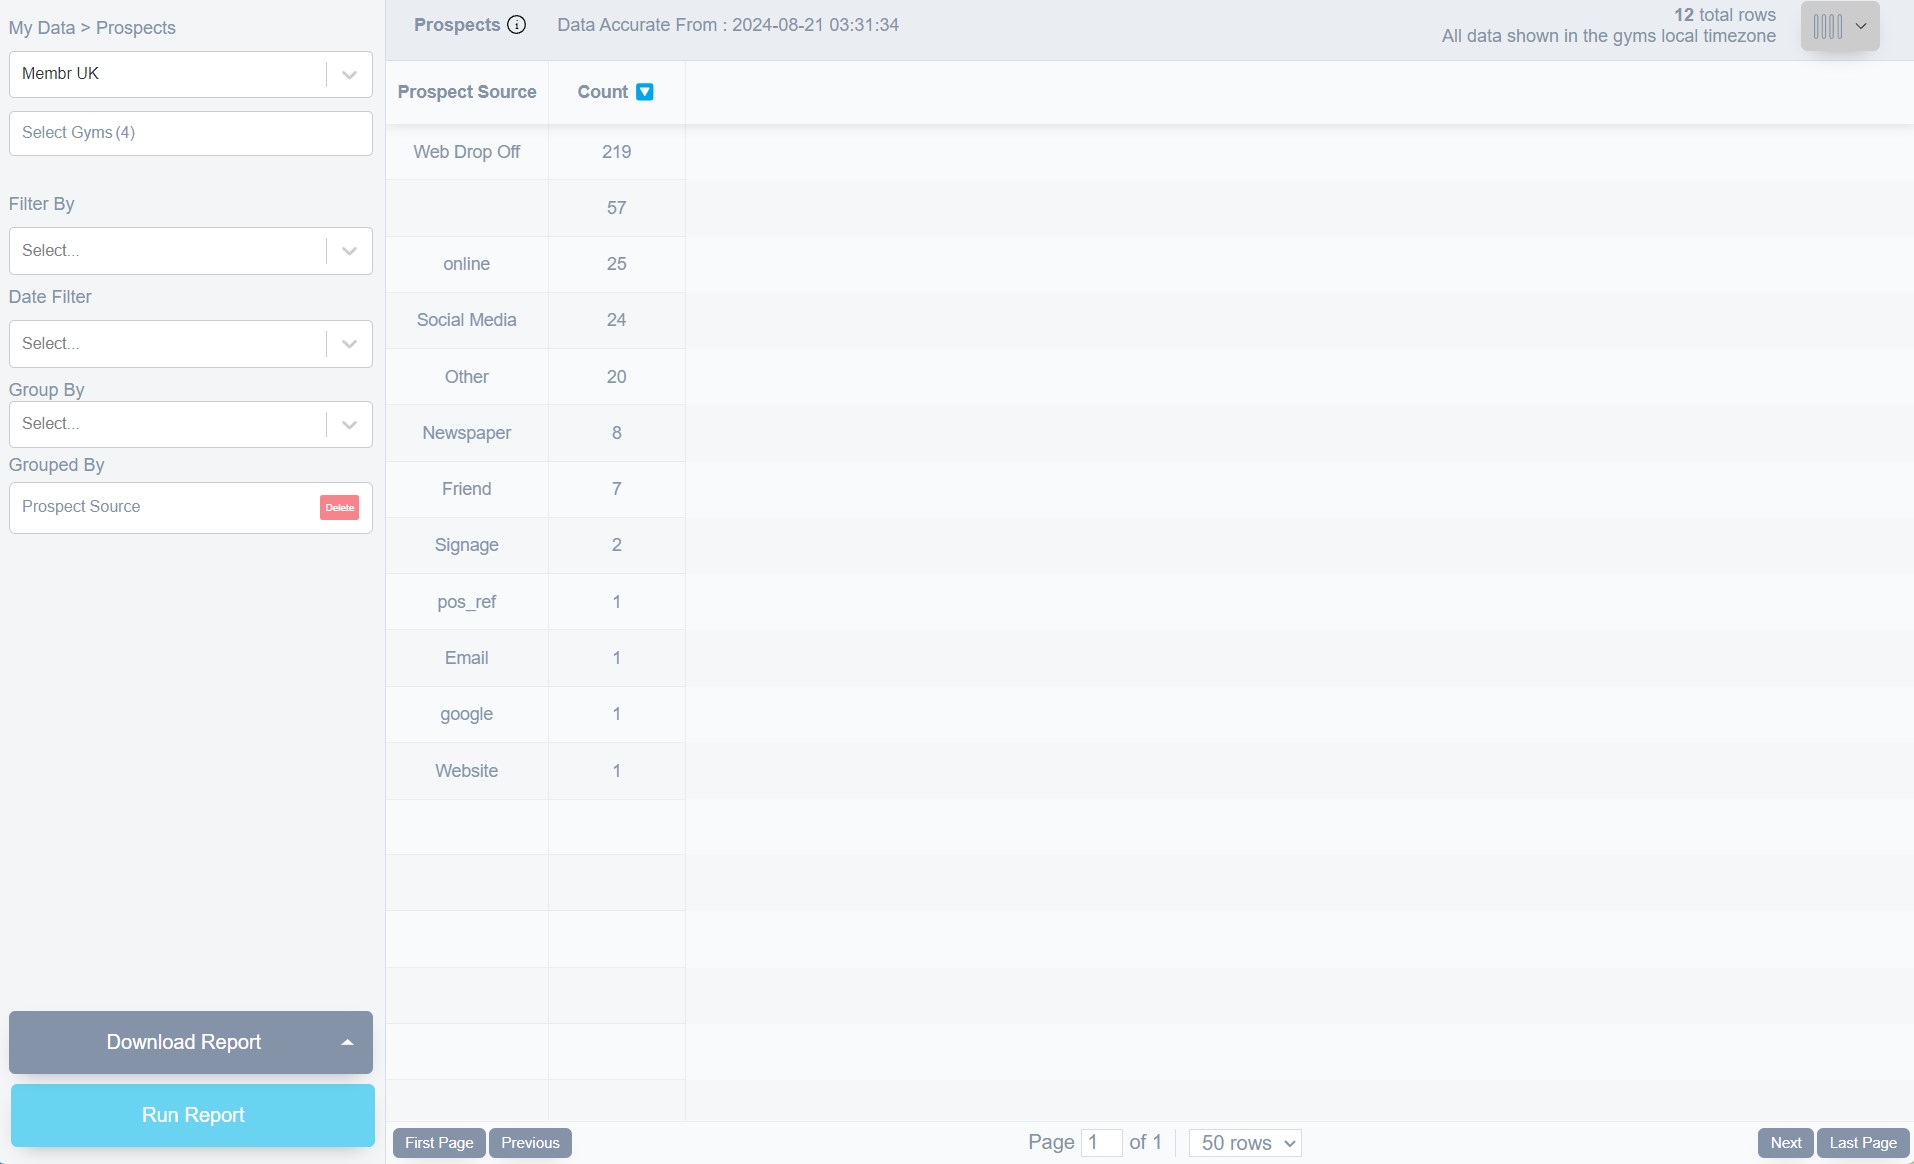
We'll stop with this example, but you could go on to make the data even more relevant - we're looking at all prospects ever, but we could add a filter to select only those prospects who were added in the past month, or 3 months or whatever interested us.
Remember:
Group By will organise your data according to whatever you choose. You might have 800 members in a list, but if you group them by gender, you'll just have totals saying 643 Male and 157 Female, for example.
Filter By will make your dataset shorter by excluding (or only including) data according to specific criteria. You might have a few thousand members for example, but you can shorten the list to only those people who joined in the past month, for example.
Tip
Don't be afraid to experiment! You can apply multiple Group By or Filter by options to extract exactly what you need. All your club's data is safe too; it can only be viewed (and not changed) by anything you do in the Reports tool.
FAQs - Reports
Training & Workouts
Exercising, workouts, and fitness plans are all catered for in the Training menu; we have a vast library of exercises that your trainers can expertly combine into workouts and programmes.
There are over 500 exercises to choose from, almost all accompanied by a short video designed to show members how to perform the exercise correctly and safely. Members can view these on their mobile devices as they exercise:

Complete training plans can be built from this diverse exercise library, allowing trainers to deliver gym-wide and personalised training plans that will enable members to work towards their goals.
Plans can be designed for exercisers to perform specifically in the gym, or marked as suitable for performing at home too; extremely useful for keeping members engaged wherever they are (or during temporary gym closures!).
The three tabs make up the various levels of the training system:
Programmes - A programme is a collection of workouts designed to last several weeks
Workouts - A workout is a collection of exercises designed to be performed in a single session
Exercises - The smallest unit in the training system - a single exercise, usually accompanied by a video showing how to perform it.
Each trainer on the Membr system has a group of members allocated to them automatically; members can request plans from their trainer (via the app), or the trainer can choose to recommend/send plans to one or more of their assigned members as necessary. Members can also download any of the general workouts available at the club, allowing them to choose whichever one best fits their mood or goals at the time.
Whenever a member completes/logs a particular training plan, their trainer will be notified, who can also view details of the specific workout and read any comment/message left for them by the member in question.
Exercises
The Exercises tab allows management of the complete set of exercises available to members and staff alike.
The Membr system comes with over 500 of the most common exercises designed to suit the needs of almost every gym. Custom exercises can be added if needed. Specifically, you can:
Choose to hide any built-in exercises from trainers, exercisers, or both, preventing the exercise being used in any workouts they create.
Add/create entirely new exercises (and control their visibility too)
Edit any custom exercises you have added (but not the built-in ones!)
Note
Exercises don't contain any information about sets or reps - these are added later at the Workout level. Exercises mainly contain an image or video of the exercise being performed, along with details of which body part is being exercised and which equipment/machine is required.
Note
You can't edit or delete any built-in exercises, but you can hide them (if your login allows it).
Note
Exercises you do hide (from either trainers or exercisers) will still remain visible to you (or any other user with permission to view the Manage Exercises tab).
To change the visibility of an exercise in the list, toggle the small checkbox to the left of each exercise:
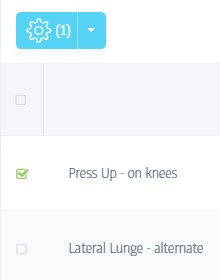
When you have selected one or more exercises, the settings menu will become available. Click the cog to view the choices:
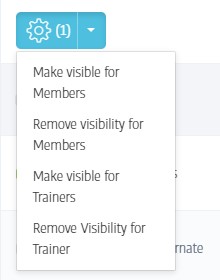
Note
Even if you restrict or remove the visibility of certain exercises, they will still be visible on workouts that already use them. However, the exercises will no longer be available for future workouts.
Workouts

Workouts combine the exercises from the library with other information such as sets, reps, and weights etc., so that they can be performed as part of a gym session. There are two types of workout overall:
Gym-level workout
These are visible to everyone* - members via the mobile app and staff using the Membr system.
*any specific exercise can be hidden from members and/or staff if required.
My workouts
Similar to My Documents on a PC - these are private workouts that belong to the logged-in user. Other staff members cannot view or edit them, but specific members can be sent copies.
In addition to the two types of workout, a member can request a custom workout from their trainer, hence the third tab on this page. All three tabs are covered below:

These workouts are private to you and cannot be viewed by anyone else, unless you send them a copy.
Workouts here might be modified/customised versions of gym workouts, or workouts that have been created entirely by you. (see Creating & Editing Workouts for details)
You can expand the menu to the right of each workout to reveal further options:
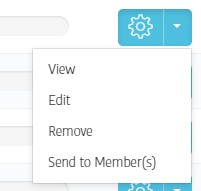
Members have full access to gym-level workouts, but if they can't find what they need, they can request a custom workout from their assigned trainer. The request is made in the mobile app and will show up here in the Training panel as a red number/notification on the Requested Workouts tab:
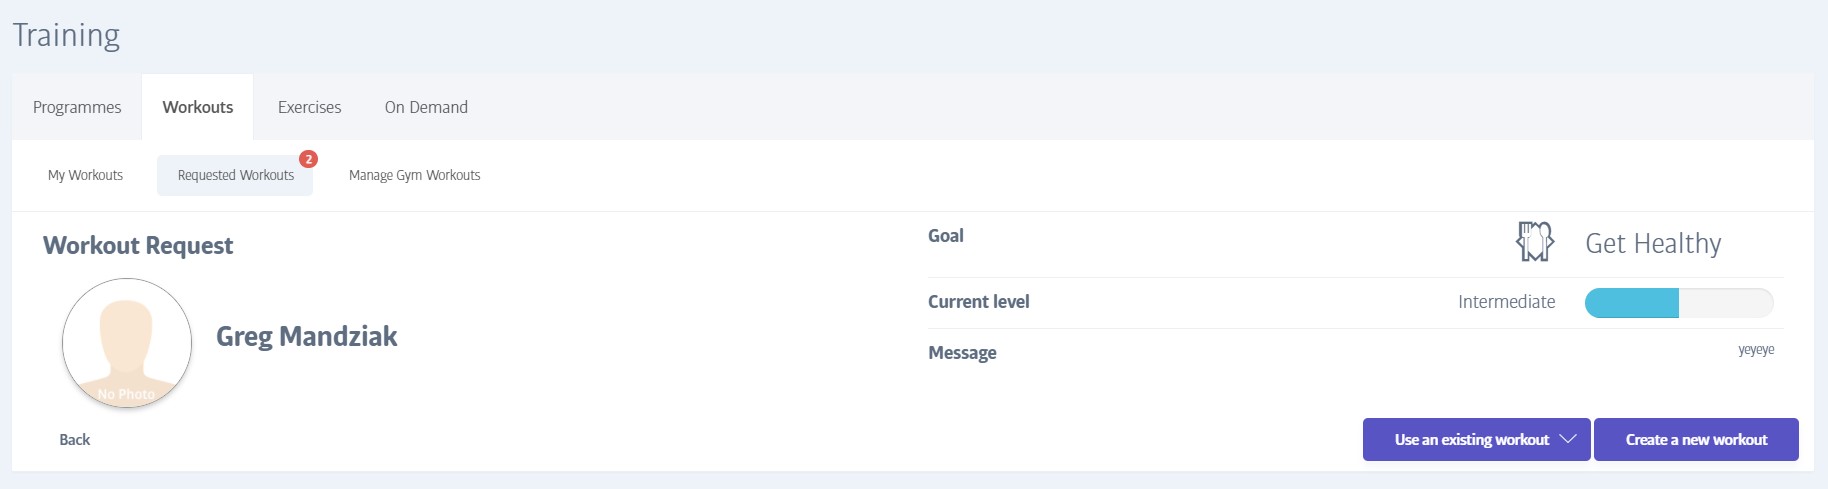
More details will be displayed about the nature of the requested workout - you can either respond by sending them any of your existing workouts, or by designing a new workout based on the details they supply. (see Creating & Editing Workouts for details)
This tab lets you edit or remove workouts and provides the same basic functionality as the My Workouts tab.
The main difference is that the workouts here are gym-level workouts that are visible to all staff and members alike (unless specific workouts have been hidden or deleted)
To the right of each workout is a menu presenting further options. Note that you can copy a gym workout to your My Workouts tab to use as the basis for a tailored workout of your own:
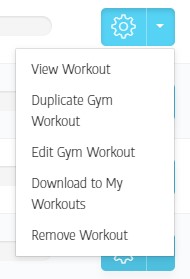
In addition, you can adjust the visibility of the workouts in this mode; enable the checkmark next to any workout and open the settings menu at the top left of the screen:
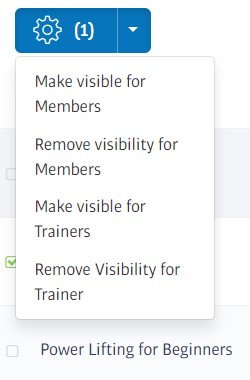
Caution
If you do download a gym workout to your personal area, you are advised to change the name to avoid confusion (as it will use the same title once copied)
Creating & Editing Workouts
After providing basic details such as name and age suitability, you move on to the exercise stage - here you add as many exercises from the gym's library as you wish.
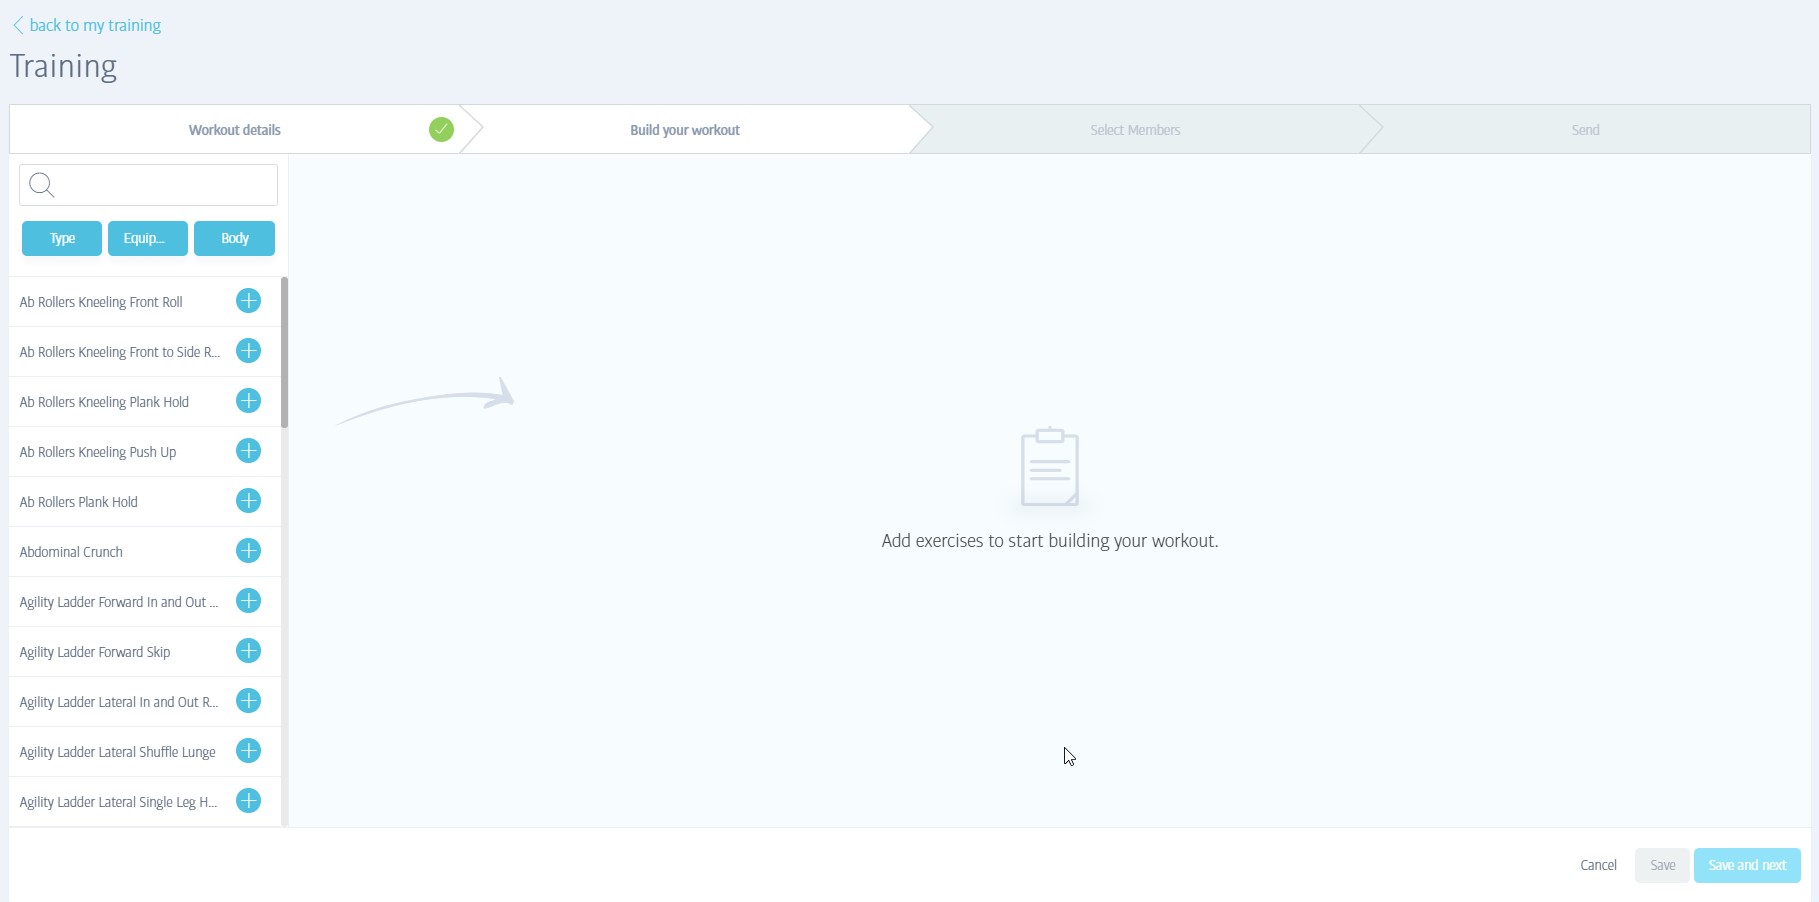
Click any of the named exercises to add them to the workout. To help you find exercises, you can search by name, or add filters according to body area and equipment type:
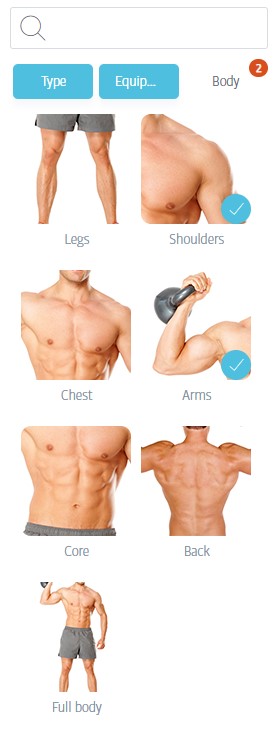
Once you select an exercise, you'll see a video preview of the exercise to act as a visual confirmation. This video can also be seen by exercisers when they workout, and serves as a great reminder of how to perform the exercise correctly! If it is the exercise you intended, you can add any number of sets, reps, duration, etc. as appropriate:
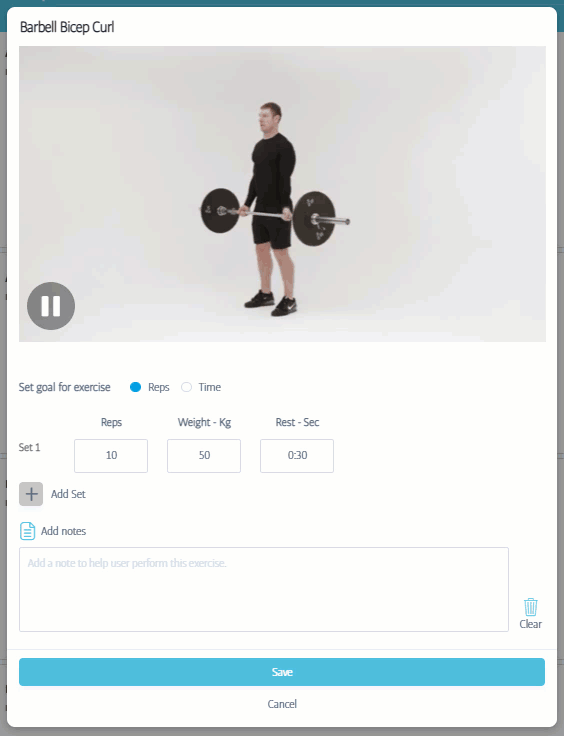
Keep adding exercises until the workout is fully defined. Note that small arrows appear to the left side of the exercise. Using these you can delete an exercise, push them up or down by a single slot, or push them straight to the start or end of the workout:
Click Save when you're done, and the workout will be added/updated as appropriate.
Programmes
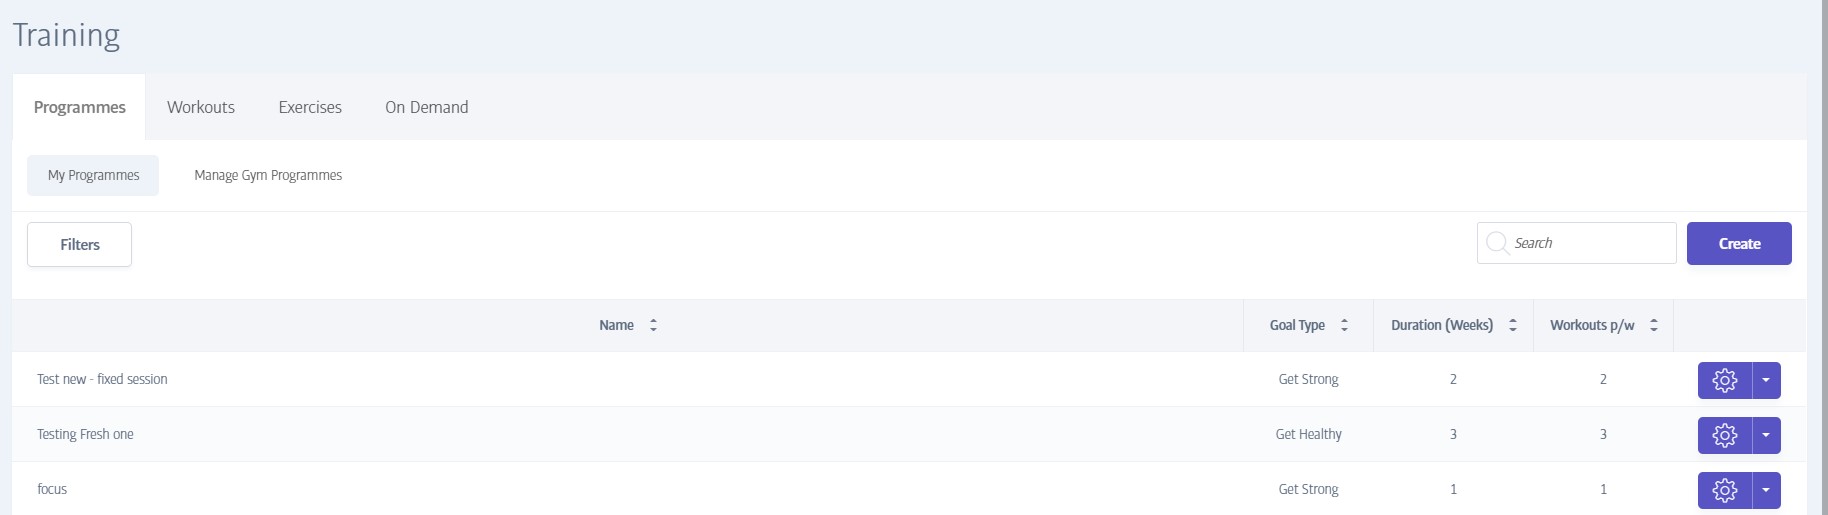
Programmes combine multiple workouts into a more lengthy plan that exercisers can work through over several weeks. They're a great way to deliver more structured training; you might build a programme that combines separate workouts for legs, core, and upper body into one long programme designed to improve whole-body fitness for example.
As with workouts, there are two main types - a gym-level programme that can be viewed by anyone, and an area for private programmes that can only be used by the logged-in user or sent to exercisers.
With the My Programmes tab selected, you're viewing the list of private programmes that are unique to you. If you click the cog menu to the right of each programme, the following options become available:
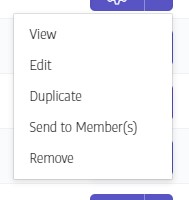
Clicking the Create button on this tab will create additional private programmes - see Creating and Editing Programmes
With this tab selected, you're viewing the master list of programmes available to all exercisers and staff.
If you open the cog menu to the right of a gym-level programme, you can perform any of the following actions on the programme (if you have sufficient login privilege/permission!):
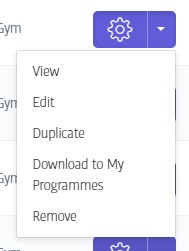
In addition, you can adjust the visibility of the programmes in this mode; enable the checkmark next to any programme and open the settings menu at the top left of the screen:
Clicking the Create button on this tab will create additional gym-level programmes - see Creating and Editing Programmes
Caution
If you do download a gym programme to your personal area, you are advised to change the name to avoid confusion (as it will use the same title once copied)
Creating and Editing Programmes
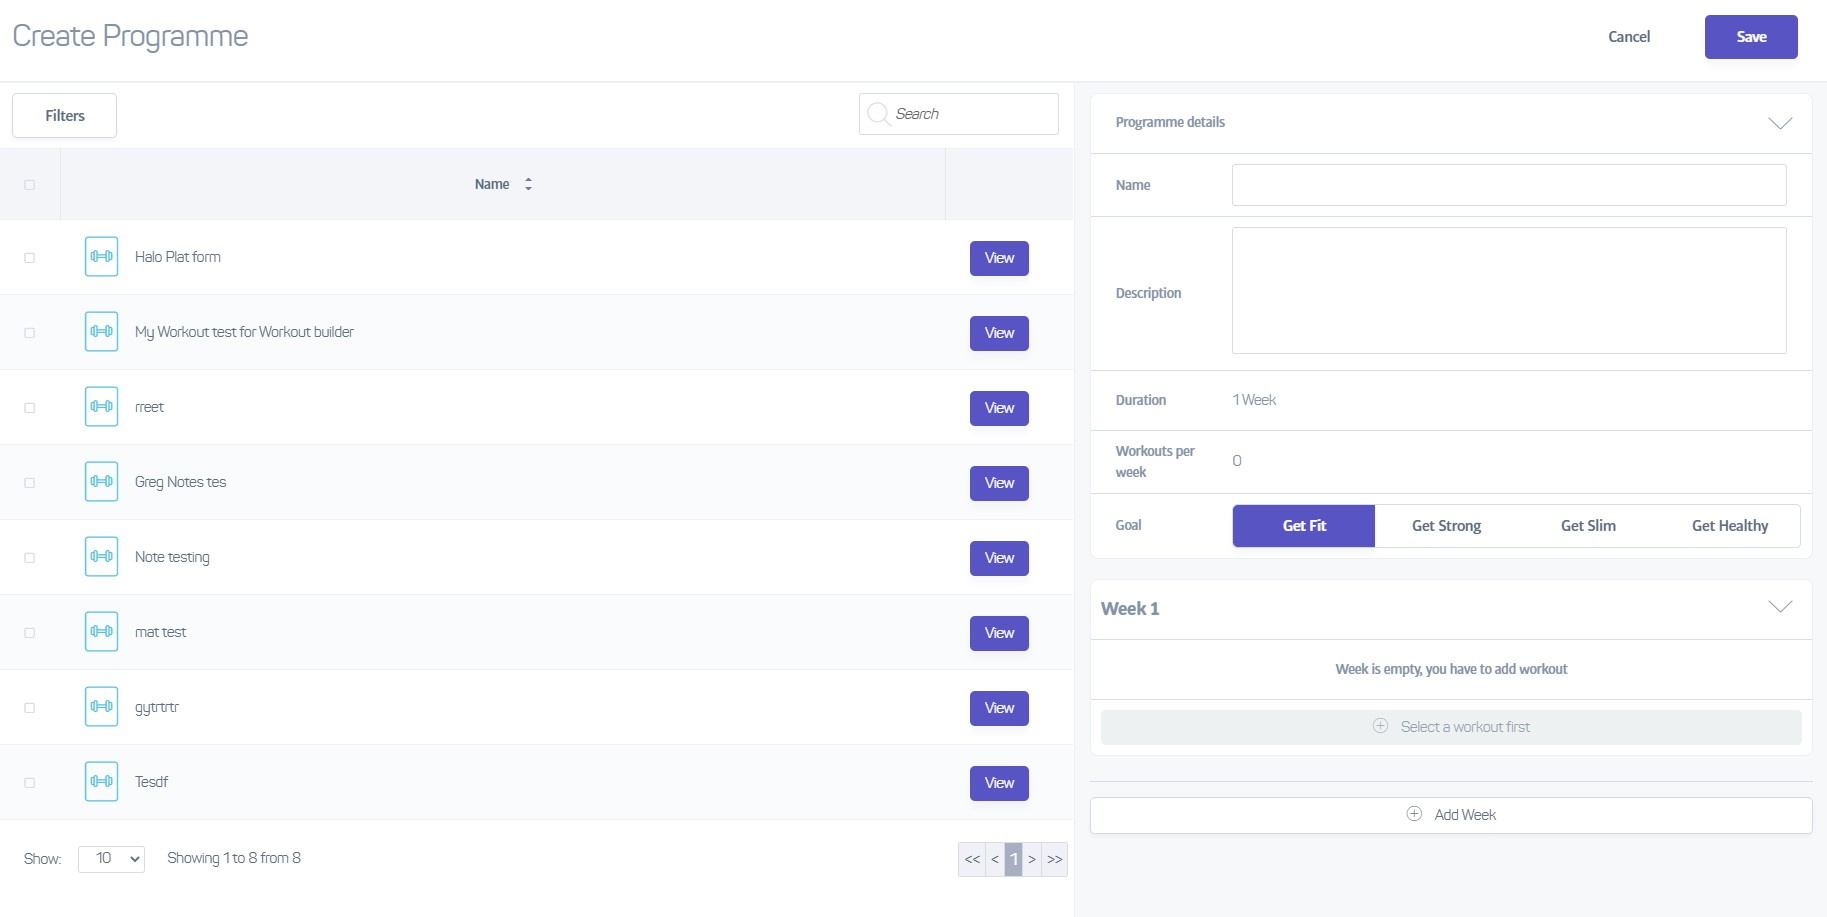
When you either create or edit a programme, a panel like that above will slide onto the screen.
The screen is divided into two halves; on the left hand side you see a listing of all the workout types available for use in the programme. (Only gym-level workouts can be added to a gym-level programme and vice versa when creating My Programmes)
On the right hand side there are several fields used to provide basic info about the programme; title, description, fitness goal and duration (the duration field cannot be edited, and is based on the number of weeks you add to your programme).
To add workouts to your programme, select one or more checkboxes to the left of a workout and then add it to the current/selected week.
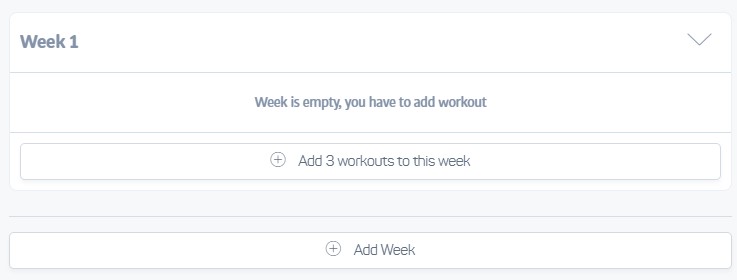
Keep adding workouts or weeks until the program is complete and don't forget to Save!
Important
When you add any workouts to a programme, a completely new, unique copy of the workout is embedded into the programme. This is to allow the workouts within a programme to be edited independently.
Therefore, changes you make to the original workouts will not affect the workouts within the programme, and vice versa!
FAQs - Training & Workouts
Setup

The Setup area is the place to tailor the Membr platform to suit your exact needs and help get the most out of your business.
Here you can tweak many aspects of how the system behaves, add or remove staff, integrate with analytics tools, customise PAR-Qs, and much more besides.
Managing Staff
Every member of your team who will use the Membr system needs a personal staff account, similar in some ways to a member profile. The staff accounts here:
Store their name, email address, password and role.
Enable access to the gym using PIN, QR or whatever other access system you have installed.
Restrict access to various Membr features based on a combination of role and any specific overrides you may have requested from our support team.
Improve accountability - the logged-in user is added to various notes when performing actions in the software.
Make it easier to revoke gym & system access access when staff leave your team.
Head to Setup->Manage Staff for a complete list of all staff defined at the gym:
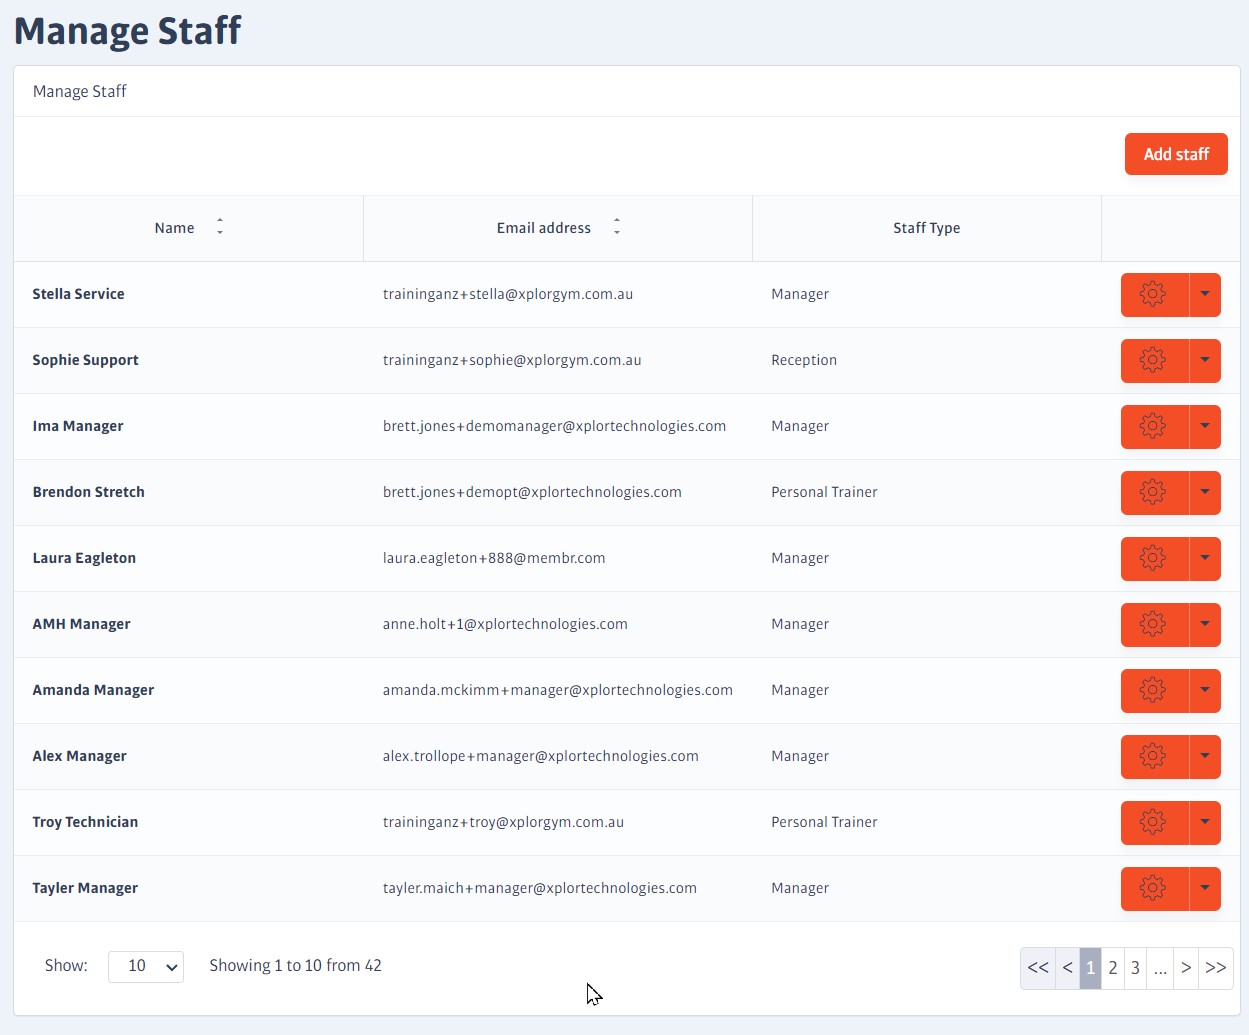
Clicking Add staff opens a straightforward dialogue where you can provide the necessary details for a new staff member. The only setting (if it appears for your login) that might need more explanation is this one:
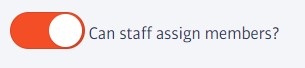
This is aimed at gym trainers/coaches; any staff with this setting enabled will be added to a pool of trainers at the gym. As new members sign up, they will be assigned to one of the trainers in the pool on a cyclic basis (you can always override the assigned trainer by editing the member's profile).
Aside from creating new staff profiles, you can perform a range of actions on the existing ones using the settings menu to the right of each one:
Edit Staff
Opens the same dialogue used to create staff, and gives full access to all the same settings.
Reset Password
Sends a password reset email to the registered address for this staff member.
Remove from gym
Disables gym access and removes them from their role. Their profile will remain, but they will no longer be able to log in to the software. (a gym admin can potentially reactivate such a profile if they are re-employed)
Delete staff
Completely removes the staff profile from the list, preventing gym and software access at the same time.
Emails
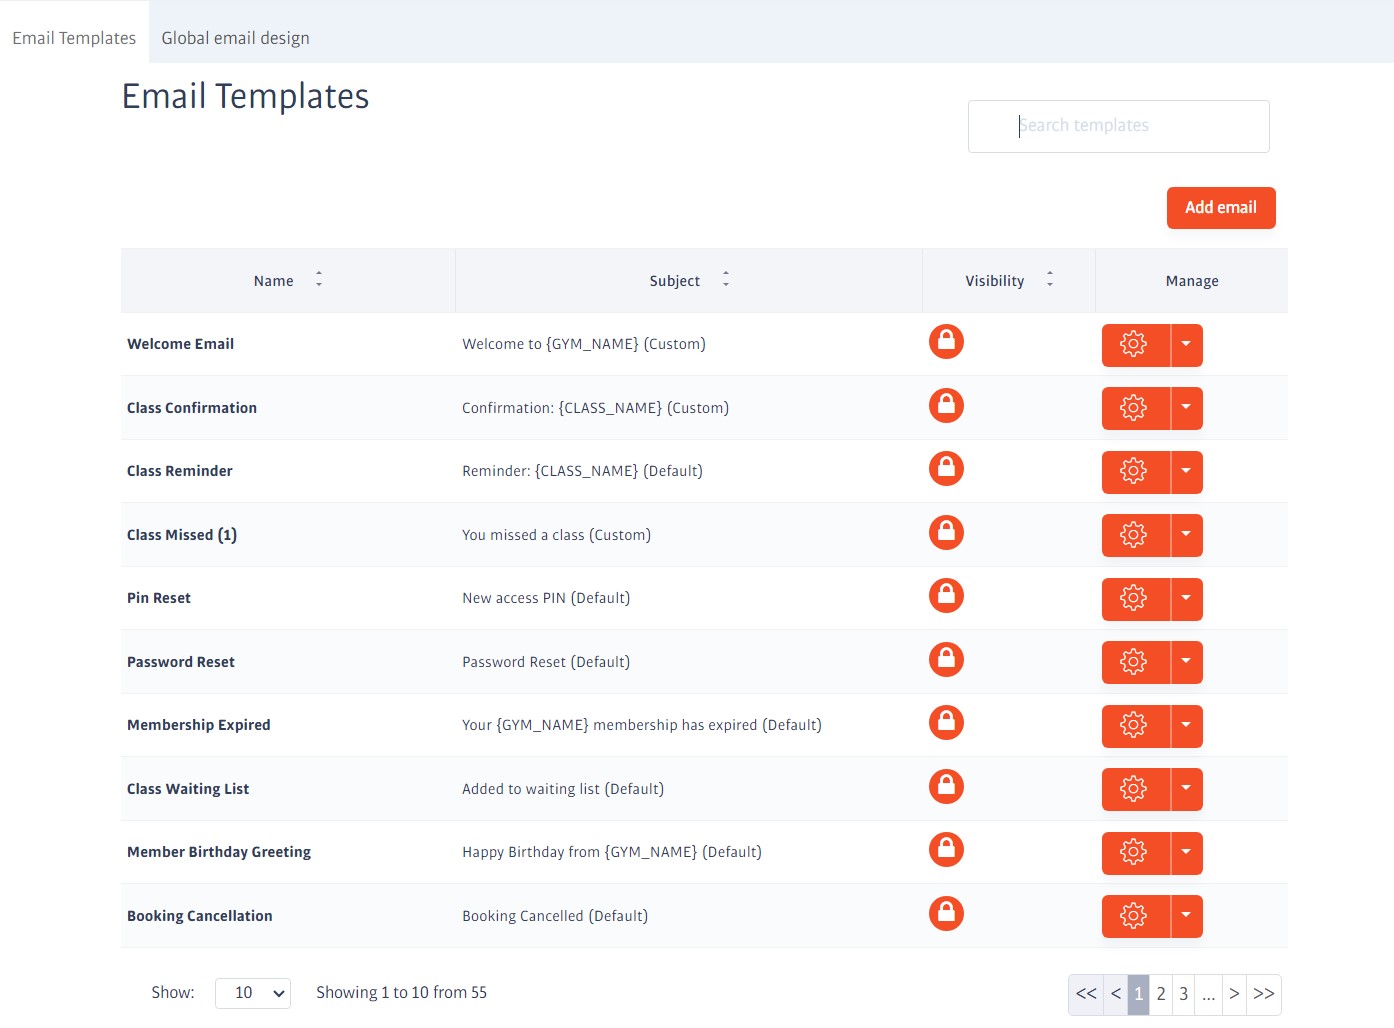
There are 50+ ready-made emails built into the software. These 'system' emails are automatically sent when various actions or events take place in the software, without the need for any action from you.
When a new member joins, for example, they will be sent a welcome email confirming the gym's details, the membership package they signed up to, etc. Likewise, a member will be sent a reminder of their membership expiry when they approach the end of their contract.
Each of these system emails contains suitable content that you can use right away, but you can tweak or replace any of them with your own designs if you want to.
Searching System Emails
It's worth scrolling through the list once or twice to get a feel for the range of available emails, but you can quickly find related types by entering a search term in the box at the top of the list:
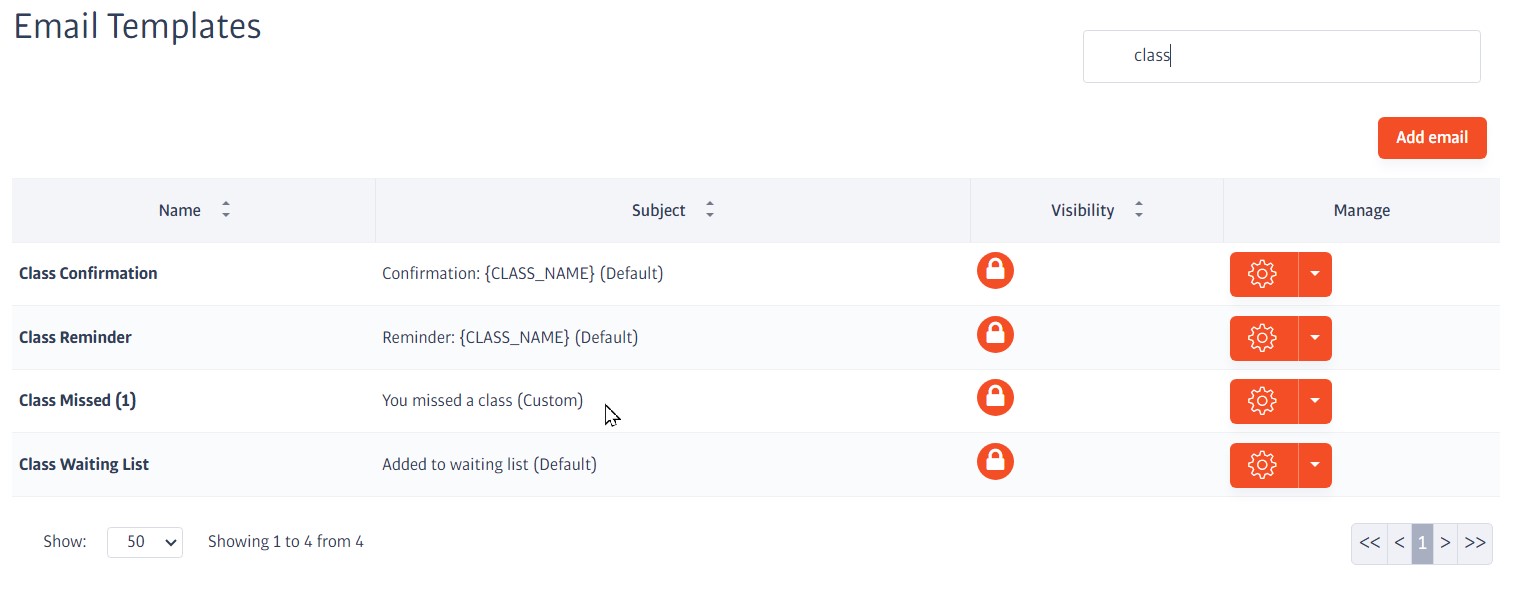
Tip
Any emails you have edited will show (Custom) as part of their title. Any custom mail can be reset to the built-in version by choosing Reset to default from its settings menu on the right.
Settings
Selecting Setup->Settings will take you to a Basic Settings page like this:
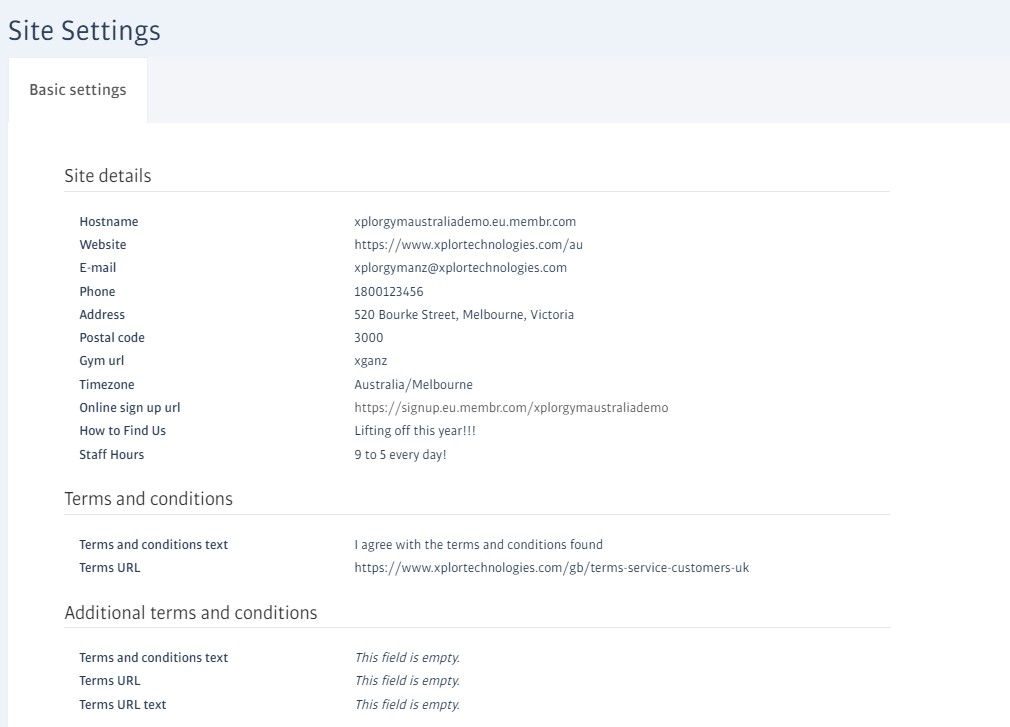
This page contains basic information about the gym, named contacts, and links to various terms and conditions. It also provides the URL for your club's online signup portal.
More contacts can be added or edited when required, and many other fields here can be adjusted too (but the signup URL is fixed).
Additional Settings
Logins with sufficient authority (e.g. a gym admin) have access to a more diverse range of pages to adjust many other aspects of the system, including some or all of the following:

Additional Settings
Fine-tune a wide range of program behaviours here, such as booking rules, sleeping member settings and many more, see the table below for a summary.
Sign-up
Various settings to adjust how your online sign-up site looks and behaves.
Branding
Adjust colours or upload your gym's logo - used in several places throughout the system (e.g. email headers)
PAR-Q setup
Add, edit, or remove any number of questions that you want to be asked in your PAR-Q for new joiners.
Email Overrides
Checkboxes to enable or disable the many automatic/system emails.
Here's a list of all the settings that can appear in the Additional Settings list. Keep in mind that some of these might be absent depending on gym configuration.
Most of the settings should be self-explanatory but see the notes column for additional details:
Additional Setting Name | Notes |
|---|---|
Google Analytic Tracking Code | |
How many days should pass without a member accessing your site to mark them as sleeping? | |
How many days should pass before we calculate the member is sleeping for the first time? | |
Select country | |
Select language | |
DDMS Payment Days | |
DDMS Payment Frequencies | |
Freeze interval limits | The maximum number of payment intervals to skip for each type of billing interval |
Would you like us to send out weekly goals messages? | |
How many days before a class should members be able to book? | |
How many days without gym attendance before a slipping notification is sent? | |
What time of day do you want members to be able to book classes? | |
How long after a message is left unread should it be emailed to the recipient? | |
Would you like to be able to automatically (through gym access) mark members as attending bookings? Opens an additional parameter: -> How many minutes before a booking should a member be marked as attended? | If members access the gym shortly before a booking they are due to attend, they will automatically be marked as attended. |
Block members who do not attend Opens up additional parameters as follows: -> How many bookings can a member miss? -> Within how many days should absence be calculated? -> How long should a member be blocked? | If members miss a number of bookings, they will be prevented from making further bookings for a short time. |
Booking Cancellation Rules | |
Renewal notifications - running X days before membership end Opens an area to allow renewal warnings to be sent at user-defined intervals. You can add one or more of these: -> Before or after, number of days, message to send | |
Facebook page | |
Twitter page | |
Instagram page | |
Automatically change prospect state from hot to cold Opens an additional box to set the number of days: -> How many days until a hot prospect becomes cold? | |
Receipt settings Opens up multiple boxes to customise receipt message: -> Receipt Layout, company name & number etc. | Company details to be printed on receipts (address, ABN, ACN etc.) |
Enable / Disable Web Drop Offs Opens up additional parameters as follows: -> Time when a joiner becomes a web drop off [min] -> Time when an email to a new web drop off is sent [min] -> Time when the web drop off becomes a prospect [min] | |
Would you like to enable the grace period? Opens an additional box to allow the period to be set: -> How many days should the grace period be from the date of cancellation/expiring? | Members that rejoin within the grace period will be treated as rejoiners when creating reports, and, cancelled/expired members in supported regions can have their subscriptions reactivated. |
FAQs - Setup
Staff
A - The staff profiles listed in Setup->Manage Staff only give access to some basic details such as name and role type.
More complete staff profiles (that include a photo) can be accessed the same way as for members; type part of the name into the search bar at the top of the screen, and select the profile from the Staff list section:
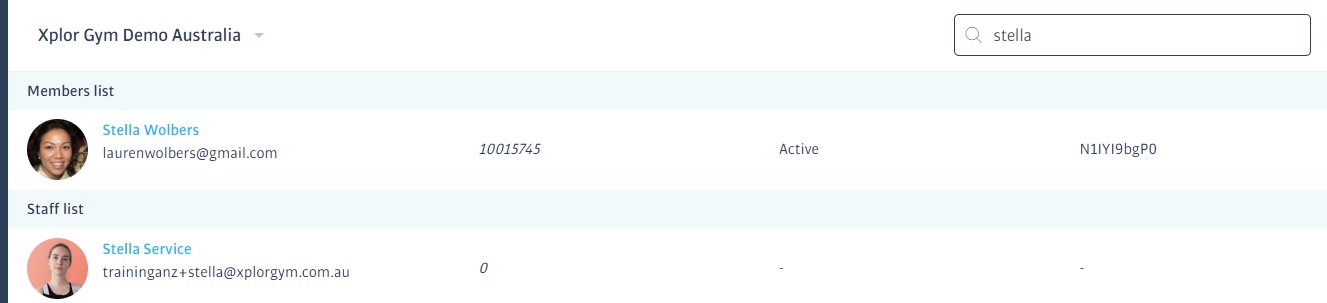
The Members' Area

When new members sign up to the gym, they are sent a welcome email giving them the URL and login details required to access their personal member area.
The members' area is a desktop website primarily aimed at easily completing membership setups that require PAR-Qs or inductions. You can also book classes here, but for even greater functionality, members can download the club's unique mobile app; this can be used to log or design training sessions, record health statistics, set goals and much more besides.
Accessing the Members' Area
Members use exactly the same login form that staff do - the URL is emailed to them when they join but it is the normal Membr address for your club, e.g. <clubname>.au.membr.com (you can find this in Setup->Settings under hostname)
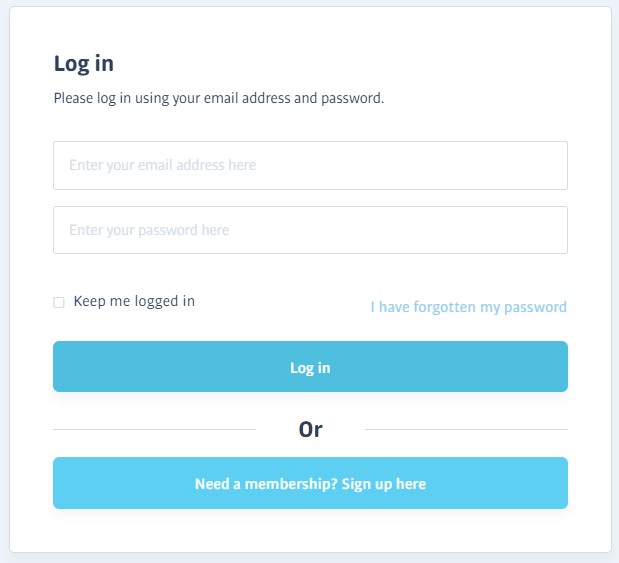
If they have signed up to a package that requires a PAR-Q to be completed, the first screen they see will be the questionnaire defined for your club:
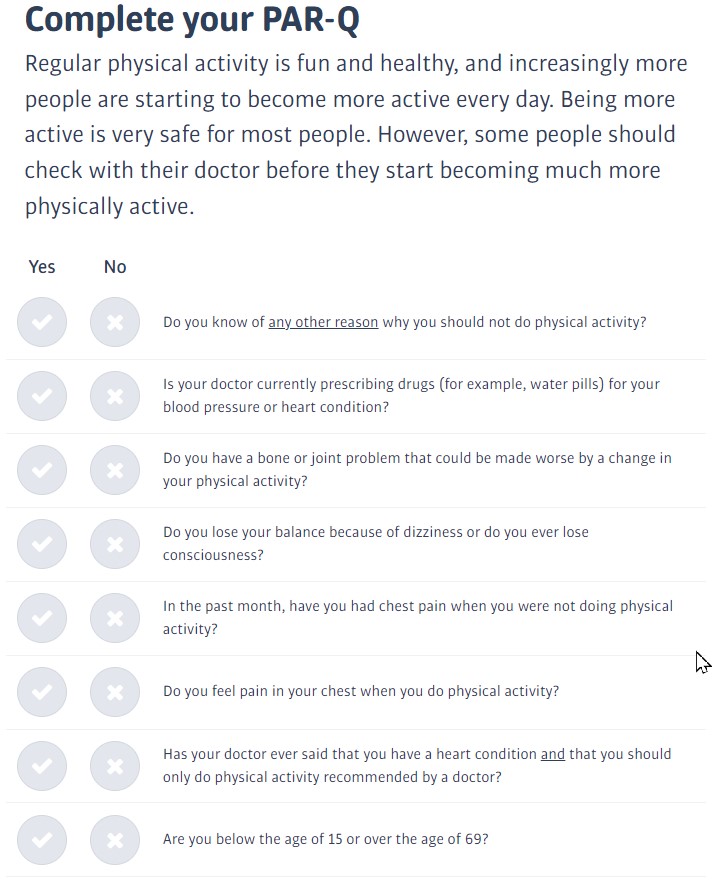
If inductions are also required by their package, they must now choose from any available induction sessions at the club, and book themselves onto it. (Inductions can be mandatory, optional, or not required according to package)
When any PAR-Q and induction has been setup, the member gains access to the main part of the members' area and these questions will not appear again.
The Main Member Area
The main thing that members can do from their member area is to browse and book classes. The main screen area will list any forthcoming classes which they can click on to find out more.
In addition, if they open the sidebar (by clicking on the hamburger menu at the top left) they can find a reminder of their access PIN (where appropriate), as well as their unique referral code that they can use to recommend the club to friends and family:
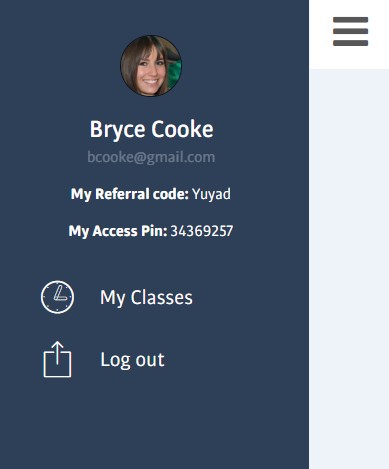
FAQs - Members' Area
FAQs

FAQs - Dashboard
FAQs - Reception
FAQs - Prospects
Prospect Dashboard
Prospect Profile
Prospect Mass Emails
FAQs - Signup
A - Sure*! However, this isn't offered by default, it is enabled using a setting on the Sign Up tab in the Setup page:
When you turn this on, the signup will be offered payment dates spanning the next six months. Selecting any future dates will increase the amount of any initial payment to be collected immediately. However, as clubs can edit the upfront payment, this may be discounted or waived entirely at the club's discretion:
*Note that this only applies to packages with monthly payments - support for other intervals is planned.
FAQs - Members & Memberships
Member Profile
FAQs - Payments
FAQs - Bookings
When adding a class to the calendar, change the Repeat for the booking (No repeat, daily, weekly or monthly). Then you will be able to pick every day, or selected days in the week in which it will take place etc.
You can also tell the system how many events you want to create or let them repeat until a specific end date has been reached.
Yes - if the class is full, they will be added to the dedicated waiting list for that class instead - if the booking has a charge, however, they will still need to pay.
If/when a place in the class becomes free for any reason, the system will automatically email the longest-waiting member to let them know, and then move them off the waiting list and onto the main list of attendees.
(If a space does not become available, any charge they paid will be returned)
FAQs - POS
FAQs - Reports
FAQs - Training & Workouts
FAQs - Setup
Staff
A - The staff profiles listed in Setup->Manage Staff only give access to some basic details such as name and role type.
More complete staff profiles (that include a photo) can be accessed the same way as for members; type part of the name into the search bar at the top of the screen, and select the profile from the Staff list section:
FAQs - Members' Area